Search This Blog

Popular Posts

Friday, 14 November 2014

Star Drop Chain Necklace


Hi Everyone
Today, it's day 4 of 12 Days of Jewellery @ thepapersac and the item of the day is a Star Drop Chain Necklace.


I've been wearing the necklace for a few days (to check out durability) and I love it - it's definitely got bling ! I know the Star Beads are a small part of the necklace but they both shine and give a quick dash of red as I move. I used a gold chain this time. You could attach the the beads to any chain with big enough spaces to attach the jump rings. I think this one works well as the chain design allows a regular spaced point to attach the jump rings. I will have a few chains in the shop if you would like a similar chain to the one I the photo.

I used 16 of the smallest Star Beads (read back for details of how to make the beads) and as I've mentioned, attached them via jump rings. The necklace measures about 46cm which has turned out a good length for me. I used gold and red as my colours but you could use any colours and sizes of a bead. I'm also convinced I can change the beads to co ordinate with Christmas outfits for all the events I will be going to (possibly). I often find myself creating a specific necklace for a particular outfit and never wear it again. I feel, I can adapt this necklace design for that special occasion - I particularly like this idea.

That's it for the 4 Star Bead designs. Here is a round up of the Star Bead items this week.


Next week I will move onto the bicone bead designs and suggest another 4 items.

Have a great weekend, thanks for reading.

Thursday, 13 November 2014

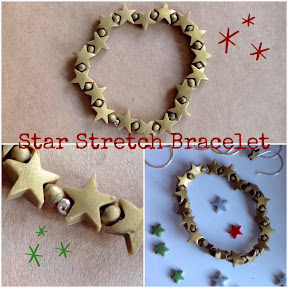
Star Stretch Bracelet


Hi Everyone
Today, it's day 3 of 12 Days of Jewellery @ thepapersac and the item of the day is a Star Bracelet.


The bracelet is made up with 18 large sized Star Beads ( look back in the series for details of how to make) and 18 tiny seed beads, the seed beads act like a spacer which allows the Star Beads to lie flat on the arm. I've threaded the beads onto a clear elastic 0.8 mm stretch thread. I've also finished off the knot with a sterling silver crimp cover bead. The beads have been sealed and lightly buffed giving a slight shiny finish.

This bracelet is a very easy make and could be made in lots of colour and/or bead size combinations. I think the star shape works well as a Christmas bracelet and the single colour is subtle 'nod' to bling. The tiny silver element adds to the bling and gives a touch of sophistication. This bracelet will co ordinate with any of the earrings in the series, so you could make a more elaborate gift by combining little projects. I hope you are inspired to have a go.

Thanks for reading

Wednesday, 12 November 2014

Star Dangle Earrings


Hi Everyone
It's day 2 of the '12 days of jewellery @ thepapersac'. Today, it's the Star Bead again but this time I'm using a few dangle style earring hooks with the beads as well as a hoop style. Look back to day 1 for notes on how to make the Star Beads.
I've made a few different shaped hooks for the earrings and a couple of the designs use an interchangeable bead idea to allow the hooks to be used with different colours and/or bead combinations.
Here are the earrings :


Each pair of earrings allows the use of all the Star Bead sizes and colours but I've used the smaller versions here. Number 1 and 2 use a gold wire and 3 and 4 use sterling silver. Number 1 and 3 will allow several beads as well as a single bead to be changed without the use of pliers, literally slipped on/off. I like this idea as different colours can be chosen to compliment an outfit or change a style.
I will be stocking the various ear wires in my shops but these Star Bead designs can be used with any bought hooks. I will share how I make wires in another tutorial series after Christmas.
I hope you like the variations and feel inspired to make some of these earrings as Christmas gifts or for yourself.

Thanks for reading.

Tuesday, 11 November 2014

Star Stud Earrings


Hi Everyone
Today, I'm getting into the core bead development of my 12 Days of Jewellery Project. As promised, all the beads are very simple to make. I used Premo Sculpey to make all the beads. Look back to yesterday's post for specific colours.

My first bead is a little star shape and my first item is Star Stud Earrings.


I made the star shape using a punch cutter. Making a clean, crisp star shape with this very small cutter can be tricky. Sometimes, the points of the star stick in the punch and occasionally the star is domed as its pushed out of the cutter. The Sculpey clay can get a bit sticky too, after handling. If I sense this happening, I will let the clay rest and it firms up well after about 10 mins.


Here is a look at the tools I've used and the tiny amount of clay required for this project.


I started with a small ball of conditioned clay and simple squashed it flat with my thumb. I cut of a single star in this photo but after I've completed my prototype I will make a batch of about 10 per colour. I don't tend to make any more than that because I want each item to be a unique piece. I will certainly alter sizes and clay colours as well as surface designs and embellishments.


I have some tiny sterling silver posts which I always place in the uncooked clay before baking. I've had problems with rebaking when posts are added to hardened baked clay - mostly the clay will crack and the bead splits.

The post will need to be 'bedded in' with clay and re baked - I will also glue in the post to keep the posts in place until baked. These posts have a little end stick which works well to anchor the posts into the tiny stars.


I make an even smaller ball of clay and place it over the post. The scrap of paper (with the hole) helps to push down the clay.


When the clay has been smoothed and blended into the back of the bead, the entire post is embedded in the earring. I like the neat, simple effect this gives.


This tile shows four sample earrings. I've changed each one slightly and added a few crystals to the gold version. Each earring needs to have the posts embedded and the whole thing rebaked.


I hope you are inspired to make some Star Stud earrings for Christmas gifts. After the 12 Days Project I will share my gift wrap ideas for my gifts. Look out tomorrow for the next item.

Thanks for reading.


Monday, 10 November 2014

12 Days of Christmas Jewellery


Hi Everyone
Today, is the first day of a new idea for the blog. I'm going to introduce twelve pieces of jewellery which will be Christmas presents for friends and family or maybe for me !
I've taken 4 different bead designs and will make up the 12 designs using combinations of the beads. Some of the designs require a very basic level of skill and some are a little more challenging.
I thought, I would start the little series with the core beads and the clay I used to make them. Part of the series will include a gift wrapping idea - so you will have a complete hand created set of gifts by the end.
Here are the core beads in a selection of colours :


My starting point was to decide on colours and I've chosen the traditional Christmas colours of gold,silver, red and green. However, all the clay colours have been mixed in some way (with each other). You will need 4/5 different clays. I used Premo Sculpey brand for this project.


Combinations of my basic beads will form jewellery presents - either earrings, bracelet or necklace in various colours. Some of my presents will go to friends of friends, so I wanted each gift to be a little different from the next (in some way). The difference may be small eg a colour or a size. I've also taken into account that many people have very little time to spend on big creative projects at Christmas time so all options will be quick to make.

So far, I've produced my core beads and will aim to produce all the jewellery items over a few days. I will give an estimate preparation time for each item based on my own experience this week. The core batch of beads took me about 90 mins to make form start to finish plus baking time of 30 mins. I suggest making the core bead batch to both save time and allow for creative combinations as you construct the jewellery.
One 56gm bar of polymer clay in each colour is needed to make the core bead batch - I have clay left over and the clay cost me less than £10. If you search around Ebay there are lots of bargains to be had.

Tomorrow, I will go into detail about making all the core beads and the first jewellery item which will be a simple star stud earring. I hope you will be inspired to make along with me.

Thanks for reading.