Search This Blog

Popular Posts

Friday 28 June 2019

Sewing News

Hi Everyone 
Just a very quick post today - I’ve another top in the planning stage. This time it’s a lovely new pattern from Merchant&Mills called Florence. The idea is to make the top as per the pattern (see drawing below) and then a dress version. I’ve got lots and lots of fabric in my stash so will be checking out the whole range before deciding.. Initially, as a wearable toile, I’ve chosen a simple cream coloured cotton or a pretty flower print (again see photo below).I’m not sure, if I have enough of the flower print so that may resolve the issue.


I love this style of top so will enjoy making it. Hopefully, I can realistically aim to complete the Make over the weekend.

Have a lovely weekend, yourself. I’ll be back on Monday.
Bye for now.

Thursday 27 June 2019

Flower ‘to be’

Hi Everyone 
I'm currently experimenting with wet felting ideas. This little project has started as an idea for a stemmed flower. I would like to develop more layers of felt petals incorporating similar colours but slightly different combinations of the colours. I like the delicate look of the fine felt fabric and the solid little balls which will combine in the centre (as a flower head). I’m also in the process of making little stamens at the moment with beaded ends. These stamens will be placed among the balls completing the flower head and central focus for the flower. There’s lots more to do but I’m having a lovely time playing with new ideas for constructing my flowers.


 Ideally, I need a few more flowers to add to my display, I’ll take inspiration from my first flower (when complete). The next stage is to create more layers and find a way of securing the stamens in place. I’m not sure how many petal layers I need but a minimum of three. The first petal layer has a wide organic square shape. I’m planning on this being the centre of the flower. The next layers will start to add more rounded edges to fill out and form the flower head. I hope to present my Make as a contemporary flower, so I have given myself artistic licence to adapt all elements of the experiment. I’ll share the results over the next few weeks.

Thanks for calling in today.

Wednesday 26 June 2019

More Sewing News

Hi Everyone 
Over the last few days, I’ve managed to sew a few little tops. I featured the latest Summer Top : Gill on Monday and have worn my top already. As promised on a Monday - here are a few photos of the top in action.

                  
The top is a very comfortable and versatile design. I’m sure, I’ll be able to layer up the top for cooler days but this top is definitely a good top for warmer times. You can read about the details of the top here.

My second Top is the Gemma blouse by Workshop. I introduced this top yesterday - take a look at yesterday’s post for the details. I had started making my top but had stalled around how to finish off the sleeve/collar seams. I am keen to finish off all aspects of my sewing projects, especially the seams. The inside is as important as the outside - for me. I like to incorporate French Seams where I can but on this Make, I hadn’t thought it an option for the sleeve/collar seam. However, I’m now - not so sure. I did struggle with the collar area of the Make and will try out a simple redraft of the neck/sleeve/ collar point. I also had issues with finishing the edges of the front facing. Again, I’ve another idea how I can tackle this part of the Make, next time.
Generally, I love the line of the blouse. My fabric is (possibly) a little stiff ? However, I do feel the blouse benefits from having structure. It’s worth having another go with a slightly softer fabric. This will also give me a chance to redraft the neck area and check out other ways of finishing off the inside of the blouse.
I need to complete the button holes and finish off some aspects of the neck facing. I’ve sourced some buttons (not arrived yet) in both an orange and green colour. I’ll decide which compliments the top when they arrive. So, not much more to do. Here is a quick look at the blouse - as it is :


Thanks for calling in today.


Tuesday 25 June 2019

New Sewing Project

Hi Everyone 
I’ve started a new sewing project. This time it’s not a Summer Top Design (see yesterday’s post for more on Summer Tops). However, the new project is another top - the Gemma Top from Workshop. This is a lovely, simple blouse with grown on sleeves and a button front.

               
You can check out the pattern here along with all their other designs. I am particularly keen on this range of patterns. I already have one of their dress patterns but love them all.
My fabric for the Gemma blouse is a quirky cotton fabric from my local fabric shop 1st For Fabrics. This fabric has been in my stash for some time and it’s seems perfect for the first of my Gemma tops. I’ve a few other fabrics which I think will also work well. I’ll work out any issues with this version and then make a silk version.
So far, I’ve cut out the fabric (only five pieces), sewn the darts and side seams. I’m hoping I can sew up the remaining pieces this evening. The whole Make seems quite straightforward at the moment. My only question is about how I can finish the seams. I rather like to use French Seams but that’s not an option for the sleeve seams. I think, I need to find a way of including an overlocked seam which does not interfere with the collar. I’ll share my progress with this issue tomorrow.

Thanks for calling in today.


Monday 24 June 2019

Summer Top Complete

Hi Everyone 
I’ve finished my latest Summer Top : Gill. The whole Make was very straightforward and a success. I’m already thinking of new ideas for more Summer Tops.

              
I was undecided about the collar on this Make. I knew, I wanted a Peter Pan collar but I wasn’t totally sure about the size of the collar. I initially thought the collar was too big. Having lived with the size for a day or so - I like it. I think, there’s an option for another smaller Peter Pan collar too.
There's not too much more to say about my Top !  The buttons are great - all the way down the back. I’m also thinking, I can wear the Top the other way around, buttons down the front too. I’ll aim to get some photos of me wearing the top, later today - both front and back views.

I love the print of this fabric, the cats are cute and the colours are great together. It's not the best quality cotton but I’m pleased with the design of this top and think,  I can wear it often. In the end, the pattern is completely reworked but I did use the Butterick 5792 original (check out a previous post about my idea here) as a basis for my Top. I’ve physically created a new paper pattern this time, for future Tops. I felt , I was creating lots more work by trying to alter the Butterick 5792 each time.

My next Top idea will feature an asymmetric button front. I have some more fabric washed and ready for the next design. Hopefully, I can get the pattern development underway later today.

Thanks for calling in today.


Friday 21 June 2019

Summer Top - Progress

Hi Everyone 
There is progress with the new Summer Top. I’ve called the top Gill - not sure why,  I think, this top design is inspired by me but for some reason - my name was the one which came to mind ! Perhaps, it’s the Peter Pan collar ? I’ve always had a bit of a thing about these collars. I also love the fabric print, both the colours and the design. As I’ve been working with the fabric, I’ve found myself smiling at the cats.


I’ve reworked the pattern pieces and added a collar piece. I’ve cut out the pieces and have started to prepare the French Seams. There’s not too much more  to do, in terms of construction. I need to complete the seams and add the collar next. I’ve created a closure on the back of the top and have found some pretty buttons, so there will be button holes to make. The final job will be the hem. I’m hoping, I can wear my top in a few days - so at this point, all is good.

Thanks for calling in today. Have a great weekend. I’ll be back on Monday with more Making stories.


Thursday 20 June 2019

New Summer Top

Hi Everyone 
I’ve eventually made progress with my latest Summer Top. I’ve used the basis of my previous tops (you can see the pattern details here) as a starting point again. The pattern, Butterick 5792 is a very simple nightwear garment and the shape fits my body well so I’m treating it like a body form. There are lots of opportunities for hacking this pattern. For this version, I’ve changed the neckline, the length and the back piece to accommodate my new top - not that recognisable as Butterick 5792 !


I have added a Peter Pan collar shape and there will be buttons down the length of the back of the top. These features have made a difference to the overall shape of the pattern, so I’m hoping - I’ve got the details right ! I’ll know how things are working when I start stitching the pieces together. I’m treating this Make as an experiment and am prepared adapt and/or redraft - no pressure here.
I’ve created a different construction approach to this top. I’ll develop the back pieces (previously one piece), add the front followed by the collar. I’m keen to use French Seams as per my previous tops, as well as the bias binding technique for the arm holes. There’s not much more to the top but the proportions need to work. 
I’ll let you know how things go.
Thanks for calling in today.

PS - I was hoping to share the progress of my Ursa#2 (as mentioned yesterday). I’d hoped to have finished knitting the body. However, I’d underestimated the number of rows - I’m nearly there ! I’ve tried the sweater on and it looks good (so far) and I think it’s going to work. Maybe - I’ll have something to show tomorrow.


Wednesday 19 June 2019

Ursa #2 Progress

Hi Everyone 
I’ve been working away with my second version of the Ursa Sweater by Jacqueline Cieslak. I’ve already made a wool version, which is lovely. However, it’s much too warm to wear at the moment. Initially, I had some issues with sizing the pattern for the new yarn, a cotton yarn. The cotton is classed as an Arran weight but doesn’t quite work in the way the wool did. I did have a few attempts at sizing before I decided on the final numbers. I think, the size will be fine. My first wool sweater is made using the second size numbers, the cotton version is the largest size - 7 sizes larger and that sounds, unlikely.  I have tried the sweater for size and it worked at the point where I split for the arms. It’s difficult to check beyond the shoulders and arm space. I’m almost finished the body - 6 rows to go ! So, it’s almost time to decide if my new Ursa will work.


The fabric of the cotton is great. The definition of the ribbed stitches is very pretty. I love the blue colour and the sweater is quite light.  Im hoping the sweater will work well as a Summer layering garment. I will know later today, if all is working well. 
I’m not totally decided about the sleeve length ? I had thought I wanted long sleeves, however, I’m not sure now. I could go for short sleeves, as the sleeves are now. There’s also an option for 3/4 sleeves. I’ll try on the sweater before deciding. 
Generally, I’m really pleased with my sweater and have enjoyed making the pattern (hopefully) work for me. I’ll let you know how the fitting goes tomorrow.

Thanks for calling in today.


Tuesday 18 June 2019

Felting Flowers #2

Hi Everyone 
Today, I’m sharing ongoing developments of the wet felting project started last week. Here is my first post on the idea hereI had an idea for stitching and layering my initial wet felted fabric. I created and used little pattern pieces (see the link above for more on this) to cut some of the pink fabric into petals and have used my sewing machine to create a more solid whole flower shape. The flower, so far is a little delicate and I need to add more strength. My plan is to add a second layer of felt - possibly hand stitching or dry felting together ? The flower will become a brooch and will need to be strong enough to suppport some form of pin. This will dictate how the felted flower is developed. In theory, I currently have two pink brooches. I’ve pieced one flower together and have a second, shaped organic oval. Both elements have been machine stitched. I could combine the elements or develop two brooches ? Still not sure at this stage.


I quite like the single pink colour of my brooch ‘to be’ but I see some need for more embellishments. I’d like to keep things simple and am thinking about making something from Silver to add a central focal point ? At the moment, I’m considering designing and making a pin which could also add something on the front - as a central embellishment. There’s also an option to use another coloured thread to add subtle elements to the brooch.

My second brooch, the blue and green version - needs more development. I like the colour combination and the ball, in the centre. I’m planning to make more little balls and have a cluster idea for the centre - possibly six, seven balls ? I’m also thinking about shaping the outer (blue and green) petal, possibly making several smaller petals from the larger ? I’m thinking about using this finished flower for a bag embellishment rather than a brooch so this is giving me more freedom to make a much larger flower. I think, I’d like to add some beads and buttons to this version.

So, lots of decisions to make. I’m planning on experimenting later today. I’ll share the final brooches when they evolve.

Thanks for calling in today.


Monday 17 June 2019

New Hap Underway

Hi Everyone 
I’ve started a new knit over the weekend. It’s the Traigh Hap by Kate Davies. I mentioned the idea last week read about it here after deciding a previous project didn’t quite work for me. The original project Polkagris Kerchief, again a Kate Davies Pattern. I mentioned that I liked the stripes in the Polkagris and spent lots of time searching for something which I could add stripes. However, I’ve moved on and will use the two colours of the original knit but as contrast sections rather than small stripes. I’m using the beautiful Northumbrian Rose yarn from Fine Fettle Fibres


I spent some time swatching for the Hap and am underway. My yarn is not quite as bulky as per the pattern, so - I’ll need to make some changes to the size. I’ll see how it goes and report back.
So far, I’m finding the knit interesting - it’s an usual construction which will take me some time. I’m planning to add a pattern section as per my little photo story (top right) every couple of days. I need to complete 24 such sections, so I’ve quite a bit of knitting to go. This section creates a pretty lace boarder along the length of the Hap. A curved section is then added to form the body of the Hap.
I’ve also got several other knitting projects underway so I’ll need to manage my knitting time carefully. I’ll share my progress here on the blog, it would be lovely to get my Hap made so I can use it over the Summer months.

Thanks for calling in today.


Friday 14 June 2019

Felting Flowers

Hi Everyone 
Today, I’m sharing a little project involving wet felting techniques. I’ve dabbled with making wet felted brooches in the past, many times, but have never quite found my particular ‘thing’. Making wet felted flower brooches has not quite worked for me. I love the look and the idea but don’t feel I can wear them ? I have a statement piece in mind but, I think, I’d like something - contemporary and slightly ‘unreal’. Having said ‘all that’, I’m still not sure about what I want. 
I’ve done a little research and have found examples of wet felted brooches. I’ve taken initial ideas and made a few, very basic sketches - as a staring point. I’ve also developed some wet felted fabric and am hoping to adapt the felt, somehow ? I have an idea to add buttons or beads of some sort, again I’m not sure at this stage ? I have the size and some basic shapes, I love the colours too. All is well.


I’m slightly lost at the moment, but I will keep working until I find a way. This is often how it works for me, the creative process often comes with struggles and because of experience, I know that eventually I can make something work or not. The key is to listen to myself, when all hope is lost - I will know. At the moment, I’m hopeful and will work on the project throughout the next few days. I’ll keep the components to hand and within my eyeline. Im confident, I should have something to share in a few days of experimenting.

Thanks for calling in today. Have a great weekend. I’ll be back on Monday.


Thursday 13 June 2019

Ursa #3 Progress Report

Hi Everyone 
I’ve been slowly adding to the Ursa #3 knitting project. This is a great design by Jacqueline Cieslak and my 3rd version of the the pattern. Technically, I will end up with two sweaters but I like to count the 1st version as it was a completed sweater before I ripped out and started again.
Version #3 is knitted in an Arran cotton yarn but it’s a very different knit from the Arran wool sweater. You can see the details of the previous sweater here. I started the cotton version with the same size needles used for the wool version (6.5mm) and found the fabric and the knitting experience poor. Smaller needles (5.5mm) have produced a lovely fabric and I’ve managed to make the sweater fit (so far !). It’s also a much nicer knitting experience.


I’m ready to split for the sleeves and have put the knitting on a long piece of waste yarn to try on the sweater. Initially, I tried to use two circular needles for this  job but couldn’t get the stitches to spread out enough to check the length of the knitting. The advice is to check if the arm holes meet, under the arms. I’m fairly happy that the arms will meet and with the general size and think it’s time to split for the arms and body.
I’m also hoping, I have enough cotton yarn left to complete the  job. I’ve a slight feeling, I will need more.

Thanks for calling in today.


Wednesday 12 June 2019

The next new Summer Top.

Hi Everyone 
I have another idea for a new Summer Top. I’m using the same Butterick 5792 pattern, as used for my previous Summer Tops. You can see the previous versions here and here. This time, Im going to add a button back, a small collar and a higher neckline. This is quite a big hack of the pattern Butterick 5792 but I love the fit of this top and I’m very keen to exploit all my ideas.


I have lots of ideas for these Summer Tops and lots of cotton fabric - which is ideal. Most of the fabrics have quirky, colourful prints and are perfect for the job. These tops only need a meter of fabric which is amazing. 
I will develop a new pattern for the latest idea, using the original as a basis for the fit and line of the top. However, there are so many changes, I feel I will benefit from cutting a completely new outline for the pattern. 
I hope, I can make my new pattern today and cut out the fabric. The other Summer Tops have been very quick Makes. I like to use French Seams and will use these again for this top. I’ll also use the bias binding technique for the arm and collar finishes.Using these techniques is time consuming but with it.
The fabric for this top is LITTLE JOHNNY DIGITAL PRINT COTTON FABRIC - CATS. It’s available in a few online shops but my fabric came from 
here, Weaver Dee Fabrics.

Thanks for calling in today.

Tuesday 11 June 2019

Jeans - the final push

Hi Everyone 
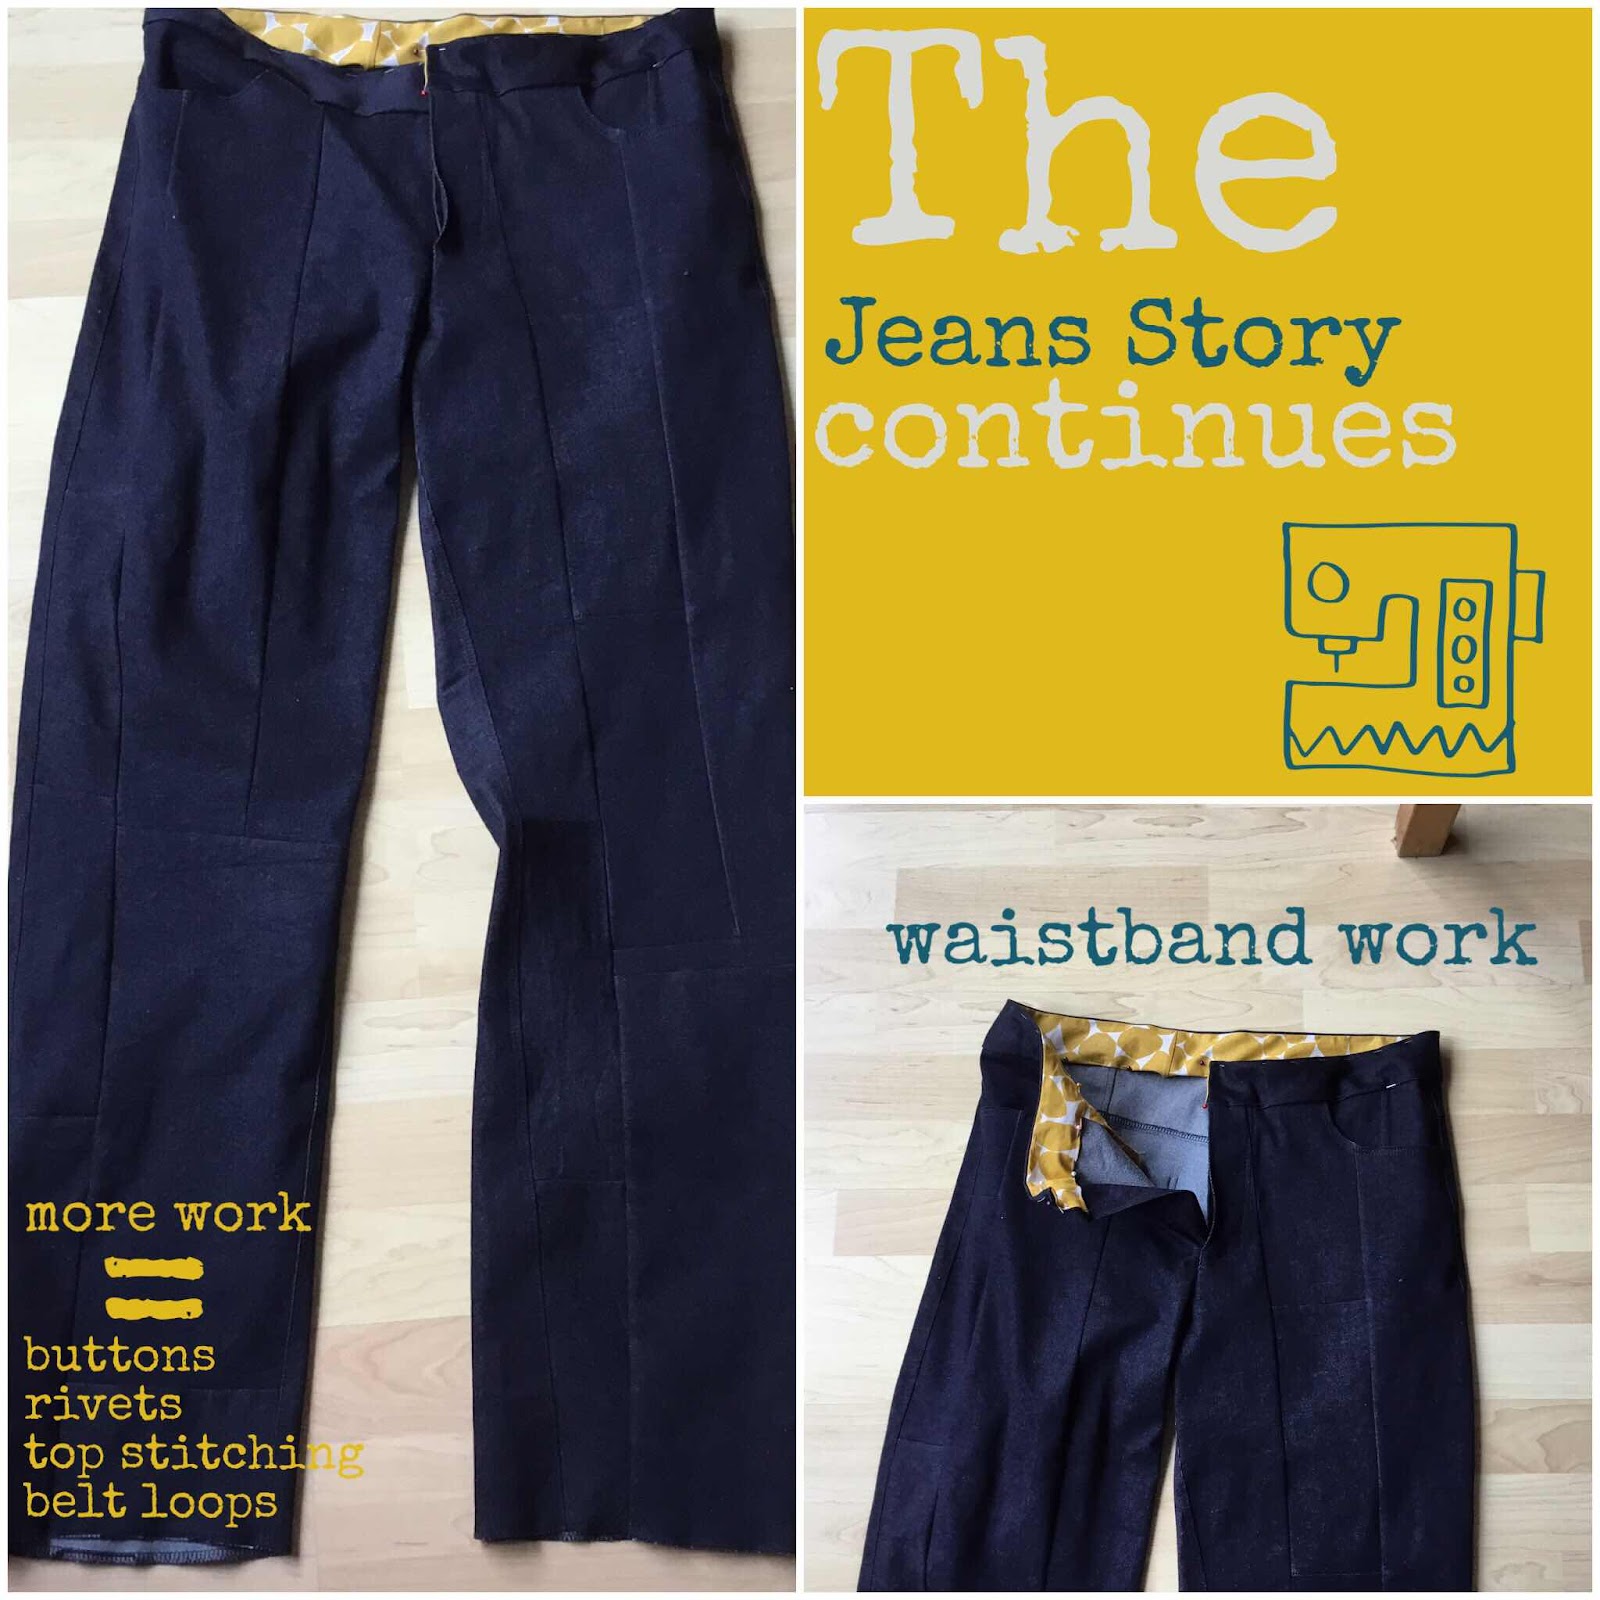
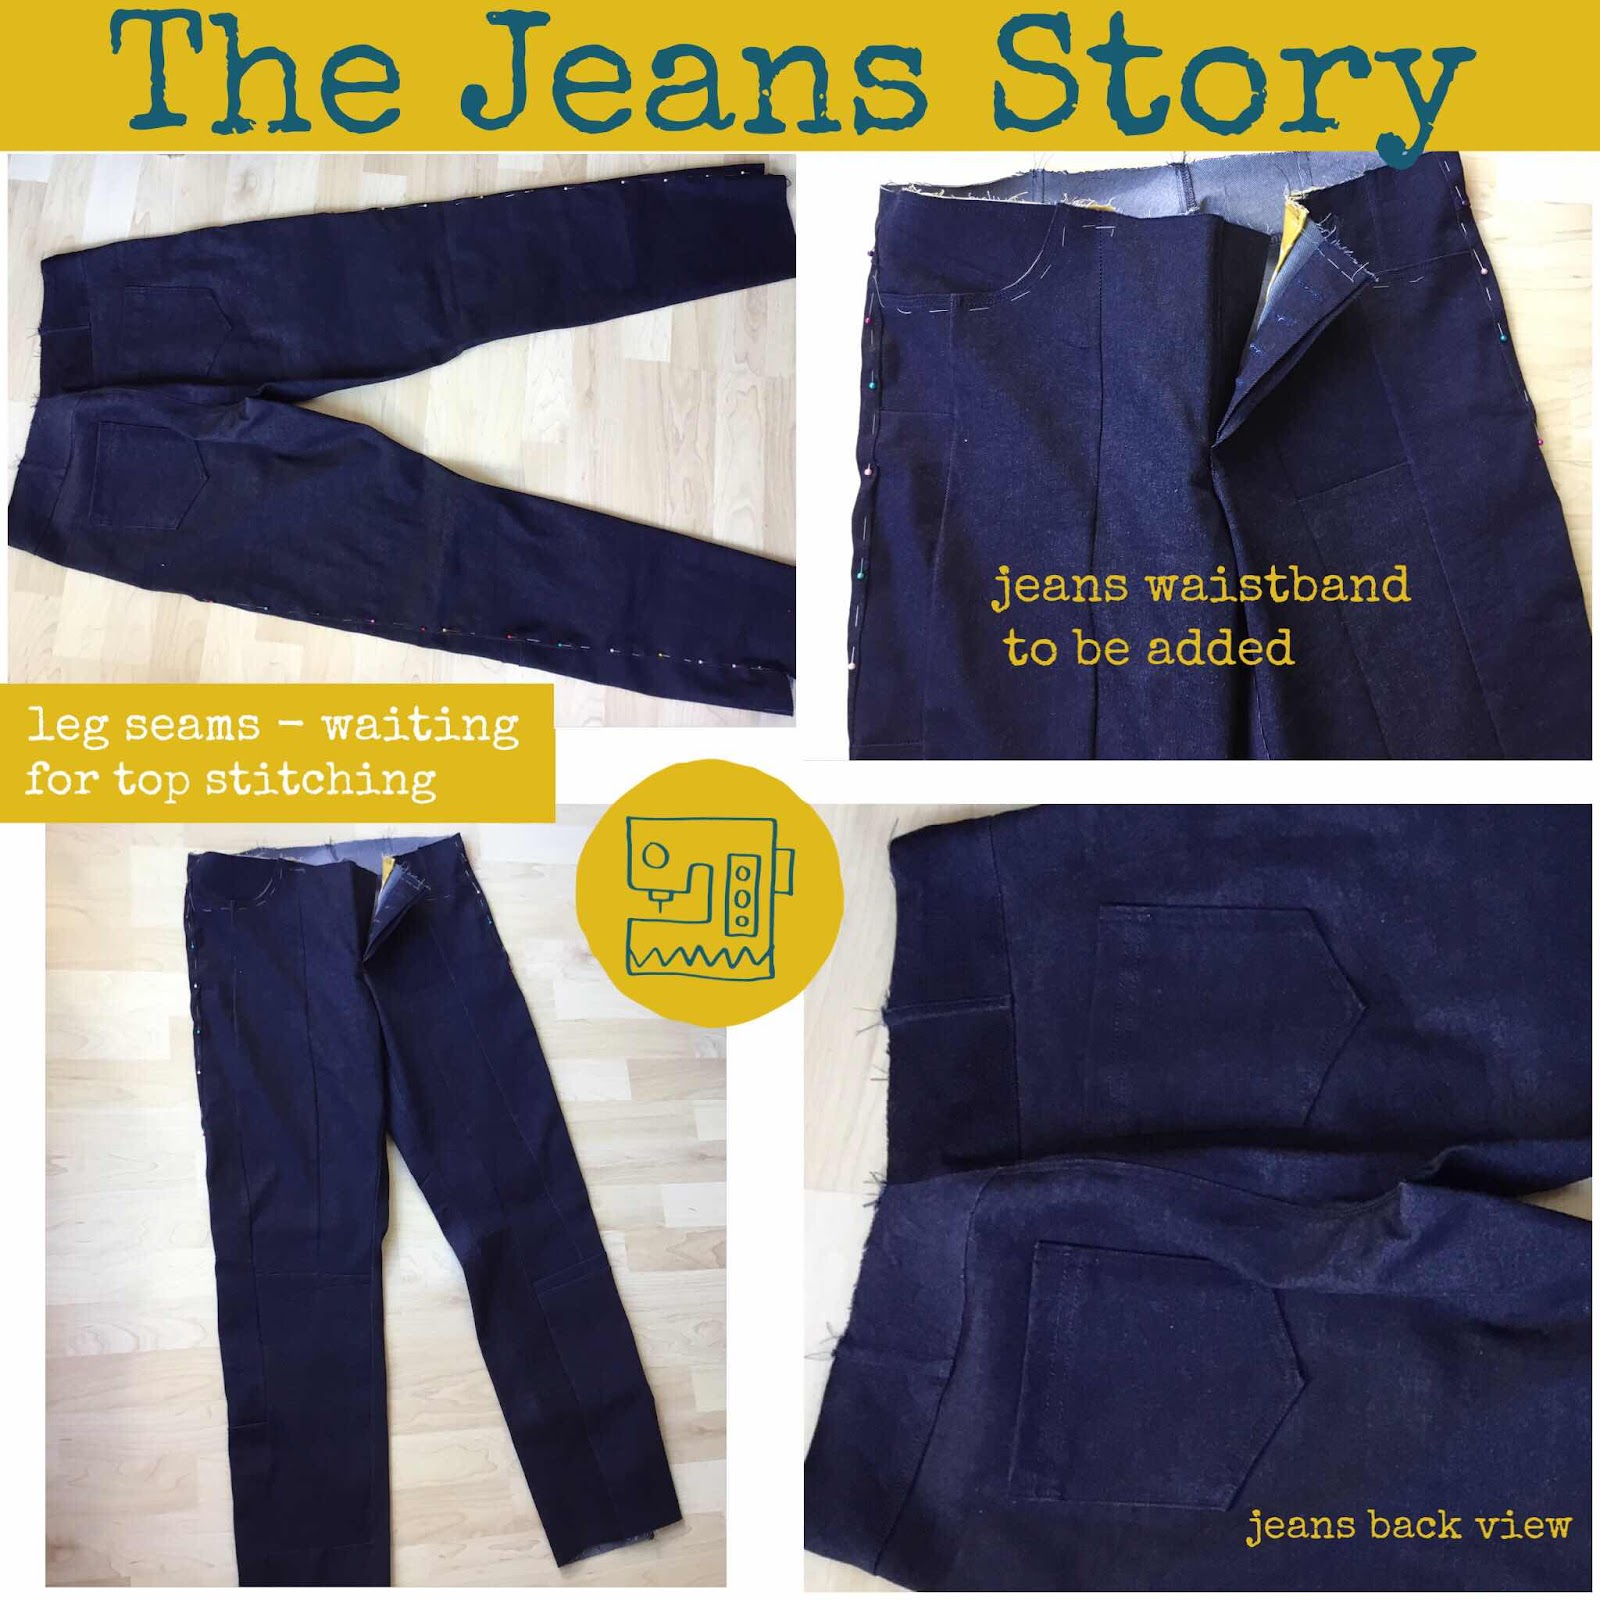
It’s the final push to finish my jeans project. This project has been my main focus for a couple of weeks and has on the whole, been a great success. I’m particularly pleased with the fit and the overall finish of the jeans. I think, I can use this exercise as a great basis for making all my jeans in the future.
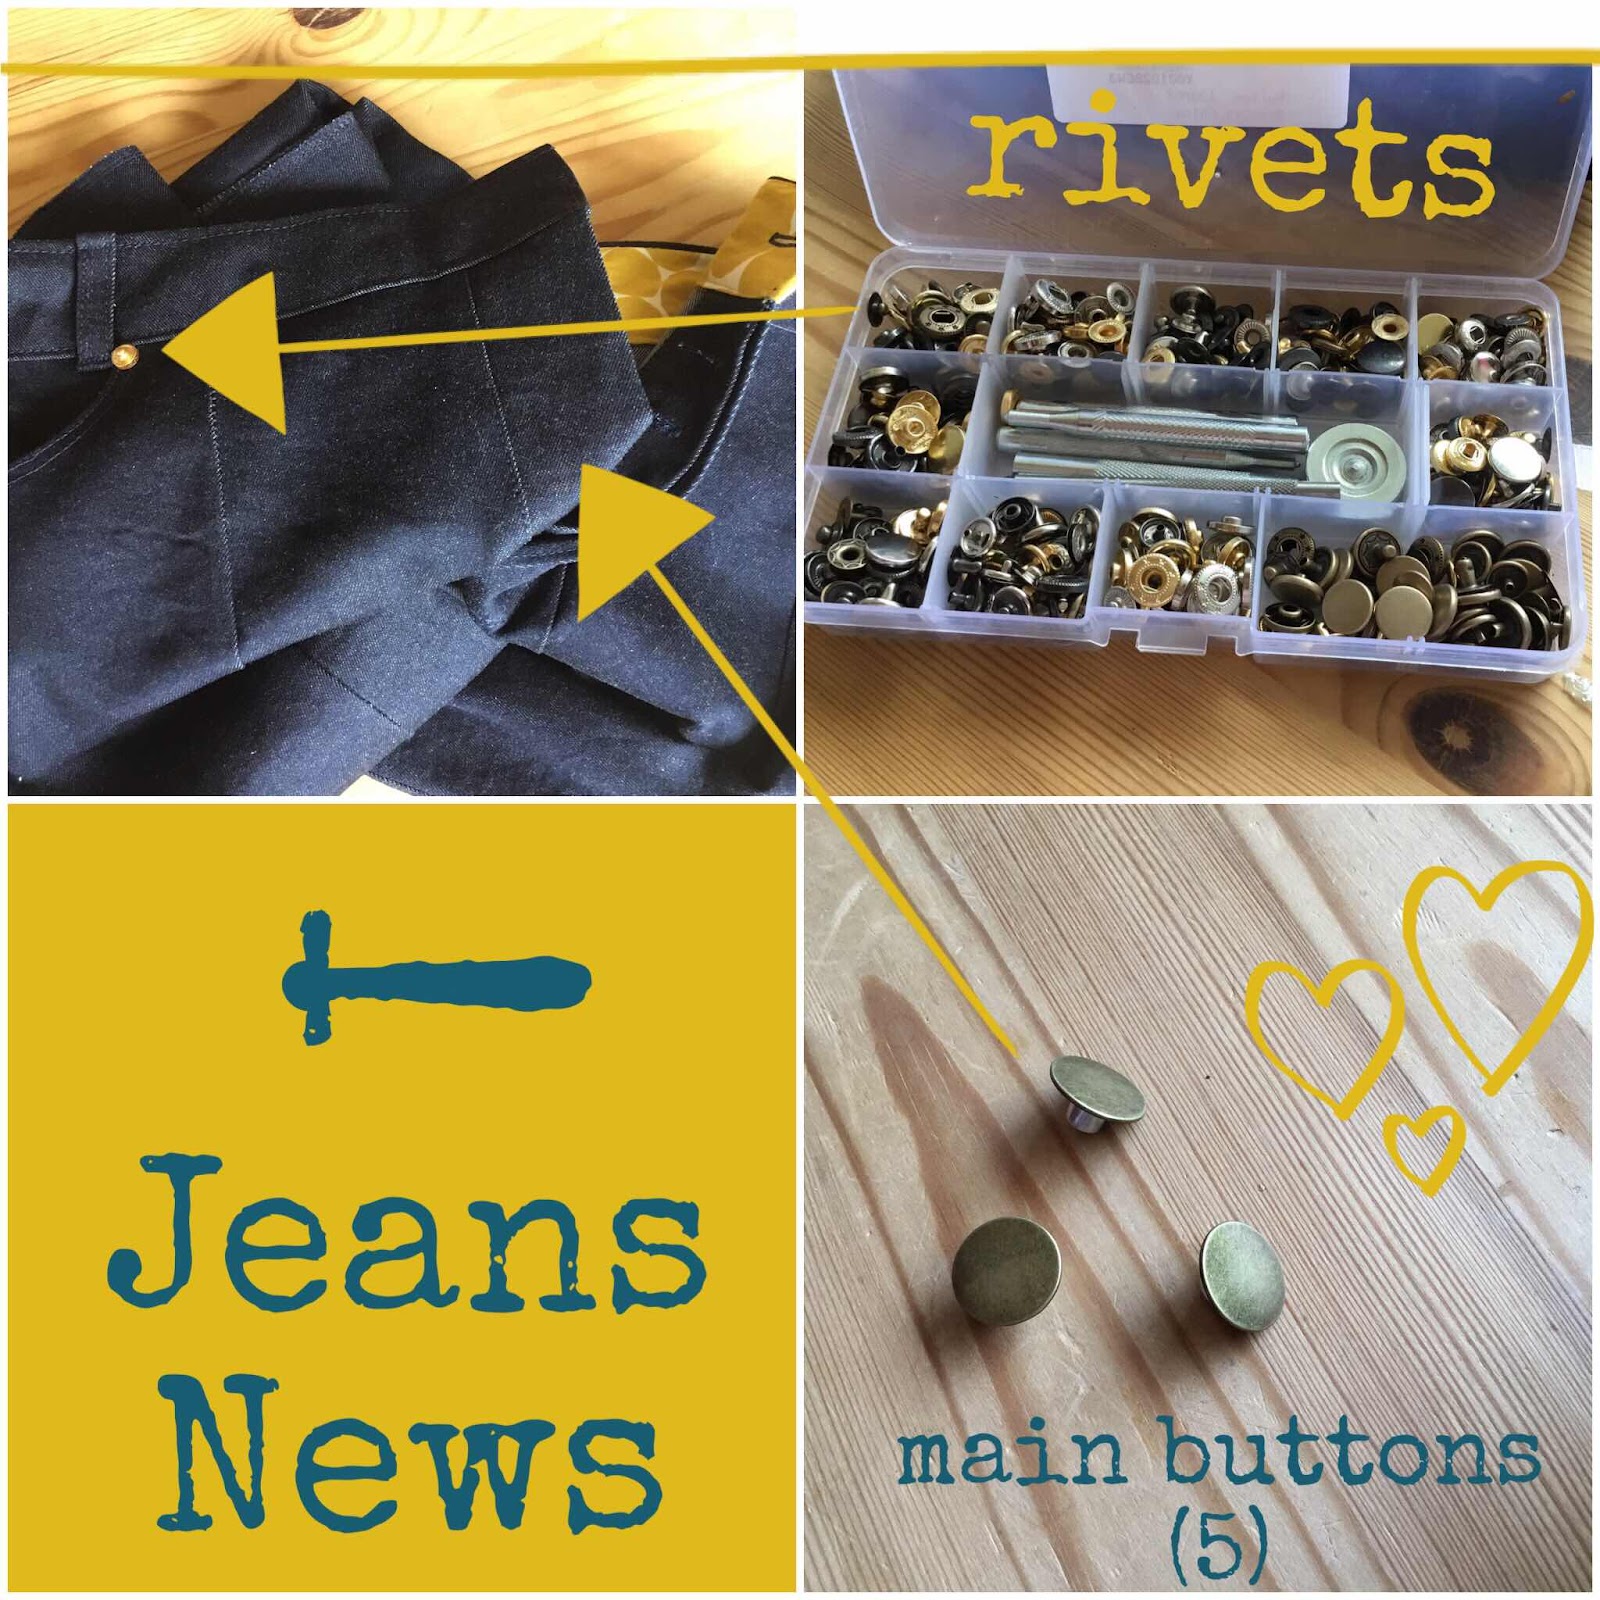
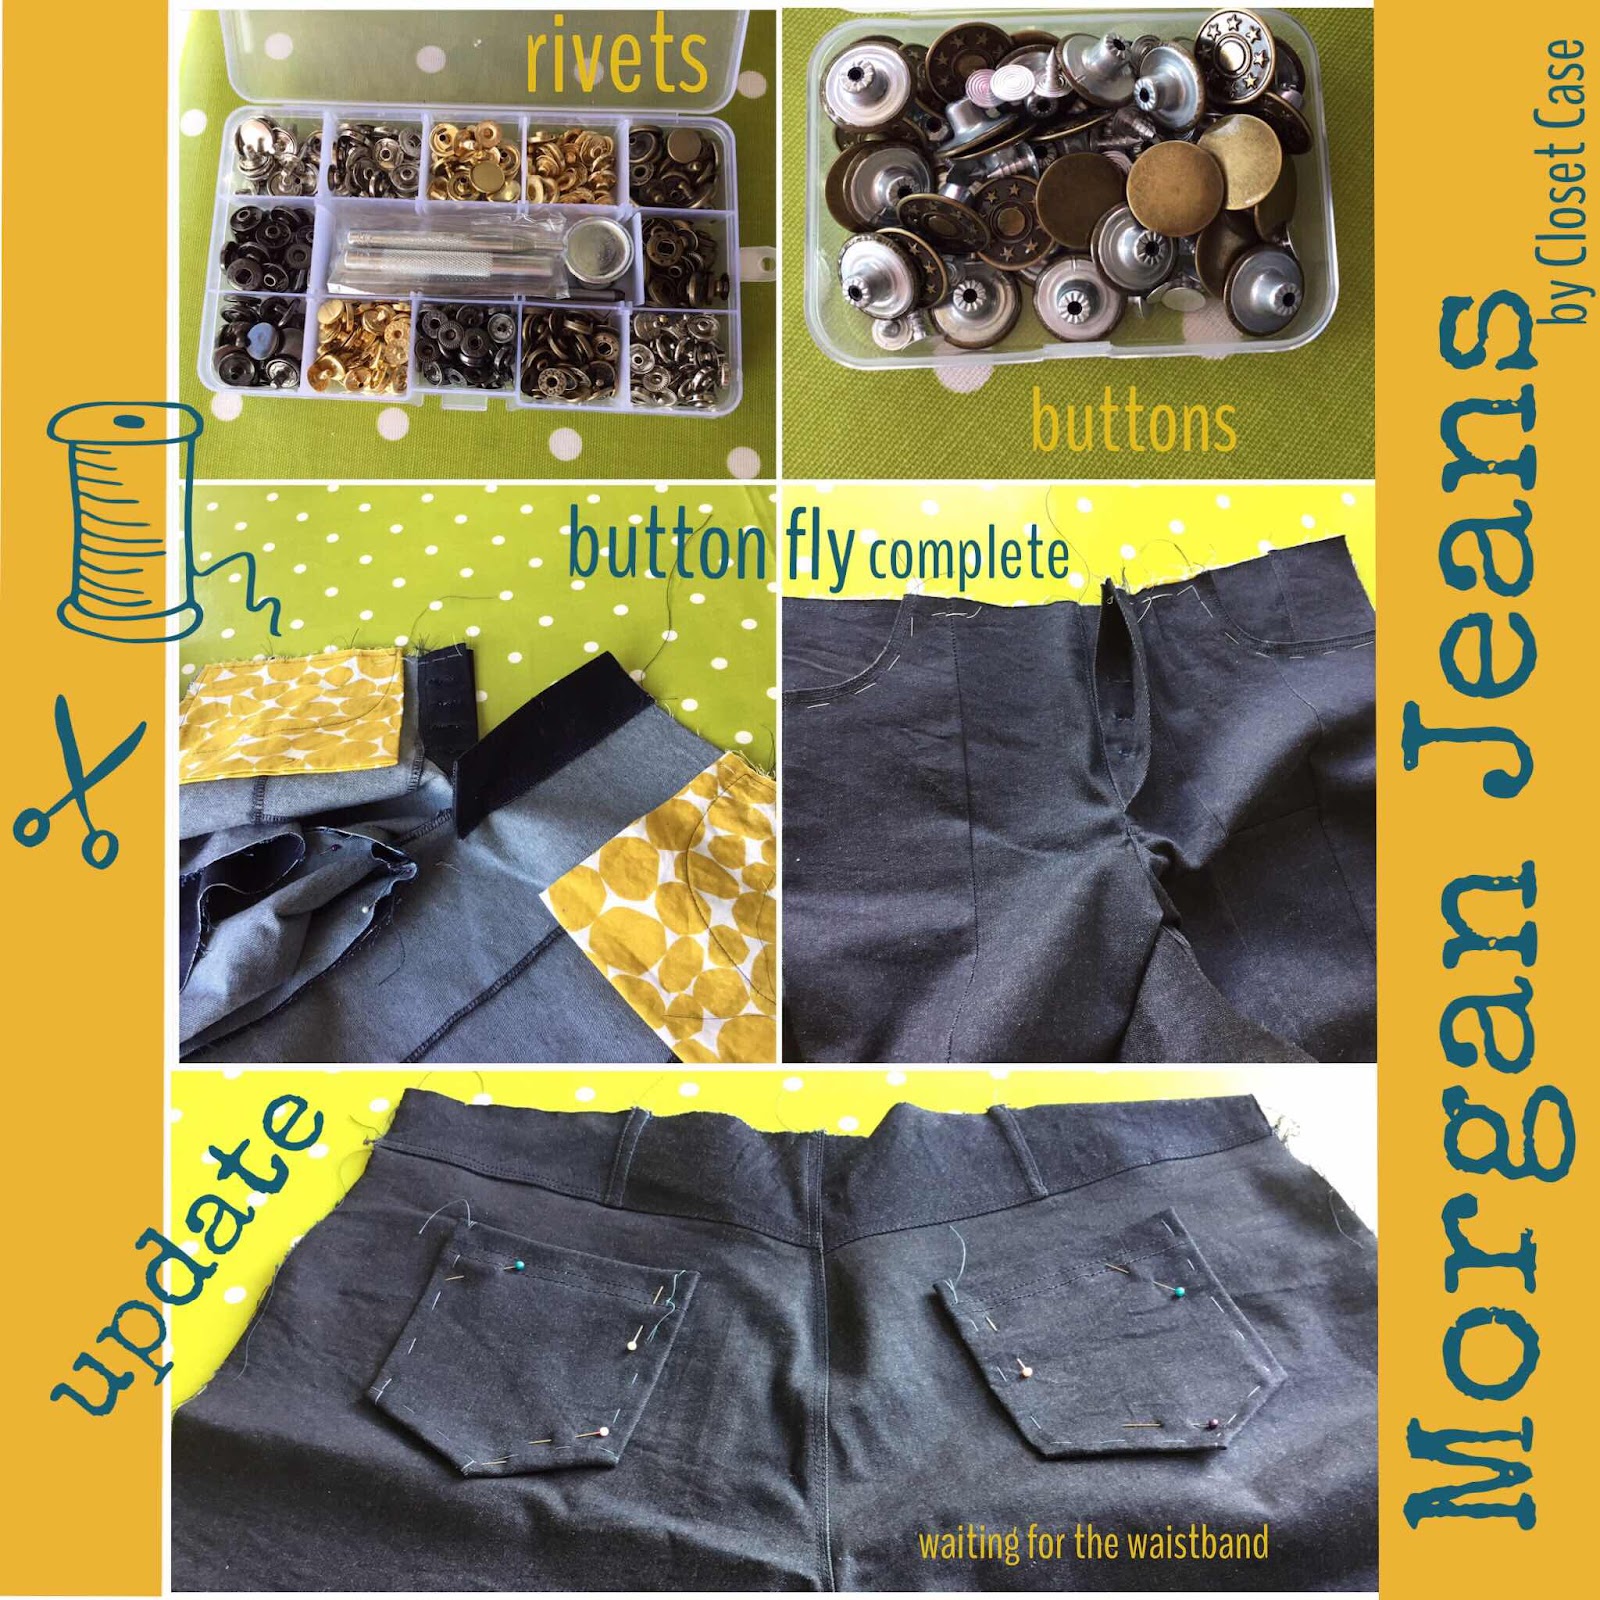
The last bit of the Make is the buttons and rivets. I’ve been delaying this task for a few days. I have tested out a few of the components in my rivet box


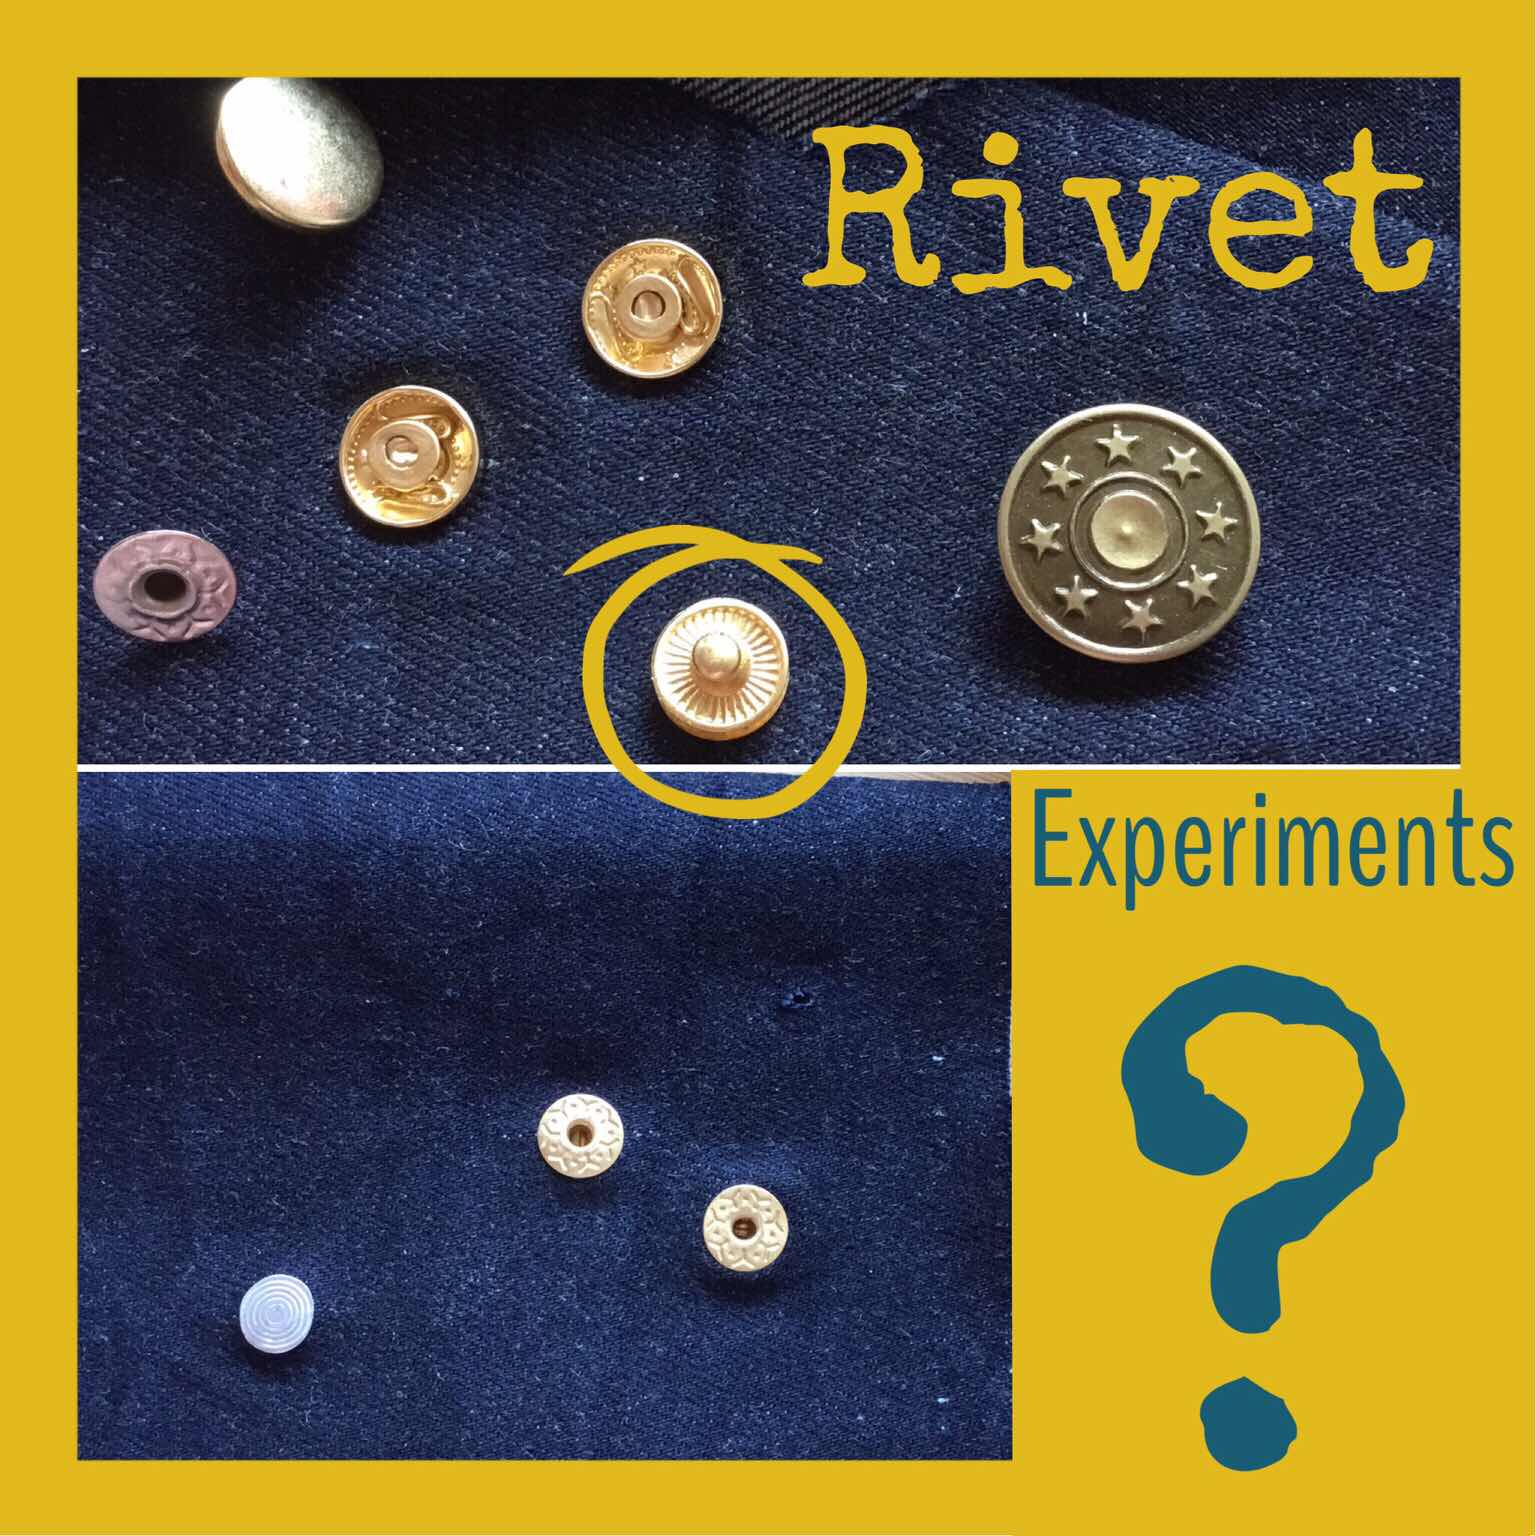
I think, most of the rivets in my box will work OK, although I have a particular liking for the nipple rivet highlighted in my little photo story above. Having done a little research, this type of rivet is the most difficult to set without a machine ! I need to do a bit more practicing before I commit. I intend to set 10 rivets, either side of each pocket and on the top of each side seam. So, I need to have the technique ‘nailed’.
I also need to add the main buttons to my jeans. I’ve chosen the the buttons, a plain antique brass finish. I need to add 5 buttons, the jeans have a button closure (rather than a zip). The buttons are much easier to set. I’ve tested out the process and it’s worked well. I’m as confident I can be re attaching the buttons.


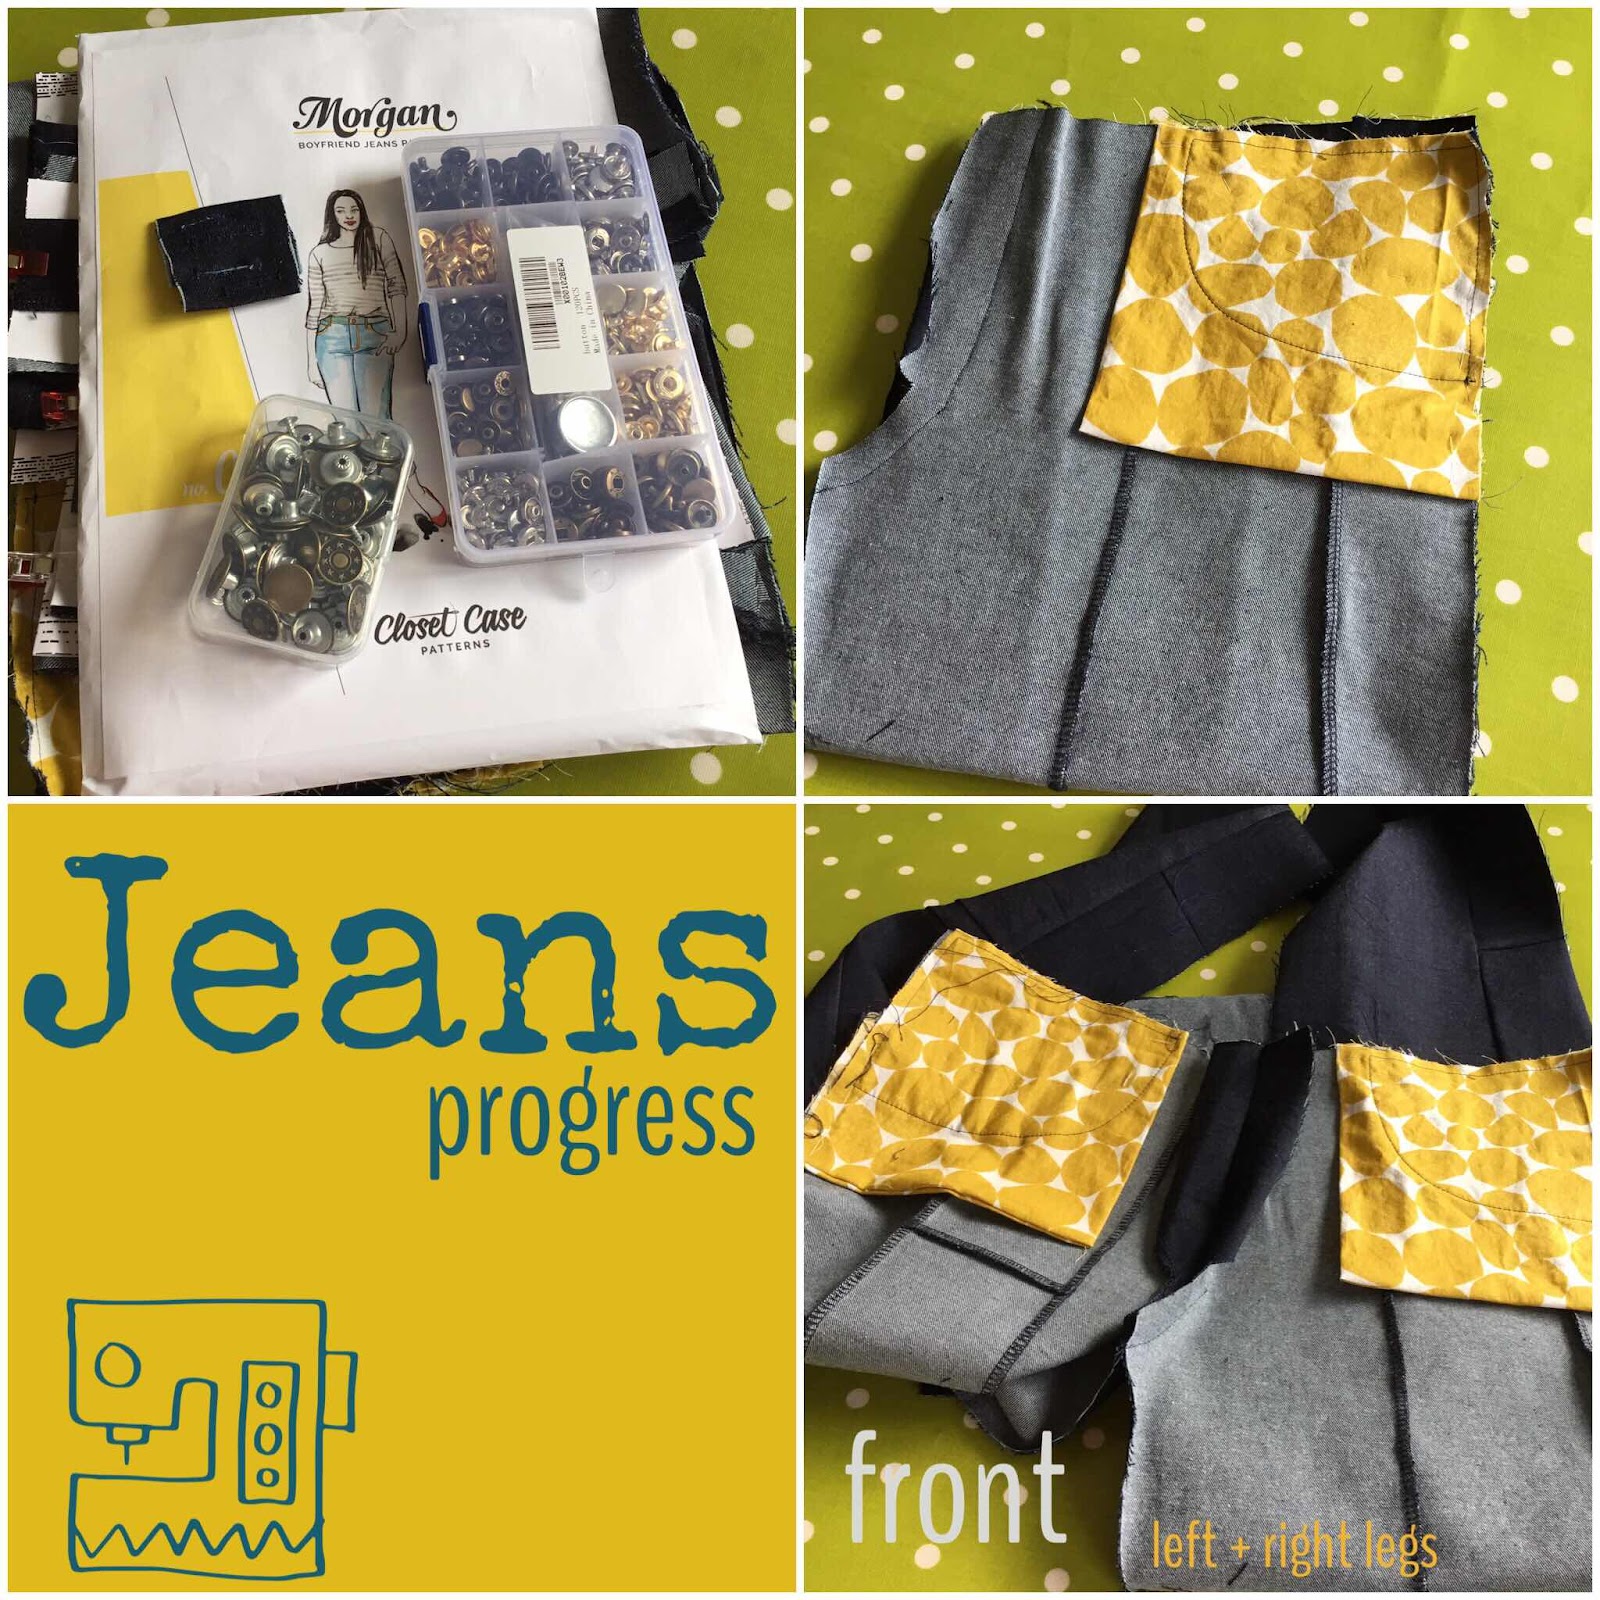
I also need to finish the hems. I’ve overlocked the bottom of each leg and will turn over to top stitch. There’s also an option to add a leather patch to the back of the jeans. This is part of the jeans pattern, Morgan Jeans by Closet Case. I’m not totally sure if I will add the leather patch ? I’ll take a day to decide and let you know.

Thanks for calling in today.


Monday 10 June 2019

Re thinking a knit project

Hi Everyone 
Having made the lovely Polkagris Kerchief by Kate Davie last year, I’ve finally decided - it doesn’t quite work for me. I love the idea of the pattern, the stripes and the size but each time I’ve tried to wear my little scarf - I can’t quite ‘pull it off’. For some reason, it’s not working with my style. So, I’ve decided a slightly larger shawl will work better. I’d quite like to keep the stripes and a simple style but I’m not sure? Is it the stripes that don’t work for me ? I don’t have a pattern in mind at the moment but will make it a priority to find one this week.


The yarn I’m using is the beautiful Northumbrian Rose by Fine Fettle Fibres (you can read all about it here). My yarn is from the initial (first ever) batch of this lovely yarn and is very special. Id like to make something which I can wear, often. I do have more than the 65gm. I’ve used for the Polkagris and have a small scale shawl in mind, something I can wear with a Summer outfit as well as an all year round item.

Thanks for calling in today.


Friday 7 June 2019

New Ursa Sweater

Hi Everyone 
Surprise, surprise - I’ve ripped out my new sweater project. It’s not abandoned but the fabric was not right, so having knitted about half the sweater, it had to go ! I’ve gone back to the drawing board and decide to go down a few needle sizes. My first attempt of the cotton Ursa Sweater by Jacqueline Cieslak started with 6.5mm needles. When I first started, I loved the knitted fabric but quite quickly, I found knitting rather uncomfortable. I had thought, the light, almost lacy fabric would be great for a Summer sweater. However, I love a neat and even knit and the first attempt was anything but neat and even. I found, I was not picking up my knitting and looking for alternatives (I have a few projects on my needles, at all time). So, out it came - last night. 


I’m very happy with my new gauge. I’ve gone down to 5.5mm needles, using Rico creative cotton in a lovely French Navy colour. The sizing is a bit of a lottery. I’ve done some Maths and hopefully my figures will work out. I’m confident to give it a go. I’ll keep trying on the sweater as I knit. I’ll know if the sizing is good when I split for the arms, so not too much knitting for the initial fit. If the figures don’t work out, I’ll keep sizing up until they do. I’m in this for the long haul. The new plan feels good and I’m excited to knit on this project again.
I know the boxy, cotton sweater will be great for a Summer layering garment. This idea is motivating me to finish the sweater, soon.

Thanks for calling in today. Have a great weekend. I’ll be back on Monday.


Thursday 6 June 2019

The Jeans Story continues....

Hi Everyone 
I’m almost there. My Morgan jeans by Closet Case are very close to being finished. You can read back each day this week for more on my jeans development. I have a few finishing touches to make, the waistband needs top stitching, I need to add the belt loops and the buttons/rivets need to be added.


The jeans are a good fit. I’ve tried them on several times and I especially like the shape of the legs, just as I’d imagined them. The construction of the waistband wasn’t without issue. I managed to attach the waistband, upside down ! I couldn’t quite understand why the top of the waistband was flaring - especially at the sides and finally worked out what I’d done. It was an easy thing to resolve but - at the time, it seemed a huge issue.
However, I’m thrilled with the way in which the jeans have worked out.
I’ll probably get the job done by the weekend and will aim to get some pictures of me wearing the jeans.

Thanks for calling in today.


Wednesday 5 June 2019

The Jeans Story

Hi Everyone 
I have another Jeans Story update. Against all the odds, it seems I have a pair of recognisable jeans. The jeans need a waistband and some significant side seam top stitching but they are almost a pair of jeans. The most amazing thing is that they fit. I’m using these jeans as a wearable toile and there will be further alterations for my next pair but generally- they are OK and definitely wearable.


I can’t emphasise how good the pattern has turned out. This pattern - the Morgan Jeans by Closet Case has been a dream to use. I was slightly concerned, early in the Make, about the pattern. I managed to sew the wrong pocket lining to the wrong front leg ! Looking back, it was entirely down to my misreading. I was having some problem recognising the key - which denotes the particular fabric to be used as well as the front or back of each fabric. Having got over that initial hiccup, every little instruction has been straightforward and very clear. Both reassuring and inspiring.

I have adapted the fit on the waist and will probably need to make further waist changes next time. My only issue with fit, seems to be the grading between the hip and waist. I may need to adapt the stitching line on the back seat, further. The difference between my waist size and hip size is significant. I’m hoping to attach the waistband today. My plan is to line the waistband with the same pocket lining fabric. I love this lining fabric, it works so well with the denim.

When I started this project, my aim was to make a pair of jeans that could lend itself to be decorated with Sashiko embroidery, you can read about the initial idea here. I pieced lots of sections of denim together on the front legs, to add my Sashiko patterns. My plan is to do this over a period of time. I will wear the jeans and plan each Sashiko element, one section at a time. I like the idea of wearing my evolving piece.
Hopefully, I can spend some time today adding my waistband. I’ll share progress tomorrow.

Thanks for calling in today.


Tuesday 4 June 2019

Jeans - further progress

Hi Everyone 
The jeans project is moving forward at a pace. You can read back for more background on this project here and here. I’ve reached the point where the pieces of fabric look almost like a pair of trousers.


The construction detail of the back pockets and front button fly have gone well. I’m especially pleased with the button fly which is looking great. I haven’t added the buttons yet, but have them ready - along with some lovely rivets. My next job is to sew the front and back inner leg seam, at the moment - I have the legs pinned together. 
Each seam has a regular machine stitch, finished with an overlocker and an additional double row of top stitching - the seam is destined never to part !
My next job is to complete sewing the legs together, followed by the waistband. My only question mark is the fitting of the jeans. I’ve re cut both the front and back legs (from the original pattern pieces). I want a specific fit, loose legs but with an element of comfortable waist ease. I think, there are still adjustments to be made for the centre back. I’ve taken a wedge of fabric out of the centre back but I think, there is more to go. I have fitted the jeans prior to sewing but there will be another fitting today. Depending on the results of the fit, I could be on the last few making days of this project. I have an hour or so each day, so we will see how things turn out.

Thanks for calling in today. Come back tomorrow for another update.


Monday 3 June 2019

Jeans - progress

Hi Everyone 
The jeans are coming together. Read back here for more about the jeans story. I’ve managed to re cut both legs and now have a much better (potential) fit. I have completed an initial fitting and the usual issue with a gaping back - on the waistband, needs to be fixed. However, the general shaping and fit could be OK ? I do want the jeans to be a loose fit. I have skinny jeans which are great but for these jeans I’d like a much more relaxed shape.  I’m using these jeans as a wearable toile and will be perfecting the cut for another pair. 

                
So far, I’ve added the front pockets to my jeans. I’ve used scraps from my latest Summer Top (check out the top here) for the pocket bags. I’m hoping, I can also line the waistband with the same fabric. The mustard yellow works really well with the denim.
I’ve also been practicing my button holes - these jeans (the Morgan jeans by Closet Case) have a button closure rather than a zip, so I have four button holes to perfect. Hopefully, I’ll get my Button placket completed today and then it’s attaching the legs together, followed by the waistband.
Once the jeans are cut to shape (my adapted shape) there’s not too much to go wrong ! - famous last words. It’s definitely the cut which will define the success of the jeans. 
Thanks for calling in today.