Search This Blog

Popular Posts

Tuesday 30 June 2015

The Making Framework

This week, The Making Framework is developing a Scrapbook Journal. This little book has started life as a large piece of medium weight card along with some plain thin scrapbook card. I've cut the thicker card to form a cover and made some smaller and different sized pages for interest. Some pages are full size (to the cover) but I've put a few smaller pages to form flaps. All the pages are sewn together with embroidery thread. The thread will have some handmade beads attached, using polymer clay.

 I've started to form a double page layout in a regular scrapbook style in the book. This double page has 'a way to go' but  I've incorporated some of the elements which will be used in the book. Each little element of the pages will record a memory and/or feeling/statement relating to one or more of the workshops. Most of the elements will use small scraps from previous projects so the whole book will contain little bits of each workshop and form a kind of record of the journey made while participating in the Making Framework.


The idea behind the scrapbook/journal is to bring all the MAKING disciplines together in one project ie those developed in the Making Framework Workshops this year. These disciplines include polymer clay work,paper craft skills, decoupage and felting (bother wet and dry). The basic book looks a bit like this:
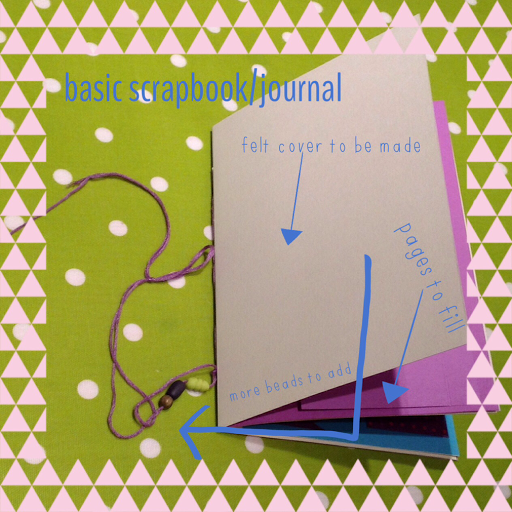


The plan is to develop pages with more elements, materials and skills as we introduce new projects to the Framework. My next part of the project  will be to make a cover for the book. I'm planning to make a felt cover and will start experimenting over the next few days. Will share new developments as they come along. 

Thanks for reading.

Monday 29 June 2015

Make Art Monday - where am I now ?

Hi Everyone
It's week 3 of the 'Where am I now ? - Eyes' feature (read back on Mondays for background to this feature). This weeks it's ' Lee' as the main character.


Lee is slightly complicated in that her eyes are not shown in this picture. However, she does have eyes and her new portrait will feature her eyes. This will give me an opportunity to develop some eyes specifically for her. The more I look at this work, the more I like it. I'm seeing a different side of the painting and am thinking or all sorts of opportunities to develop the piece. I like the dress and the simple positioning of the limbs. The 'eyes' will be the main feature in the new work so this simple body is perfect.
I'm working on another project which involves making a journal (FROM SCRATCH) and I'm going to make another journal to show the new developments of the Where Am I Now Series.
Only 1 more character to introduce. Next week and all 4 characters will be ready to go !

Thanks for reading.

Friday 26 June 2015

Blog Friday Link

Hi Everyone
It's Friday again, I know I'm forever saying this on Fridays but it's frightening how quickly the weeks go by ! I want the days to slow down. 
Today, I'm recommending a blog called Noodle Head http://www.noodle-head.com/. I came across this blog via Pinterest while browsing. I was particularly drawn by a little purse sewing project.


The blog has a shop as well as lots of sewing tutorials. Anna Graham heads up the blog and she explains (in the introduction) the Noodlehead name comes from a nickname she gave one of her children. I like the chatty style of the blog and love the inspiration ideas. Anna has a book out with many of the little projects featured on her blog, I'm already thinking it's something I need.
One of the features on the blog 'Sew Along' - is a great way to make up a garment (skirt). The task is split into small sections which are to be done in daily sessions. The idea is to make the skirt along with Anna plus her community, Anna gives lots of tips for each day and those taking part comment as they go. I like this idea and am inspired to tackle the skirt myself.
One other inspiration I need to mention  is a great little hold-all bag - used for sewing.


This project is in Anna's book, another good reason to acquire the book ! I really like this site and will be visiting often. The blog has reminded me how much I like sewing but tend to leave sewing projects alone - not sure why ? I'm now inspired to get back to sewing on a regular basis. I have a number of possible projects in my stash already but would love to have this small hold-all bag for sewing. I can see lots of little hold-alls being developed for a number of crafts.

Thanks for reading.
Have a great weekend.

Thursday 25 June 2015

Imitation Game

Hi Everyone
I'm almost there with the Starburst Collection. The red version of the beads is yet to be turned into something but the green and blues have made their way into bracelets and almost a necklace.


I'm slightly disappointed with the green beads, I liked them  better before they were cured. The semi opaque nature of the white clay has muted the colours slightly. I think, a polish in the tumbler and some experiments with a shiney surface will improve the beads. Somehow, they appear to be rather dark ?
My favourite version of the blue is the bottom right, I've used some sterling silver beads to form a mock chain and I think it works well. I also like the shape of the beads. The blue colour merges well with the white and gives a certain richness to the bead pattern which I find pleasing. Amazingly, I do  like the round version of the blue beads and I feel they have improved post curing. I did feel they were not what I had wanted but I'm reassessing my ideas. The necklace needs a few more beads and I'm keen to incorporate some of the red beads. I'm not sure the bead arrangement will stay as it is ? I will play around with some different arrangements before settling on the final piece.

I still have the yellow version to develop (contrary to my suggestions from last week - they didn't happen !) . This week ....... without fail ! I want to finish this project and start the next, so am going to pull out all the stops ! These prototypes will be used for developing new stock. I want to find a reliable way of using focal beads and I like the design using silver beads like a chain. 
All these designs are threaded onto stretch cord which allows for a simple construction without the need for clasps. I like this idea and feel beads are made to be central to the design without the findings getting in the way.

Next week, The Imitation Game will move onto the new piece but I will round up with the finished items from the Starburst Collection before I go.

Thanks for reading.

Wednesday 24 June 2015

Kit Day

Hi Everyone
Today I'm featuring a kit from another site called Beads Direct. It's quite a big outfit with lots of jewellery kits as well as a huge supply of beads and other related stuff. I like the variety of findings and often find myself looking to check out if something is available or give me an idea for developing a design. As I was browsing a few weeks ago, I came across a great bracelet idea which is incredibly quick to make and would be suitable for one of my MAKING groups. However, looking at the cost of the kit - the price (although reasonable) would be outside our range.
 I've been thinking about this all week and am going to try something inspired by this kit but keeping costs down. Here is a quick look at samples of the finished bracelets.


Visit the site for specific details and ordering -  http://www.beadsdirect.co.uk/projects/swarovski-crystal-medley-bracelets/.

I especially like the magnetic clasp (can be ordered separately) and the flat leather in a variety of colours. The Swarovski strip is good too but I'm wondering if can come up with something which will bring the price into our range without losing the simple but attractive look of the bracelet.
In the kit, a strip of Swarovski Elements (sparkly beads in various shapes and sizes) is simply stuck to the leather and the clasps stuck on the trimmed ends. The glue must be good ! I'm going to buy a single kit and test it out and then adapt for the group - if I can find an idea within the budget. Hope you are inspired to look at more of the kits, I'm a regular 'snooper'.

Thanks for reading.

Tuesday 23 June 2015

The Making Framework

Hi Everyone
I'm returning to the detail of last weeks Making Framework : PaperCraft 4 workshop today. The idea of the workshop was to make a greetings card using a 3D little house. I mentioned last week that I would share how to make the basic structure of the card. It's possible to just measure out a shape for each card but I've produced a template using old index cards (the sort used in library card catalog systems, now mostly obsolete). I've had these cards for many years and always choose them to make templates. Having a template allows you to produce a card very quickly and you can spend your time embellishing the card. For this particular template - The Cottage, I've used small (4) index cards. This includes all the walls and the roof (not shown in the first photo).


My intention with the template was to make the size suitable for use with an A4 sheet or a 12x12 ins scrapbook card sheet. I wanted to cut out the cottage walls in one piece. The folded lines are creased into the template after cutting out. Each wall measures 7.4cmx7.6cmThe roof measures another  4.9cm to the highest point. I have made mush larger cards using this template method but add a flat to several walls and glue them together. It's possible to make quite large cards using this method.

I simply used a pencil to draw around the template and cut out the shapes with a craft knife.


I cut off the little flap on the left hand side because I used another tie closure for the cottage (will cover this next time). The basic shape is now complete after creasing the sides and the roof. This little card can look spectacular depending on the embellishments used. The basic shape can also be simply decorated with just a few windows and a door. In the workshop, we (of course) went to town with lots of decorated little extras.
The template can be used many times and is a favourite for a special occasion. I'm using the idea for a number of Thank You gift cards over the next few weeks.
Over the next few weeks, I will share several options for embellishing the little houses and options for closures.

Thanks for reading.

Monday 22 June 2015

Make Art Monday - where am I now (2) ?

Hi Everyone
It's the second week of 'eyes' in the where am I now ? painting. Read back a few weeks of Monday's to understand the background to this feature. 
This weeks eyes are from the character named Alison.

Here she is :
              

This character has full eye shapes and uses her expression to give a view 'inside her head'. Alison is in the centre of the painting and is given a major role in the painting. Her eyes are a little dreamy but I think they can be improved upon. Her colouring has influenced the eyes, perhaps next time I can intensify this characteristic. I would like to place Alison in another context - not sure exactly where or what but I like her form and think I can experiment with the character. My first job is to re draw/paint the eyes a few times to compare the best colours for the bigger job. 

Thanks for reading.


Friday 19 June 2015

Friday Blog Link

Hi Everyone
My blog recommendation today is :

                                           http://sarahstrachan.com

This site is the home of someone called Sarah Strachan, she describes herself as an artist, designer, puppet-maker, crafter and a performer. Read about her impressive work on the site. The site itself looks lovely because of the brilliant photos of her work. It's split into sections which show different aspects of her work. She has an Etsy Shop and a blog too. The blog gives a great insight into how she lives her creative life.
 I especially like her Art dolls work but all her projects look great.  Take a look at her site and you will see an amazing range of beautiful dolls, all her dolls are made with very detailed clothes and props which make the dolls so interesting. She shares lots of little dogs too, make from wool. Her work is responsible for lots of my own inspired dog and doll makes.

Here is a flavour of her work from a Pinterest search :


I love the attention to detail she brings to all her work. I wouldn't consider myself to be a 'doll' person but there's something about Sarah's dolls that draw me in. I think my favourite doll is a Victorian style doll in a iron bedstead with a small quilt - it's a lovely item. Take a look at her site and be prepared to spend ages just looking.


Thanking for reading.
Have a great weekend.

Thursday 18 June 2015

Imitation Game - Starburst Blue

Hi Everyone
Last Thursday, I declared the next element of the Starburst Collection (read back to Thursday episodes for background) was to be the yellow. However, plans have changed over the week and I've tackled the blue (plus a touch of lavender) cane. 
I had decided to make a simple round core bead using transparent clay. The size would be 5/6mm in diameter. The plan went ahead and I used thin slices of the cane to give the beads a veneer, then ....... I didn't feel 100%  happy with the beads. They were OK but I couldn't see myself wearing the resulting stretch bracelet (the initial jewellery item idea). 
Plan B was to turn the cane into lentil beads instead. This works better for me and although I won't get as many beads, I think the lentil shape suits. I quite like the way the lines are off centre and have a slightly abstract pattern. Each bead has a different direction for the stripes but they all, clearly compliment each other. I like this idea.
Here is a quick look at the round beads and their development. I will thread these along with some more transparent seed beads and maybe some very small silver beads. I think this idea can look a little like a chain but retain the elastic characteristic.


The next image shows the lentil beads shapes alongside the rounds and some slices of the cane which have all turned into lentil beads.


I was thinking about keeping the flat round design (far right) and making a threading hole through the centre but eventually decided on the lentil shape. The lentil shape appears on the left of the photo and doesn't look very different in my image but as a bead its flatter and slightly wider than the round. I'm going to thread these lentil beads onto elastic thread and again add some different style silver spacer beads.

Next time it will definitely be the yellow cane. I've already decided to keep the flat shape as per the above right bead. I will go for another bracelet but this time it will have a clasp. I think I would also like to make the beads larger than the current cane size. That's the plan ! 

Thanks for reading.

Wednesday 17 June 2015

Making Kits

Hi Everyone
I'm featuring another Making Kit today - this one is another flower and the kit is called Paper Roses. These flowers are very pretty and look amazing in groups. They look complicated to make but in fact are relatively easy. The first Rose seems a bit fiddly but very quickly you find your own way of building the layers. Here is a look at a finished single Paper Rose


These particular Roses are made using a Paperartsy die and stamp set but I have cut out the basic petal shapes with a pair of scissors and had great success. Each Rose in a Making Kit will have enough petals to build 5 Roses. You could make yourself a template to make more (if you feel inclined). The Paperartsy set has co ordinating stamps which give the lovely grunge look to the roses, it also includes a couple of leaf stamps. The leaves are also included in the Making Kit.
Here are a couple of images to show how the flowers are constructed.


You need 3 petals per flower. Use the leaves as a base for the flower, make an incision in one flower petal ie a snip with scissors into the centre. On the next petal, remove one section (keep the removed bit). With the remaining petal, remove two parts of the petal. You will be left with 5 pieces. With strong glue fold over the petals as above (bottom left image) the 2 smaller sections of the petals are rolled and the smaller one glued into the centre of the next size up. There is a great YouTube video showing how the Rose is constructed, although the video shows different materials being used you can see the process and adapt to using paper. http://youtu.be/zCp0888695o
Once folded, the glued petals now have a pointed end. This needs to be trimmed across and trimmed again in the opposite direction (see image bottom right). After trimming you can press the petal down on a flat surface to build the flower. Encourage the petals to roll backwards, this gives a more realistic Rose look. Glue all the petals together in order of size, finally glueing onto the leaves.

There are lots of possible variations in this kit, each flower will be slightly different and you will find a favourite way of developing your flower. Here is a quick look at some roses I made using a template and cutting out with scissors. The flowers are not stamped and have a very different look.


I hope you feel inspired to have a go.

Thanks for reading.


Tuesday 16 June 2015

The Making Framework

Hi Everyone
The Making Framework is hosting another workshop today. The project today is the 4th in a series of PaperCraft workshops. We are making little houses. The houses are gift cards with the roof giving a space for the greeting (in theory), although messages can be written anywhere and the whole idea of the project is to develop creative ideas with the project. No rules here. 
The basic design is a template and depending on the size of the house, can be formed from a single piece of A4 thin card. Larger houses, as the one in the photo are made up using several sections and glued. The roof is a single folded piece and proportional to the house.
This project is a very simple cut and fold piece in its basic form, although the end product can look very sophisticated. The creative design of the finished house will depend on the range of embellishments used, the creative possibilities are endless.

Here is a quick look at the sample houses created for today's workshop.

                            
Next time, I will give a photo tutorial for the construction and the following Tuesday, I will focus on the internal embellishments. 
I will take some photos at the workshop later today and share a flavour of the range of little houses we come up with.

Thanks for reading.

Monday 15 June 2015

Make Art Monday - Linda

Hi Everyone
It's Monday again ......... and Make Art Monday is featuring a relatively old painting today. I'm still working on 'eyes' !  ......... and I wanted to concentrate my efforts on painting more  'eyes'. I started looking for a project which would allow me to do this.
Last week, I found myself thinking of a painting in my house. I think this should help in the 'eye' development thing. I will take an individual character (from the painting) per week and feature her eyes.Today, it's this character, her name will be Linda.


The painting is quite a few years old and although the eyes are not especially detailed or particularly well painted they are central to the painting. There are four women in the piece which help tell the story. The eyes are therefore key to how the painting can be 'understood'. It's quite a sad story (for me) and I'm hoping I can add more feeling to the characters by studying their eyes in more detail. Some of the new paintings will be large and some small. All these things are relative but my 'large' will be the biggest piece of wood I can manage (easily) on my easil. I have an ambition to paint 'big'. 

 I like the painting, the colours, the texture and the shape of the painting. Over the next few weeks, I'm going to develop another series of paintings, featuring each character and developing some of the characteristics of the original. I'm calling the collection 'to be' -  'Where am I now '. 
The original piece is painted on wood with a mixed media approach. The dresses of the characters are developed from paper and the paint is mostly acrylic with various acrylic mediums. I will develop the new pieces on wood and again use acrylics with  paper. I'm not sure at this stage, how many additional paintings will develop ? but I would like to eventually use some of the images I produce for fabrics and prints.

Over the next few weeks, I will feature the progress of the work. I'm hoping I can improve the eyes of the characters and use my 'eye' observations to add a new dimension to the story.

Thanks for reading.

Friday 12 June 2015

Friday Blog Link

Hi Everyone
It's my Friday Blog Link today, only the second blog in this new series. I'm sharing specific blogs that I find interesting and have a common link in some way with my blog. I'm inspired most days by reading something on a blog. It's one of the amazing things about the making community ie their wish to share and spread ideas. I don't want to limit the scope of my blog recommendations, so if I find something outside the usual subject matter, it
will be welcome. If anyone would like to recommend any blogs please get in touch (either here in the comments box or via Facebook - link also here on the blog).

So, today I'm recommending 

             http://abeautifulmess.typepad.com

I've known this site for many years and it's evolved into a great resource blog for lots of making related things. However, blog is more than making and talks about lifestyle and lots of other varied projects. The blog is called A Beautiful Mess. Today, for instance, they are dealing with a particular take on felting (a huge favourite on this blog). They often include very simple and accessible projects which I like and many of their makes are bright, colourful and 'on trend'.
The site is well organised and the girls that run the site are sisters, Elsie and Emma. I first noticed Elsie many years ago via scrapbooking and have one of her books which I still use now and again for ideas. Take a look at the blog for background about the girls and the range of material they offer via an online shop.
The photography on the site is good and makes all their projects look inviting. I find myself developing ideas from the site for myself and taking them a stage further.
The girls also have a couple of Apps, one in particular called ABM is the most used app in my collection of apps. I use it daily and I could not work without it. Thank you to ABM.


I hope you will visit the blog and get some inspiration.

Have a great weekend. Thanks for reading.

Thursday 11 June 2015

Imitation Game

Hi Everyone
I'm sharing the development of the Starburst range of beads today (as part of my Imitation Game series) and I've chosen the red Starburst cane next. Read back to previous Thursday blogs for background on this feature.
The shape of the beads with this cane created a problem for me, my usual starting point is to make a quick sketch and the ideas tend to flow. However, on this one my process didn't work and I seemed to have dried up ! Finally, I decided to reduce the cane from 3cm to 2cm in diameter, mainly to give me more beads but also as I just couldn't decide on a suitable bead shape or end jewellery piece in the larger size. Here are a few photos showing the development.


(1) - my starting point and my quick sketch, this cane is the 3cm diameter size
(2) - shows the length of the cane, before reducing -  only 4cm
(3) - I've now reduced the cane and its 2cm diameter and still round in shape but much longer (approx 8cm)
(4) - bead is more of an oval shape and the hole is created by placing a toothpick between two slices


So, here we are with the Starburst 2 bead design. These beads will make up one of my stretch bracelets with a silver knot cover.  I will add a little silver charm (this will be made from scratch). The charm is still in design stage and I'm hoping to complete for next time. My charm idea is to reflect the star shape of the bead.

Next time will be the yellow cane. I'm not sure what will develop ?

Thanks for reading.

Wednesday 10 June 2015

Kits - Paper Flowers (2)

Hi Everyone
Our kit for today is a pack of Daisy Paper Flowers, kit (2) in the flowers series. This kit will make a range of  simple layered Daisy flowers using various sizes of petals. These petals are versatile - they work well as a simple flower for cards and Scrapbooking. The layered and curled petal is also a good option for a decorated gift box.

                                
The petals also build into quite a substantial flower if constructed onto wires and bound with florist tape (I will be featuring this in a few days). Generally, these kits are incredibly useful for lots of embellishing.

The kits includes twenty petals with an option to add more. The patterned papers are scrapbook weight and there are five heavier cardstock weight. Each pack contains co ordinating round shapes to act as a centre for the completed flowers. Kits are created with a core colour in mind (available at order point) all packs are different so a unique 'make' is the result every time. Finished flowers measure 8cm ,6cm and 4 cm in diameter.


Flowers may need some form of centre, so the kits have a selection of round shapes for the job. Each pack will contain ten different sizes and finishes to co ordinate with the papers/cardstock.


I hope you are inspired to have a go with the kit. Kits will appear in the shop before the end of the week. Look out for another blog on the wired stem flower - coming soon. 

Thanks for reading.

Tuesday 9 June 2015

The Making Framework Revolution

Hi Everyone

If you are following this regular Tuesday blog feature, you will know that we enjoyed a PaperCraft workshop last week in the Making Framework. Here are a few photos of some of the little boxes we made :


The group made a great job of making the boxes as well as a few little paper flowers for embellishing.

Next week, we will hold a final week of PaperCraft in a series of four workshops. Week four will make a greeting card which creates a 3D house or cottage. The idea is to remove the roof (which provides a place to write a message) to reveal a decorated little house interior. The little house folds flat to fit in an envelope and is a great card for lots of different themed greetings. I'm hoping each member of the group will create their own theme. I will feature a sample card as well as all the Maker cards next time. Kits will be available shortly in my shops.

The Making Framework is continually extending the range of craft projects we offer. Here is a list of the current tried and tested project crafts we have trialled in our workshops :
         Polymer Clay for jewellery (7 kits)
         Felting - wet and needle (2 kits)
         Decoupage (2 kits)
         PaperCraft (4 kits)
Coming up next Scrapbooking (2 kits)

These kits will be available via the shops over e next few weeks.

Central to the concept of the Making Framework is a self development idea. Makers are encouraged to have a go with a range of crafting projects, especially projects which are new to the Maker. There is a strong suggestion that by 'cross making' with different craft skills our Makers are developing an overal skill set which helps practical as well as personal creative development. Along with these practical skills, confidence and entrepreneur ideas are forming. All our Makers are inspired and energised after working in the Making Framework sessions over the year. Ultimately, the idea is that the developing Maker becomes a Maker Champion and creates their own projects for others to try. There is evidence within our group that it's happening already. The revolution has started !


Thanks for reading.

Monday 8 June 2015

Make Art Monday

Hi Everyone
My Make Art Monday feature today is an old painting that I'm working with to help me with my 'eyes' project. I'm working on developing my eye painting skills and am looking back at previous work for extra ideas. I like the eyes I gave to a painting called Mary Haversham. Here she is :


Mary's eyes are drawn in pencil, coloured in wax pencils and layered with acrylics. I want to be able to create a similar style with water colour, so that's what I'm going for later today.

Here's a closer look at the detail :


While browsing Pinterest Boards - I saw a great photo  - I love this idea and am thinking of putting all my eye experiments together to form such a collection. 


Thanks for reading.

Friday 5 June 2015

New - Blog Link feature.

Hi Everyone
As of today, Im starting a new feature for Fridays. This new feature will be called Blog Link. Each Friday I will recommend a blog. The blog will be something I've found myself for a particular reason or a blog that someone else has pointed me to look at. I will explain why I'm including the blog and the specific feature from the blog that interests me. I often find great ideas or techniques to share via blogs. I hope you will too.

Today's recommendation is a blog called Flamingo Toes run by someone called Bev. It's got an interesting organisational style and looks very attractive.  There's lots to look at and I keep finding news things as I use the blog. The blog is described as a creative blog. In the sewing section there are links to a crochet page. The specific post I'm looking at is : http://www.flamingotoes.com/2014/07/21-cute-quick-crochet-projects/. This post is all about mini crochet ideas. The reason I was interested in using this post was to keep practicing my crochet skills in order to make some little crochet clothes for some of the recent felted dogs. The small projects are just right for me at the moment.

One of the little projects I especially like is a crochet bow bookmark. I'm not sure why I need a few of these but I do !!


I've never been a skilled crochet person but I do enjoy the crochet process and will definitely be trying out a few of the ideas featured in the post. I get a great feeling of satisfaction when I complete a crochet project, it's a bit out of my comfort zone (at the moment) - I'm hoping this will be a short term thing. Trying out new skills and/or techniques definitely helps develop a high level MAKER. My ultimate ambition !

Take a look and try one of these projects out for yourself.

Have a great weekend. Thanks for reading.

Thursday 4 June 2015

Imitation Game Starburst 2

Hi Everyone
Last time I posted with the Imitation Game Starburst, I had a difficult issue with technology and was forced to cut short my developments news. Hopefully, all is well today and I can share the outcomes so far.
In addition to my technical issues, I've also had trouble of another kind trying to decide on the shape of the beads I wanted to develop. This problem extended to the actual jewellery piece  I want to create. I do know I wanted to use the Starburst design as a key characteristic of the bead and this narrowed down options because the Starburst design needed to be on show. So many 'unknowns' ! 
Ultimately, I've resolved some of my issues and created a range of sample beads. After  baking them, I will spend some time 'playing around' with different combinations. So far, this is where I am :


The bottom left photo shows two beads which will become stud or dangle earrings (another decision to be made). At the moment, I'm thinking the beads will form a necklace on stretch thread ......... but maybe not ?

Next week we will know how things turn out.


Thanks for reading.

Wednesday 3 June 2015

Kits - Paper Flowers - Fleur

Hi Everyone
There are three different flower design kits available, each with very different construction techniques. All three are die cut shapes although one of the designs can be hand cut to give a professional finish. This kit will be available (to order) in the shops by Friday.

I'm highlighting the first flower kit today ie Paper Flowers From Scratch (1). This flower is a rosette style flower which I'm calling a Fleur. 

                              
The photo story shows the development of the Fleur which starts out as two long lengths of concertina paper and two round circle shapes. The lengths are paper are folded and glued at each end. The resulting round shape is then pushed flat and secured on both sides with the paper circles.
                               

The kit comes with enough papers to form five individual Fleur flowers in a variety of patterned and plain papers. These flowers are very easy to make and are very useful for gift embellishment or scrapbooking.
Hope you are inspired to have a go with these very simple flowers. Next Wednesday's post will feature a few ways in which to use the Fleur Flowers.

Thanks for reading.

Tuesday 2 June 2015

The Making Framework

Hi Everyone
It's another workshop day today for The Making Framework. Read back each Tuesday for more detail on The Making Framework. Today, we have a Paper Craft Session (3rd in this series)


The main focus of this workshop is making Gift Boxes from scratch. All the papers/card are organised into little kits (available via the shops) by the end of the week. In addition, we will make some paper flowers - hopefully these flowers will be additional decoration for the Gift Boxes. I will share some photos of the boxes we make after the session.

The idea behind this particular session is to develop the paper working skills of the group as well as develop future packaging ideas for  craft items produced in the workshops. I will let you know how things go.

We have a limited number of places available in the workshops - if you are interested in joining the sessions please get back to me via the comments box or via Facebook (link below)

Thanks for reading.

Monday 1 June 2015

Make Art Monday - Eyes

Hi Everyone
I've had a break for half term and had intended to post a few photo stories. However, we have exams going on in our house and all plans are disrupted ! Life seems to be on hold for the whole family. It will soon be over, for now !!

Today, it's Make Art Monday again and I've been researching and experimenting with 'eyes'. The eyes for today are part of four paintings from my collection, previous paintings done over about four or five years. These eyes are minimal in terms of detail. They fit the paintings but I want to try and develop the shapes and colours for a larger, detailed view of each eye. I'm going to re work each eye and practice an upscaled, detailed version using these original examples as a starting point. I've made a new book for the job. It's a handmade book with simple white pages, sewn together and will concentrate on facial features. I like Feel of  this new book and am especially keen to show stages of my developed paintings.

Here is the range of eyes I'm using :


These eyes were drawn and coloured then painted with was pencils and acrylic paint. Over the next few Monday's, I will share my progress.

Thanks for reading.