Search This Blog

Popular Posts

Friday 28 February 2020

Sewing Idea Update

Hi Everyone 
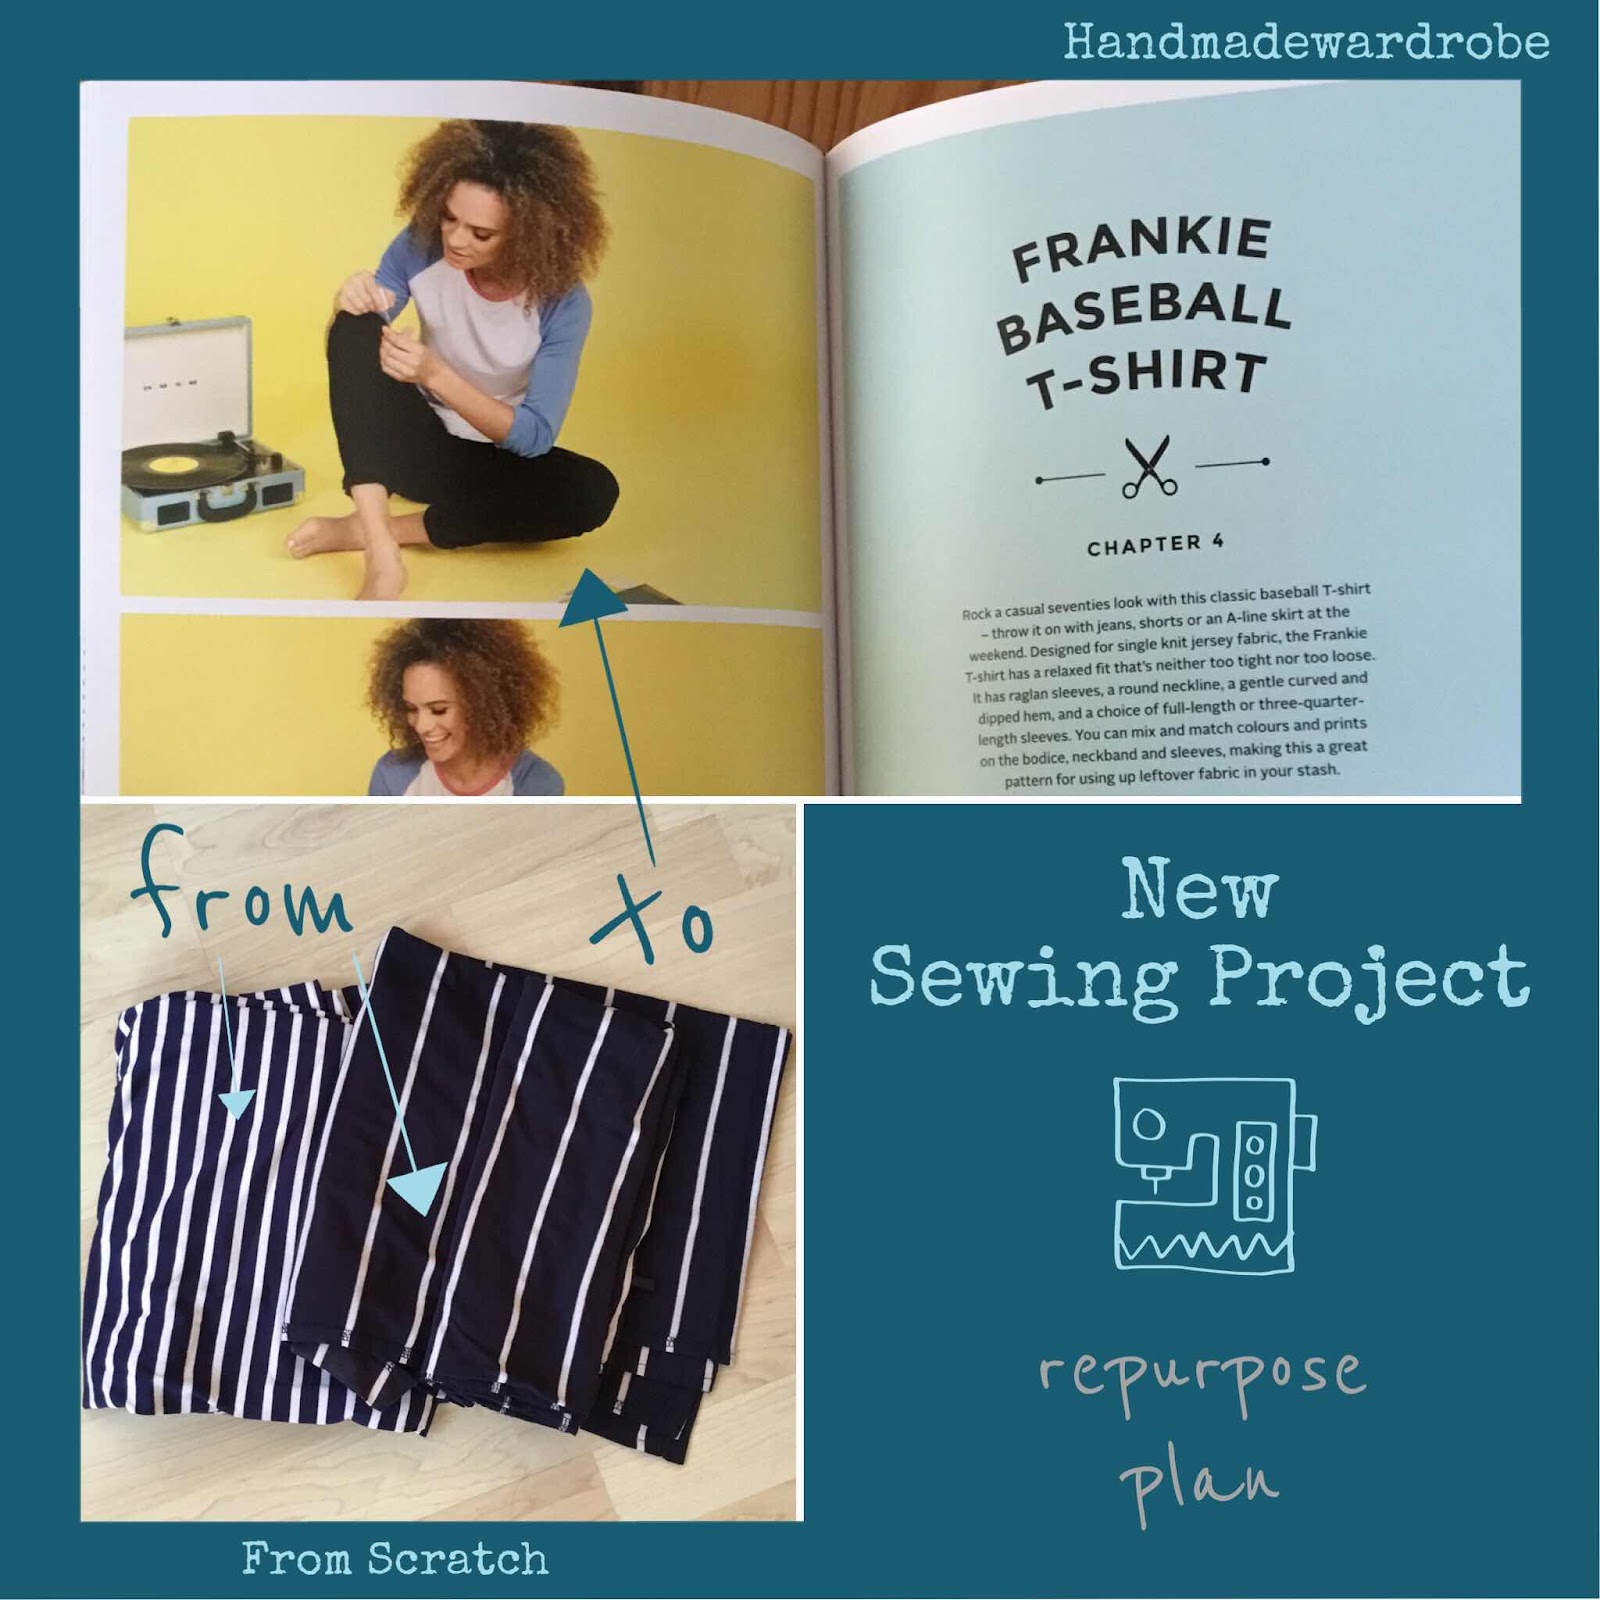
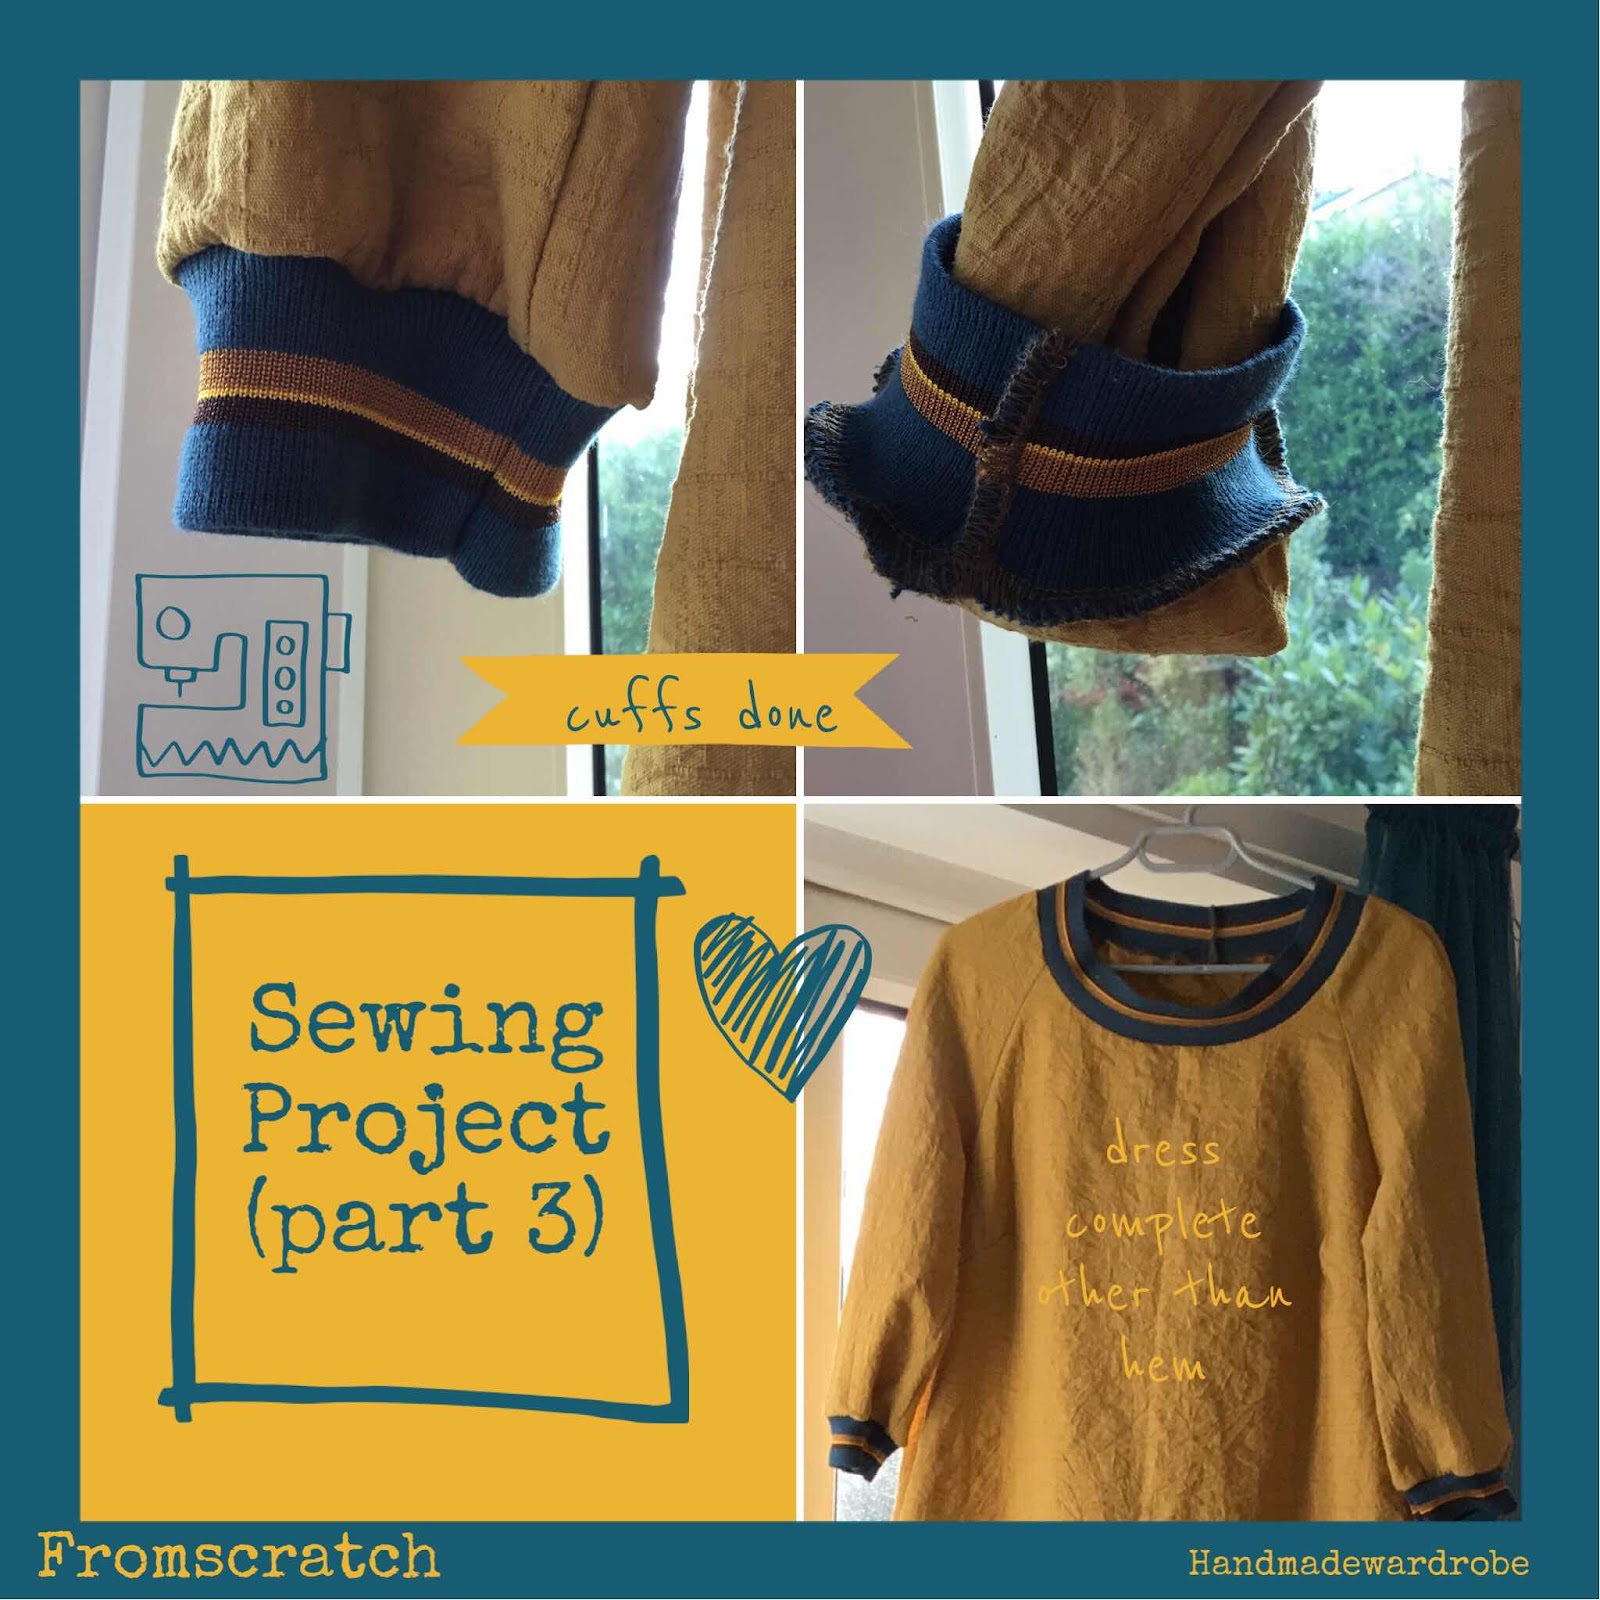
 Today, I’m sharing my completed Baseball T shirt by Tilly And The Buttons. You can read a couple of posts earlier this week for more on the background to this story. Generally, the project worked really well. The whole project is a very simple sew. I used my overlocker for most of the sewing. There are only 5 pattern pieces involved. Each sleeve is sewn to the front and back pieces. The neckband is then added and the hems completed. That’s it !
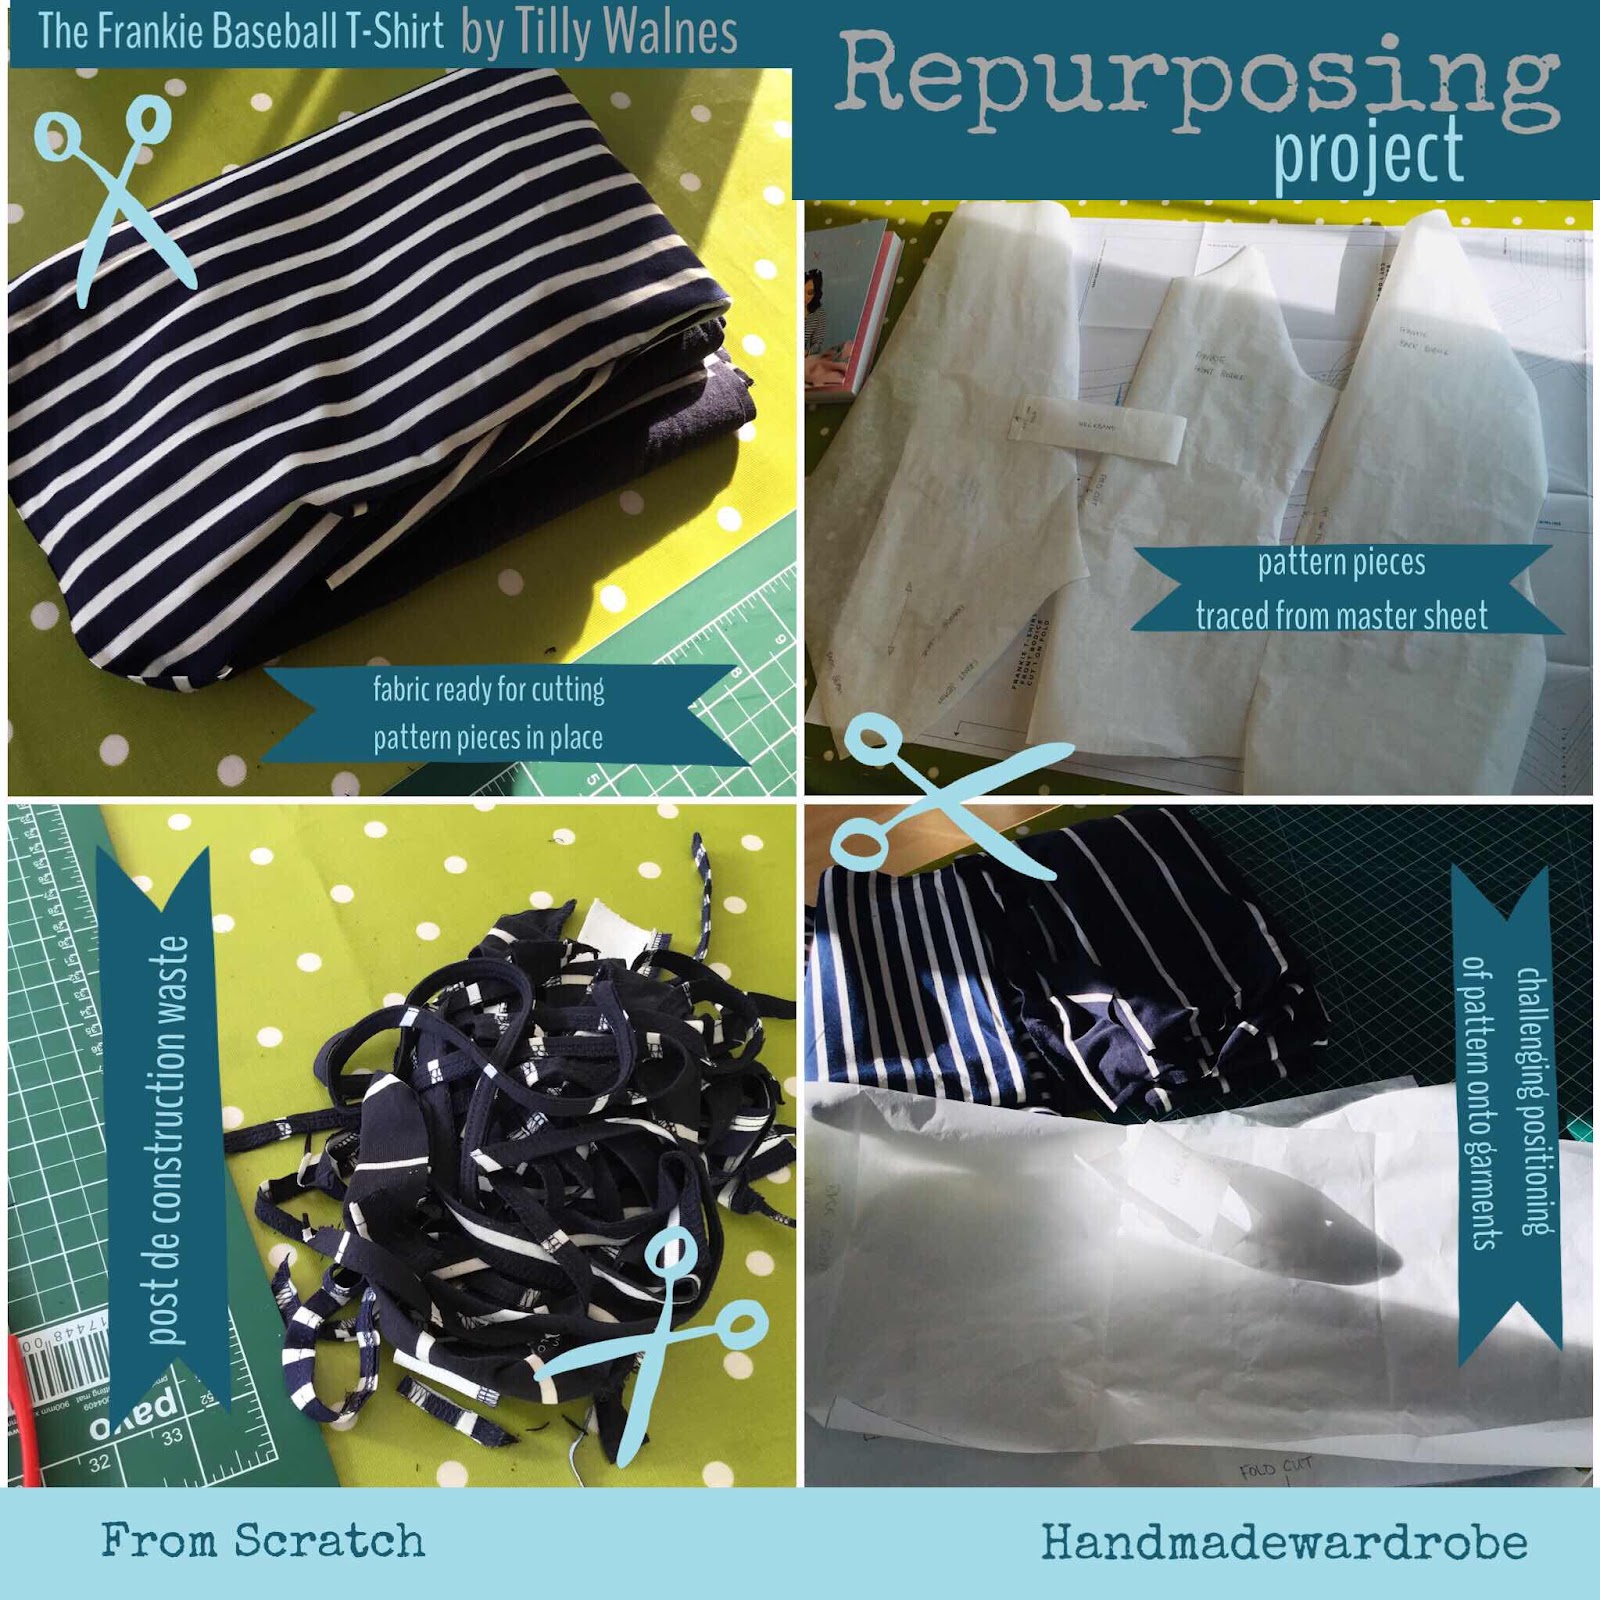
The point of this project was to repurpose a couple of old and discarded items of clothing. The original garments were made from lovely striped jersey fabrics and I knew I could do something with them both. I envisaged, a T shirt, which could be a useful part of my wardrobe. I have lots of ideas for layering my new T Shirt, it’s a very useful ‘blue’. Most of my wardrobe tends to be either blue of will work with blue !


The cut of this design is very nice - the T Shirt has a flattering neckline and a well balanced body shape. I will definitely be making more of this design.
I have a number of jersey fabrics in my stash and am already working out some interesting combinations. 

Thanks for calling in today. Have a great weekend, I’ll be back on Monday with more Making stories.


Thursday 27 February 2020

Silver Sample (27/2/20)

Hi Everyone 
This weeks a Silver Sample is a ring. I’m calling my ring the Seed Pod Ring. 


I’ve created the Seed Pod Ring using four strands of 1mm Sterling Silver. I’ve soldered the lengths of Silver in the centre and shaped them around a ring mandrel to form the beginning of a ring shape. Initially, I’d thought about winding one of the Silver wires around the others to form a ‘bunch’ of Silver strands. There are 8 strands in total. However, the loose strands were not long enough to wind around the others, so a plan B was necessary. I decided to create a closed jump ring to slip over the strands and this worked well. With the strands in the centre, each strand was ‘balled’ with the application of heat to each strand and spread to a pleasing position in the bunch. I worked to further shape and size the ring and finally tumbled to give a high shine.
Here’s a quick look at some of the stages of development:


I’m already thinking about additional elements for this Collection, perhaps earrings and a necklace. I’ll hopefully have something to share next week.

Thanks for calling in today.


Wednesday 26 February 2020

Sewing Idea (2)

Hi Everyone 
I’m sharing a tiny bit of progress with my latest sewing project, read back yesterday for the background story and images of the Make. I’m making the Frankie Baseball T Shirt by Tilly Walnes of Tilly And The Buttons fame.
My project involves repurposing a couple of old pieces of clothing into the T Shirt. I have used a skirt and a dress, both are full length and summer-type garments. Both are drapey, jersey fabrics in similar Navy and White stripes.


I’ve traced the T shirt pattern from a Master sheet, part of a book called Stretch by Tilly And The Buttons. Initially, I simply placed the pattern pieces onto the wearable garments. They didn’t fit ! I did wonder if there was enough fabric ? However, having deconstructed the skirt and the dress, I’ve now  easily fitted the pattern pieces onto my fabrics. The front and back bodice and the neckline will be made from one fabric, previously the dress. The sleeves will be made from the skirt fabric. 
You can see there is a small pile of waste (bottom left image) fabric but I’m happy with how much of the fabric has been used. There will be some fabric left after making my T Shirt and I’m thinking about using the leftover stuff for a few new mini Makes. I have a few ideas. I’ll share these ideas over the next week or so.

Today, I’ll cut out my T Shirt and possibly sew it up ? I’ll record progress as it happens.

Thanks for calling in today.


Tuesday 25 February 2020

Sewing Idea

Hi Everyone 
I have a new sewing project to share today. This time, I’m repurposing a couple of garments from my wardrobe. The items are a couple of simple, sleeveless dresses which have been waiting for something to happen to them. The dresses have always been a bit too big for me, I’ve been meaning to alter them. Each time I start the job, I think, I don’t really like the style. As a result, they have been sitting and waiting for something else to happen ! 

              
The fabric is lovely, a traditional navy and white striped jersey, very soft and beautifully drapey. After, lots of thought, I’ve decided to make the dresses into a Frankie Shirt from Tilly And The Buttons. The pattern is part of her Stretch book. I haven’t made this pattern before but I think it’s quite a simple Make. 
My plan is to use both striped fabrics for different parts of the shirt. I’m not exactly sure about how I will cut the pieces yet ?, I’ll wait and see how the pattern looks when placed on the fabric. There will be fabric leftover and I may find, I have enough for a second (short sleeved) top. I’m hoping, I can use my overlocker for most of the sewing and the project will work well.
I’ll take some photos as I work on the project and share over the next few weeks.

Thanks for calling in today.


Monday 24 February 2020

Earring Tales

Hi Everyone 
Today, I’m sharing another couple of earring samples from my recent experiments today. This little project has a way to go but I’m happy with the samples produced, so far. I’ve focused on small ‘everyday’ earrings in terms of size and am trying out different coloured enamel paints for the finish.


The navy earrings (bottom right) are approximately 17mm long and the white earrings (bottom left) are x- shaped, almost stud earrings (around 4mm across). I’m wearing the samples to check the durability of the paint job and so far all is well. The paint has an even coverage, I dipped the components rather than painting them and the surface seems to have dried ‘very hard’. I want to see how the earrings will stand up to wear and tear for a while.
I’m especially keen to make some more shapes and try some different colours. I have a mustard yellow colour, in mind as well as a red and green. I’ll be checking out paint options later today. 

Thanks for calling in today.


Friday 21 February 2020

Knitting News

Hi Everyone 
I have a very exciting new knitting project in my queue. 

                    
I’m knitting a second tarasgeir by Flora Kennedy. This time, I’m using the wonderful Uist Wool, in the Calma colourway. Close up, the yarn looks ‘brown’ but  from a distance is could be ‘black’. It’s a very rich shade with lots of tiny ‘silver’ single hairs, I love it.
My previous tarasgeir was hacked (by me) to give a dropped shoulder rather than the fitted version in the pattern. I will knit the true pattern, this time.

I do have another Uist wool project in my queue, the Lovage sweater by Flora Kennedy. This has been waiting for around eighteen months ! Check out the project here. I’ll be starting this project after a I’ve finished my current sweater, St Catherine cardigan by Kate Davies. Check out this project here. I’ve had a few issue so I’m not done yet ! So many sweater to knit !

Thanks for calling in today. Have a great weekend, I’ll be back next week with more Making stories.


Thursday 20 February 2020

Jewel Sample (20/2/20)

Hi Everyone 
I have a completed set of the prototype earrings from last time. This is the copper/enamel version which has been dipped in enamel paint.


I’ve given the earrings a small Sterling Silver post with a Butterfly Back (not shown in my photo story) rather than the longer post. I’ll be making a second version with the longer posts. 
I’ve used a white, gloss enamel paint for this job and I’m reasonably pleased with how things have turned out. Drying the paint takes 24 hours and I wasn’t sure about how I could support the earrings while drying. However, I thought about my Third Hand Tool and it was perfect for the job. The finish of the enamel is pretty and I love the white colour. Not everyone will go for a mismatched set of earrings but it’s just the sort of thing for me ! I have some similar navy enamel paint so will choose a navy colour for my next experiment. Next time, I’ll make ‘o and x’ shapes with short posts, quite small components, I think ?
I do have some Sterling Silver components ready for this (mismatch) design and will think about using enamel paint on the design,  not a total immersion, probably a partial dip.

Thanks for calling in today.


Wednesday 19 February 2020

Sewing Project (part 3)

Hi Everyone 
It’s almost the final part of the latest sewing project, the Fielder Dress by Merchant&Mills. You can read back a few days worth of blogs to get more on this project.
 I completed the cuffs yesterday and overlocked the hem, ready for turning up. I’m not sure about the length ? I need to try on my dress with a few different combinations as well as testing out shoes. Hopefully, I’ll do that later today. Also, I did suggest needing to add a stitch line to the sides seams, yesterday. I didn’t do this but am still thinking it could be a good idea. I feel, there could be a slight possibility of the overlocked seam stretching and showing on the right side. I did have slight issues with my overlocker coping with the thickness of the fabric. I’ll decide when I try on my dress.


Generally, there were no issues with the cuffs. I used the usual method of adding stretch elastic to an opening. I stitched the elastic into a ring, the pattern told me what length I needed. I divided both the fabric of the cuff and the elastic ring into quarters and placed a pin on each quarter mark. As the two pieces come together they meet at the pins points. I started machining the elastic in place, stretching the elastic between pins as I stitched. This stops any puckering. All is well and I’m happy with the results.

I’ll get some images of me wearing my dress when I check for the hem length. I’m already thinking about new ways of using my Fielder pattern. I have some lovely stretch jersey which will make a great tunic length Fielder.

Thanks for calling in today.

Tuesday 18 February 2020

Sewing Project (part 2)

Hi Everyone 
I introduced the Fielder Dress project yesterday, read back for more details on the pattern and fabric. Yesterday, my job was to sew up the side and underarm seams (including a side seam pocket). I did manage this job. However, the very simple task took forever ! I think, it’s to do with trying to overlock several layers of fabric which includes previously overlocked seams (very bulky in places). The trimmed fabric (from the overlock process) wanted to get between the blade on the overlocker. I did consider a plan B, ie overlocking the sides (to give a neat finish) and then sewing up the seams in the conventional way. In the end, I did manage to complete the job on the overlock machine. I’m still wondering about adding a single line of stitching along the overlocked seam. For some reason, I’m convinced the overlocked seam isn’t as secure as I’d like ? I’ll take another look today and check it out. Other than, the machine issue, all is well. My next job will be adding the cuff. I had thought, I could have finished this yesterday - not to be !


Hopefully, I’ll get the cuffs onto my dress today. This should be quite a quick job, famous last words ! The neckline uses the same elastic and the technique worked very smoothly, so I’m reasonably confident the cuffs will be similar. After the cuffs, it’s just the hem. 
I’ll share how the cuffs go, tomorrow.

Thanks for calling in today.


Monday 17 February 2020

Sewing Project (part 1)

Hi Everyone 
I have a new sewing project to share today. I started the Merchant&Mills Fielder Dress over the weekend and am well into the process. This project is one of my Christmas presents and it’s been patiently waiting for me to get going. I cut out all the pieces, sleeves, front, back and pockets with elastic cuff and neckline, not too complicated ! The front has a couple of bust darts and the back has no fitting. The sleeves do have some lovely shaping over the top of the arm part, using quite a deep dart. This gives a very nice line to the top of the dress. The sleeves fit into the neckline with a raglan style design. Generally, the dress is elegant but very simple.
I’m using something called Double Gauze Revolver fabric in a Mustard colour, again from Merchant&Mills. The fabric is beautiful to work with and I love the colour. The fabric is woven and I did wonder how to cut my dress, regarding the fit ? In the end, I cut a size 10 top section and graded out to a 14 below the pockets. I knew there would be no give in the fabric so didn’t want the hip line to be very tight. As it turned out, the 12 would have been enough and I ended up taking in the bottom part of the dress. I basted all the bits together before overlocking the seams.  The initial fitting was perfect and I’m amazed at how good the fit was. I tend to err on the side of caution with sizing and often make a garment which is much too big, often disregarding all the finished garment measurements ! However, on this occasion, everything turned out well.


I’ve got quite a bit of the project completed. The front, back and sleeves are all attached, I’ve added pockets to the sides seams and attached the neck rib. My next job is to sew the sleeve and side seams (including the pockets) to complete the main garment. 
Tomorrow, Ill share the detail of the neck band and sleeve cuffs - if I can find some time to work on my project today ?

Thanks for calling in today.


Friday 14 February 2020

Knit Update

Hi Everyone 
Today, I’m sharing progress with my latest sweater knit, the St Catherine by Kate Davies. As my photo story shows, this is my second St Catherine.

              
This time, I’m using a different yarn. My first version used a sports weight yarn and the whole project was a ‘breeze’. I’ve had a bit of a trial this time ! I’m using a 4ply merino half together with a Kid Silk. You can check out my initial post introducing the project here, where the yarn is highlighted.
So, I think, the problem lies with the size of the needles and the combination of yarns. It’s not a big deal but I’ve pulled out the project three times. I wanted a soft and slightly drapey fabric for the cardigan and as such have chosen to use 5.5mm needles. I think, I’ve managed to get the dimensions right in my latest version. 
There has been frustration about progress. I feel, I’ve wasted quite a bit of time re knitting the first section of the cardigan. There are quite a number of stitches in this section and it’s been necessary to spend a few days worth of knitting time on each version ! However, moving on, I think all is well. I’m about 3/4 of the way through the first section. St Catherine is a very clever construction and I love the way the separate parts build up a beautifully, fluid shape. The next bit will be the back and I’m hoping I’ll be there in a few days.
I love the colour and texture of the new cardigan, I’m already thinking about sewing projects which I can start to compliment my new cardigan. I don’t have many green items of clothing in my wardrobe so lots of new opportunities.

Thanks for calling in today. Have a great weekend and I’ll be back next week with more Making stories.


Thursday 13 February 2020

Silver Sample (13/2/20)

Hi Everyone 
This weeks Silver Sample is still in the design stage. I’ve done a preliminary sketch and made up some copper prototype samples. I produced the copper components simply to assess the size and I’m happy with each component. The idea with this design is to produce something which is alike rather than the same. I’ve decided on an overall size of earring and made up slightly different earrings, using different sized flattened rings. The prototype copper rings, have not been flattened or soldered yet.


My final plan is to attach two Sterling Silver smaller (pebble shaped) rings together, to form one component. This will be equal (in size) to one larger ring. I’ll attach long Sterling Silver square hooks to the top of each component. I’ll also make a second pair of earrings with small, short ear posts. Both sets of earrings will be relatively small, I’m not especially comfortable with large earrings. I feel there are lots of large earrings (on the market) in the style of my samples so my aim is to produce something on a smaller scale. I’m hoping one set will be for me !  The pebble/ring components measure around 2cm, so quite small.
I’m also going to use the copper components in a third pair of earrings. I’ll give the earrings Sterling Silver (short) posts and add enamel to the copper, I’m not sure of the colour, at this point ? I’ll share the final items, next time.

Thanks for calling in today.


Wednesday 12 February 2020

Fabric Design

Hi Everyone 
I’m talking about fabric design today.
I’ve dabbled in fabric design a few times and have a number of my designs on fabric, particularly my Miss Mitchell designs. My latest experiments with fabric design have come to the stage where I need to make some decisions about where to go next. Ive been working with more abstract designs and have produced a number of acrylic prints, which appeal to me for dress fabric. I‘ve narrowed down a selection of two designs and now need to decide on the type of fabric I’d like to go for.


As you see from my photo story, I have two pieces which are framed and on the walls (top right and left). I’m especially drawn to the design (bottom right). These colours are muted blues and browns, I love the combination and can see a dress in this fabric. However, I also like the yellow/mustard tones of the alternative (bottom left). Both framed pieces are in my eye-line everyday and has prompted me to move on this idea.
Custom printing with fabric is quite an expensive thing, so I want to be sure about which fabric and how much money I want to invest in this project. Initially, I was thinking about a cotton jersey and a tunic of some sort ? However, I’m now moving towards a cotton lawn and a dress, possibly lined ? I think, I need to acquire a few swatches before making my final decision. 
I’m also looking for a suitable dress pattern. I want to be sure about my decision before committing to the fabric run. I’m hoping, I can complete my research over the next week or so. I’ll let you know how I my decisions go.

Thanks for calling in today.


Tuesday 11 February 2020

Boxy T Shirt Two

Hi Everyone 
I’m sharing my second Boxy T Shirt today. Check out yesterday’s blog for details of the first. I’m using a pattern from Makers Atelier as a basic template for this project, although the final T Shirt is a very different garment. I had thought I was finished ! However, I’ve been test wearing the T shirt around the house ( only for an hour or so) and have quickly decided the sleeves need a bit of work. Here’s a quick look at the current T Shirt :


The sleeves look OK (for me) in the photos but as I move around and get on with life, they are too long and not quite tight enough to stay in my desired position. I was finding myself fiddling around with the bottom of the sleeves, most of the time. I had thought, I could take in the sleeves, slightly, to use the width of my arm to keep the stretchy fabric, in place. This is a minor issue but will make quite a difference to the T Shirt.
I like the boat style neck and the boxy shape of the T Shirt. I also like the length of the T Shirt, I usually go for a cropped length because I feel it suits my body shape but this time the boxy shape gives a nice profile to the garment. I love the colour of the fabric and the tiny stripe detail of the pattern.. The only issue seems to be the lower part of the sleeves. So, I’ll cut off the current sleeve hem, take in the sleeve seam and re hem. I will try unpicking the hem first, I have a feeling the stitching will have damaged the fabric of the current hem. Hopefully, my new T shirt will be perfect in a day or so.

Thanks for calling in today.


Monday 10 February 2020

Boxy T Shirt News

Hi Everyone 
Last week I introduced a couple of examples of the Boxy T Shirt project. You can check out my original posts here and here. I’d already completed the basic construction of the first woven, blue sample and was about to start a stretch version in a green and white stripe ( more about version 2 tomorrow). I’m almost done with both. There have been a few issues ! I made quite a few changes to the pattern for both T Shirts. The blue version was recut in a few significant places, the neck and the sleeves needed to be changed, quite dramatically but I’ve finally managed a reasonably good fit. One of the optional features of this version of the Boxy T Shirt is a folded ribbon detail. This attracted me to make the T Shirt in the first place, so quite an important feature for me. So, I’m there - I have all the ribbon sewn in place and only need to remove the basing stitches.


I’m happy with the results of this project. I adapted the methods suggested in the pattern instructions for getting the ribbon onto the T Shirt, it looks a very simple task. However, not the case ! The instructions from Makers Atelier suggested ironing the folds and applying directly onto the T Shirt. I found this very difficult. I tried a few different approaches and produced a few samples (see my final sample method top left image). Eventually, I worked out a method of folding, pinning and basting to the final position. I then, used my sewing machine to attach to the T Shirt with a single, straight stitch down the centre of the folded ribbon. The result is quite dramatic. I wanted to achieve random folds (of the ribbon), again not as easy as it sounds ! 
The T Shirt is a very simple design but I like the fabric choice, the colour is a wonderful blue and the folded ribbon is the stand out feature. It looks quite dramatic but very simple. I feel the top can be dressed up or down to suit many different occasions. I can’t wait to get the final basting stitches out so I can wear my T Shirt. I’ll get some images of me wearing the garment later in the week.

Thanks for calling in today.


Friday 7 February 2020

Silver Sample (7/2/20)

Hi Everyone 
It’s Silver Sample day today. I try each week to bring a prototype Silver piece of work to the blog. This time it’s a necklace. 


This piece is very simple but I do like it. It’s very easy to wear. The necklace is very casual but could look good to compliment a plain more dressy outfit.
I’ve used Sterling  Silver for the linked rings. One ring is slightly smaller and allows the necklace to sit nicely when worn. I’ve added quite a long Stainless Steel chain with Sterling jump rings. I’ve given the two rings a bright, shiney polish. That’s about it, as a description. However, since making the necklace, I’ve had lots of ideas about how I can change the components. I’d like to add more rings and link the rings in different ways. I’d also like to change the finish of the rings. 
Here’s a quick look at the necklace in action :


Thanks for calling in today. Have a great weekend, I’ll be back next week with more Making stories.


Thursday 6 February 2020

Another Boxy T Shirt

Hi Everyone 
Earlier this week, I introduced a Boxy T Shirt project - check out the details here and I mentioned plans to make a second. Ive found some lovely stretch jersey from (deep in) my stash. This is a fine green and white striped fabric. I did have issues with the fit of my first Boxy T Shirt, mainly to do with using a woven fabric. The first shirt was much too tight in certain places ie the neck and the arms. I’m certain this will not be a big issue for a stretch fabric, however, I’ll be measuring the crucial details carefully.


I’d also like to change some of the details of the pattern. I’m thinking about a boat neck feature and a split hem. I’m also going to lengthen the T shirt slightly, both the body length and the sleeves. Hopefully, I can cut out the second T shirt later today. The Make should be very simple, famous last words ! I’ll hope to share the finished garment next week.
PS : I still need to attach my ribbon to the original blue T Shirt, image bottom right. It’s a job for the weekend. By next week, I should have both completed T Shirts. 

Thanks for calling in today.


Wednesday 5 February 2020

Sock Talk

Hi Everyone 
My story today is all about socks. I (almost) always have a pair of socks on my needles. At the moment, I have five pairs ! There are 3 pairs which are being repaired - a couple of new ribs (holes), a new toe (it has a hole) and I’ve changed the top of one pair to a rib. I did have a lovely sock cuff in the style of a traditional fair isle cuff. You can check out the style here. Although the sock cuff looked great, the lack of stretch didn’t work too well. I’ve decided to make a new plain, 2x2 rib and the socks fit much better. I still have more work to complete my repairs but the socks look like new, with very little effort. I will certainly, do this again. I have a few more pairs which could get new coloured heels and toes, very soon.


I’m also still knitting some blue socks to use up a leftover batch of memade yarn. This yarn has been spun and dyed for a sweater and there’s still more to use. I’ve knitted a toe up sock, I’ll add an afterthought heel and am now into knitting a cuff with my memade yarn. My plan is to produce a deep turn over cuff. Everything is working well at the moment, although - I have taken a while to get the right tension (where the change in yarn happens) for the cuff. I’ll share images of my work when completed.

My last sock story is about a new (to me) sock yarn from Denmark. The yarn is from hobbi and called Dots. It’s a 100gm, standard sock yarn. I’ve  seen this yarn knitted up and it does produce dots. My colour is 03 and is a series of faded pinks with purple spots. I think, I’ll go for a very simple, plain sock and allow the dots to ‘pop’.

So, lots to keep me busy. My approach is to work on a separate pair each day for a short part of my knitting time. The repair jobs are quick and I’m almost there. I have a second blue sock to complete (top left photo) and then, I’ll get to the dots sock.

Thanks for calling in today.


Tuesday 4 February 2020

New Knitting Project

Hi Everyone 
I have a new plan for my next sweater knitting. I have various sock projects going on but my next sweater will be my main knitting focus for the next few weeks. I’m knitting a second version of St Catherine by Kate Davies. This is a great knit, lots of small sections, a very clever construction process and simple garter stitch throughout. My first St Catherine is very well worn, so I’m looking forward to a second. This time, I’m going for a slightly different approach.


 I used a Sport Weight yarn for the blue version in my photo story. I’m planning on using a 4ply merino held together with a Kid Silk next time. I’m also going for a green colour - I don’t have a green sweater but am very much looking forward to producing one ! I need to work a swatch. I’m not sure exactly, what fabric I will get ? I’m hoping I can make things work out. If my choice doesn’t work, I’ll dye some yarn to get the appropriate weight. I’m very keen to use Kid Silk and love the combination fabric this yarn produces when held together with other yarn. I have various shawls which use this technique, so I’m familiar with the process.
I’ll share the results of swatching in a few days, as I get my project underway.

Many thanks for calling in today.


Monday 3 February 2020

Sewing Update

Hi Everyone 
I introduced the idea of making something from a lovely blue silky fabric last week, check out the plan here. I had a couple of options which you can see in my plan. In the end, I opted for the Boxy T shirt by Makers Atelier. However, all was not straightforward. Although the Boxy T Shirt is designed for both stretch and woven fabric, I didn’t look at the finished garment measurements close enough. As a result, the first T shirt didn’t fit. I had ignored the advice about measuring my biceps. The arms were very tight and no good at all. The neck opening was also much too small, I have a very small head and the T shirt would not go over my head. Not sure how that happened ? The length was also a bit on the short side (if finished in the way the pattern suggests). Generally, a disaster ! So, Plan B was required. I knew, I could resurrect the project.

My new plan involved recutting  a set of sleeves, I reshaped the original neckline and added a section to the bottom of the front. The pattern has a lovely deep hem which finishes around 5cm shorter on the front piece. I love the design idea but for my T shirt it wasn’t working. 
I wanted to add a folded ribbon feature around the sleeves, bottom hem and neckline. This was the main design characteristic which had drawn me to the design. Take a look at the link above to see how this detail should look.


My second attempt turned out well. The T shirt fits beautifully and I’m ready to add the ribbon trim. Hopefully, I’ll have some time later today, to complete the project. 
I will make this T shirt again, using a stretch fabric. This time, I will check all the measurements carefully. I have some lovely green and white stripe fabric which I have in my stash. I’m hoping I have enough ! I will check out the plan as soon as possible. 

Thanks for calling in today.