Search This Blog

Popular Posts

Thursday 31 March 2016

Holiday Post (3)

Hi Everyone
Another little photo story -


I spent a little time playing with ear hook sizes yesterday. I wanted to try our some new shapes and decided I needed a reference for myself. The photo will be my own guide when choosing which size to go for.

Thanks for calling in.

Wednesday 30 March 2016

Holiday post (2)

Hi Everyone
Here's another little photo story. Read back for more on the Faux Turquiose journey !!


Finally, I can wear my Audrey ring.

Thanks for looking in.

Tuesday 29 March 2016

Holiday Post 1

Hi Everyone
A little holiday photo post.


Happy Easter Holidays.

Thanks for reading.

Friday 25 March 2016

Faux Turquiose (4)

Hi Everyone
Just a little update on progress with my necklace and ring from yesterday's work.


I need to make a thin, black veneer layer for the back of the piece and add the magnets. One magnet for the front and one to be embedded int the bead.


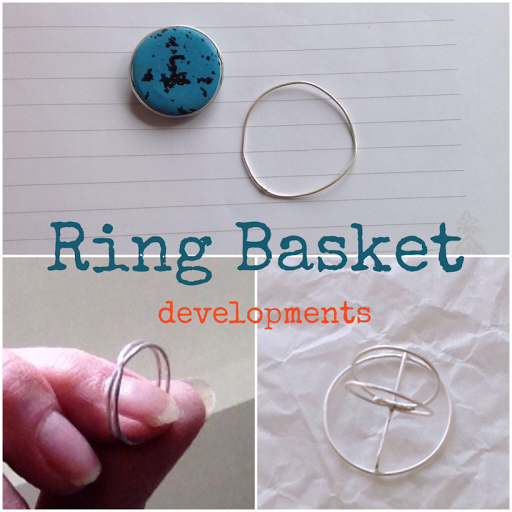
The ring basket has worked well and looks quite delicate but I think it feels solid and balanced when I'm wearing it. The ring basket needs polishing and tidying up and the Faux Turquiose stone needs setting into its finished position. Generally, I like the design. I'm inspired to try it with thicker wire.

I've got a few items to finish off but I'm almost there with the whole Collection of 13 pieces. Hurrah !! I've enjoyed making the Collection but it's time to move on.

As it's Easter holiday time, I will be signing off from my daily blogs for a couple of weeks. I will continue to work on the little finishing jobs and will get some good photos done over the next few weeks. 

Have a great Easter break.
Thanks for reading.


Thursday 24 March 2016

Faux Turquiose (4)

Hi Everyone
I've not got much to show for my efforts yesterday. However, I did make a little time trying to prepare my Faux Turquiose feature stone for adding some Buna cord and magnets. I've organised something which I think may work but I'm not totally convinced the Buna connection will be good enough for the job ? I want the design to be simple, streamlined but magnetic. I've carefully positioned the components to give balance and will give it a go today.


I have some more work on my rings and a couple of additions to earrings and the collection will be there !

As I inspect each item and begin to think how to photograph and present the pieces, I know, I will find things I'm not happy with. I'm going to build in  time to thoroughly complete this process, so I don't rush the process.

I'm also going to determine which bits of the collection  will go into production. Some of the pieces have worked great as a 'one off ' but not to make again.

Thanks for reading.

Wednesday 23 March 2016

Faux Turquiose (4)

Hi Everyone
I had a busy day yesterday (running workshops) so didn't have lots of time to work on my Faux Turquiose pieces, however, I did manage to string a second toggle bracelet using some of the Eastern style Faux Turquiose beads.


I've now made two toggle bracelets, one using silver findings and one using rose gold findings. I like the contrast with the different colours and metals and am persuaded to use rose gold in more of my jewellery. Rose gold is such a pretty finish and seems to compliment darker colours very well.

I've got more workshops today, again ..... I'm pressed for time but I'm going to try and prepare another piece of the Faux Turquiose collection. My focus will be a necklace using Buna cord.


I've made a pretty, large bead with a space for a cord to pass through and attach with some form of magnet clasp. I'm using black Buna cord which will have an additional black bead attached and a magnet embedded into the bead. The other magnet will be embedded into the large bead in the photo. I'm not sure about placing or size etc ? My aim today is to organise some options into a plan and experiment with construction.

Thanks for reading.


Tuesday 22 March 2016

Faux Turquiose (4)

Hi Everyone
I made good progress yesterday with my ring jobs. Most of my ideas seemed to work well. Here is a photo story of the developments:


My first job involved making the components for the stone basket, all the bits were then soldered together and cleaned. The solder job worked well and the stone is a lovely fit. However, I'm not convinced the ring wire is right for the basket - it's much too chunky and doesn't look balanced. I'm going to do something else with the chunky ring and go for a double strand, thinner wire model for the ring part. I'm thinking about a novel way to attach the shanks. I'm not there yet.


 Lots more hammering, filing and polishing later, I had another large statement ring. This one didn't go exactly to plan. The shaping for the silver shank part of the ring was difficult to get right. I managed to get rid of some of the initial flattered ends and ended up with a poor shape, which was unfortunate ! However, when I got the ring on my finger it felt great - just my sort of thing. The stone is held in place with a simple piece of 1.00 mm wire through the middle. The wire is a tight fit and I've flared the ends in position to keep the wire in place. The ring can swivel over to give a second colour to the ring - two rings in one.

                                
The last ring worked very well - a simple post was soldered to the ring and I chose to use the larger bead. The bead has been polished and is ready to stick onto the post. The solder went particularly well and the construction is simple and neat.


Generally, I had a good day yesterday, I've got a MAKING Workshop today so progress will be very limited. I'm hoping to string one of the toggle bracelets next, so I may get this done.

Monday 21 March 2016

Faux Turquiose (4)

Hi Everyone
I'm planning to spend another week on my Faux Turquiose project. It's a short week, only four days because of the Easter Holidays. I'm not sure I can complete every piece in the Collection but I will make as much progress as I can.
Today, I'm going to work on the rings. I've made the cabachon ring and the actual band part for one ring (bottom left). This ring also needs a basket to sit the stone into. I need to make a few more bands and develop the parts of the rings which will attach my Faux Turquiose stones. Each ring will have a different design so I need to spend time making sure they will work. Here is a little photo summary of the rings so far :


I do have a plan for each design but will go with whatever turns out. The ring, top right will have a drilled bar through the stone and will be  a challenge  getting the bar to fit through the silver band - I think I have a solution but maybe not ? The bottom right ring will have a single round bead attached, I'm not sure which size will work best so I've got two sizes to try. I've made a prong for the bead and need to solder the prong to the band, when it's finished. 
I will share my progress tomorrow.

Thanks for reading.

Friday 18 March 2016

Faux Turquiose (3)

Hi Everyone
I'm sharing my experiments from yesterday's Dangle earring job. I made a range of Faux Turquiose beads to decorate sterling silver dangle components (made a few days earlier). All the beads worked to point, although some better than others.

                              
The first three beads are designed to work as an additional component which can be removed or changed. Number 1 is a version of a flattered Doughnut bead and works behind the silver dangle part. I feel the hole is too large to sit where it does, so not brilliant. The bead size is Ok but I will try out a smaller holed version. Number 2, I like. This bead works in front of the silver dangle part with the post in the centre of the small cup shape of the bead. Number 3 is a tiny, flat bead. Again, this bead sits in front of the silver dangle component. I think, my favourite is (2) ?

In addition, I worked on a different way of holding a small bead on the dangle component :

                                
The bead component in this version (above) is a fixed one. The bead is a barrel type shape with some surface lines which I will highlight. The earring post will be soldered into place in this version. The component can also take an ear wire fitting. The version on the left is made from 2mm sterling silver wire and the version on the right, uses 1mm wire. The 1mm wire is too thin to flatten and drill a hole into it, so I've added a loop instead. The beads with the 1mm wire will fit in the same way as the 2mm wire. The 1mm has a different more delicate feel to it. I had decided it was too thin but having worked with it, I do quite like it. I will use hooked ear wires for this version.


My last MAKE from yesterday is another ring. This ring is made from 3mm round wire and is 'chunky'. It's my favourite size at the moment and will have another basket (read back for my previous basket idea) construction to take a large round Faux Turquiose stone. I've had various designs in mind for the basket  and will make some prototypes today. All my polishing will need to be done again after constructing my basket but I just wanted to check out the shape and finish. I may use a brushed finish rather than a high shine ? Can't decide.

That's it for this week.
Have a great weekend. Thanks for reading.

Thursday 17 March 2016

Faux Turquiose (3)

Hi Everyone
My experiments from yesterday worked well. As predicted, I didn't have too much time but I made a range of Faux Turquiose beads for the dangle earrings. All of the various bead components will work with the silver, I'm probably going to make some more silver dangle pieces to add to the earring style, making a few more pairs of earrings.


I started making the first beads with a range of round, flat pieces of clay, using a punch cutter. Some of the beads were cured on a small glass pebble to give a cup shape to the final bead and holes were made in the centre. The final bead has a shiney surface because it's cured on the glass. The smallest version of the bead is too small to shape so was left flat. I also made a few more beads with a flattened, doughnut style shape - not sure exactly how I can use them at this stage ? - more experiments required. I'm going to try all the possible combinations of the components and will photograph each one to make decisions about which will work best.
I'm also planning to make a second toggle bracelet which uses the Eastern style Faux Turquiose. I've chosen to use a rose gold toggle for this piece. This bracelet will have a very different look to my first toggle version which uses the silver and South Western Faux Turquiose.

Thanks for reading

Wednesday 16 March 2016

Faux Turquiose (3)

Hi Everyone
Just a short update today - I've almost finished the cabachon ring (read back yesterday for details). Lots of extra work developed from resizing, as a result of resizing much of the surface pattern was removed and I needed to 're vein' the polymer. The finished cabachon and the silver needed polishing again but I'm almost there. I need to finally set the stone into the basket and secure the prongs but it's worked well.


The ring is well balanced and feels very comfortable to wear. The cabachon is quite large but I'm happy with the shape and how it looks with the thick, rounded band. I've called the ring Audrey (it makes me think Audrey Hepburn could wear it with style !). 

My other issue from yesterday - ie. developing ideas for my earring components (read back for details). My favourite at the moment is to make some very small faux Turquiose bowl style beads which will sit behind a balled silver ear post. I'm going to make a selection of beads today. I will develop a few different sizes to see which works best. I'm hoping I can make the earrings a '3 in 1' design, using each element separately or in various combinations. Will share my experiments tomorrow.


I've lots of other stuff going on today, so probably that's all I can expect to achieve.

Thanks for reading.

Tuesday 15 March 2016

Faux Turquiose (3)

Hi Everyone
A quick update on this weeks progress so far - early days but I'm moving on with my Faux Turquiose Collection as planned. Ive made another  pair of earrings using the sterling silver bar style with soldered posts. The new version has little round holes filled with Faux Turquiose. The holes are tiny but cover the front of the earrings and give a subtle blue tint to the bar part. I need to cure the clay  and then polish the whole thing to a high shine.


I mixed a new Faux Turquiose clay without any veining for the earrings, I thought the black element would not work with such tiny holes so toned down the blue with some caramel clay. I'm hoping to get a high shine to the silver post curing which will set off the blue of the clay.

I also managed (as mentioned yesterday) to solder the wire basket support to my cabachon ring. I will spend some time cleaning and polishing before I set the cabachon into the basket. I was unsure about the solder job on this one but all went very well. The Faux Turquiose cabachon needs to be slightly reshaped to fit the basket and I want to spend time on this job to get an exact fit.


My third job of the day was to develop another earring design - a hinged earring with a Faux Turquiose bead. I planned to use a length of 2mm silver wire  to form a semi round shape with holes at each end and to be worn via a wire hinge. Having hammered the ends of the silver and drilled a hole at one end, I liked the look and abandoned the original design. I've  polished the silver and will use them as a component for aother simple earring with an ear hook. I like the simple paddle ends with a high shine. I need to add some Faux Turquiose to this design and I've no idea how to do this ? I will keep working on it today.


PS  I will do another set of silver for the original hinge design tomorrow.


Thanks for reading.


Monday 14 March 2016

Faux Turquiose (3)

Hi Everyone
I'm having another week of my Faux Turquiose project, this will be week 3. Progress is steady but I'm trying to find a working process which can be integrated into my other responsibilities. I have a few classes and lots of writing to do as well as being a Mum and I find myself very pressed for time. However, I've been reorganising my work bench and everything is more streamlined for working. I'm hoping I can make my way through the Faux Turquiose Collection this week. I'm not rushing things, so I will see how it goes.
I've a few images to share re the Faux Turquiose earrings with the extension (read back for more on this). Generally, the plan worked well and I do like the earrings. They need a polish and some butterfly backs and they will be complete. 


Originally, I had planned to sand the clay to give a seamless extension to the silver bar of the earring. However, this style just didn't look very interesting. The added volume of the 'seed like' end I chose instead, gives a balance to the piece and allows the Faux Turquiose to take centre stage. The central support does work well too. No glue going on and the clay feels like it's part of the earring rather than something added.

I also started the cabachon ring pieces. 


I've planned the piece in my sketch book and followed the plan so far. I've made a flat structure, measured to fit the clay stone. It's made up of two pieces of silver wire, hammered flat and soldered in a cross- like shape.  Today, I will solder the flat 'basket to be' to a ring (made last week) and fit the cabachon. The cabachon is made from Faux Turquiose and has been polished. Here it is :


Im hoping all the elements will fit together and the piece will work as I imagine. I will share an update on progress tomorrow.

Thanks for reading.

Friday 11 March 2016

Faux Turquiose (2)

Hi Everyone
The theme of my whole week has been 'not enough time'. I've actually not given myself a timescale for the Faux Turquiose project so I'm not sure why I'm so obsessed with under achieving ? However, each day I've felt that I wanted to have more progress to report. Having realised this, I'm not going to obsess about time and finished items; any progress is good and I want to enjoy the whole process.
On that note, I did make progress yesterday and modified an earring design that's been under development for a few days.

                                
The photos shows two sets of earrings (top left), one with a textured surface and the other plain. I had made the textured version first but decided it would not work for the second phase of development. The plain surface has an extension to support some polymer clay extension which will be added today I've the second phase of the design. I had decided to solder the wire the other way around, ie with the balled part at the bottom. However, I reconsidered and thought the balled part would allow for a more secure purchase (at the join) for the clay if placed at the point of the join. The clay will be developed in a Faux Turquiose style. I'd like to get a seamless extension but we will see how things turn out.

The practice toggle (bottom right) was a trial for sizing the toggle. I won't use the solder on jump ring style for my toggle, I like the idea of making one piece and twisting the ring part from one piece. I also like the colour of copper but will go for silver in my final toggle clasp. The copper would not be suitable because it's going to be in contact with skin (on a bracelet) and will result in green stains on the wrist. Rose Gold would work beautifully - maybe one day !

I think, I will have another week with my project (I'm released from the time pressure issue) and will plan which elements I can produce next week.

Thanks for reading. Have a great weekend.

Thursday 10 March 2016

Faux Turquiose (2)

Hi Everyone
I had another rather busy day yesterday and not much time for my project and my task for yesterday didn't quite turn out as planned. I'd hoped to add some Faux Turquiose to the end of a pair of silver post earrings. As I worked on the earrings it became clear that my surface design (on the silver) would not work well with the additional Faux Turquiose tip. Ive decided that the silver posts need to be plain to compliment the pattern of the Faux Turquiose. The surface pattern on the silver and the pattern of the Faux Turquiose on the quite small earrings looked too 'busy'.
I do like the simple post earrings with their surface pattern and have started to polish them and keep them as they are ie simple post earrings. So, it's back to making another pair with a clear, polished silver post. 
I've already prepared the little support structures and will try again today with Plan B. Here is a view of how they will be constructed.

                                 
As you can see the ear post (needs to be trimmed for length) have been soldered onto the main part of the earring and I have some tiny, balled wire pieces which provide a support structure for the clay (bottom right). The idea is to solder the support structure to the silver post and cover completely with clay. The clay will then be shaped and give a seamless extension of Faux Turquiose to the end of the silver.
My Plan B for today is to make a plain silver post and repeat the design idea. The soldering is quite tricky because of the small components at either end and the relatively thick silver post in the middle. I hope I can do it without messing up the shapes. Will share my results tomorrow - good or bad !

Thanks for reading.

Wednesday 9 March 2016

Faux Turquiose (2)

Hi Everyone
Just a quick update on progress and some ideas I have. I didn't have too much time yesterday for my project and haven't made too much progress. My priority was to prepare some silver for a specific earring design. As things turned out, I don't have the correct wire to make the shape I'd planned so changed my initial plans. I quite like my new plan and will go with it.


I took a piece of 2mm square silver and cut 2 pieces - 2cm. long. I textured the surface with a stamp and rounded the ends, a little. I've got some 0.8 mm round wire cut (for ear posts) which need to be soldered onto the textured silver. I'd hoped to find a way of including some Faux Turquiose in the mix here and have decided to add an extension to the silver using Faux Turquiose. I'm going to prepare some clay and mould into shape, cure on the silver, file and polish. To make sure the clay is secure on the silver,  I'm going to solder a small balled silver post at the contact point. This will be embedded into the clay. My plan is to simply extend the length  of the silver. I'm hopeful I can do this, it's going to be fine work ! At this stage, I want to give the earrings a mirror finish and feel this will compliment the Faux Turquiose. The little diagram below illustrates my plan.


I'm already thinking of some more ideas using this particular earring shape. I want to add some tiny bezel cups to hold some small Faux Turquiose stones along the length of the silver and will keep thinking of more ideas.

Thanks for reading.


Tuesday 8 March 2016

Faux Turquiose (2)

Hi Everyone
I'm moving on (very slowly) with my Turquiose project. I have lots of extra work commitments this week so any progress will be good. My aims are to get the silver work completed. Here is a quick overview of the work so far :


The rings look (almost) the same size but are in fact quite different in the side view. The ring on the right is 2mm and the left is 3mm. They are very different to wear and will be more obvious when they are united with their faux Turquiose stones. The pendant chains are attached and I'm looking forward to wearing them. I also have one toggle clasp, one more to go. I'm going to make a slightly different style toggle for the next one. These clasps will be attached to a couple of  bracelets using Fireline thread. The bracelets may need some spacer beads and I'm trying out some options.

That's is so far. Hopefully, I will have a little time today for some more silver work.

Thanks for reading.


Monday 7 March 2016

Faux Turquiose (2)

Hi Everyone
I'm planning to spend another week on the Faux Turquiose Project. Last week, developments moved on well and I'm hoping to get the majority of the sterling silver elements completed this week. I've decided to make all the findings first and then build each piece of jewellery. 
My first job today, is to make a couple of toggle clasps followed by a range of earring components. I will sketch my components in detail and work through the preparation of the silver today.
I've also had some good photos taken of the jewellery I made last week and am inspired to greater things this week. Here they are :


I have the silver chains ready to add to the pendants and the bead (top right) is waiting to be added to a silver ring. I've made the ring and designed a little basket style setting which I will solder to the ring. The quality photos show the bead style well, I particularly like the veined stones which have polished up beautifully.
Generally, the mix of silver work and polymer clay works well for me and I'm inspired to try more faux gem ideas.
Call in each day this week to share my progress and elements of the production detail.

Thanks for reading.

Friday 4 March 2016

From Scratch @ thepapersac

Hi Everyone

A rather disappointing production day yesterday ! I managed to fit one of my silver bail pendants to a Faux Turquiose stone! and it's ready for attaching to a silver chain. I also did a little bit of bead polishing and found my 2mm sterling silver wire (for the toggle clasps). Other work commitments had priority and have 'eaten' up my time but I hope to keep going with 'catching up' today. Here is a quick review of work to date.


I'm hoping to complete the toggle clasps later today.


This week of 'concentrated focus' has been a good way of moving into a new project and I will definitely use it as a way of kickstarting future Collections. Perhaps, I can plan a three day block so as to accommodate other work and give myself a more relaxed creative time.

However, I'm quite pleased with some of the techniques I've learned and used for making faux semi precious gems. I'd like to try out a range of faux gems so will start planning.

Thanks for reading and have a great weekend.

Thursday 3 March 2016

From Scratch @ thepapersac

Hi Everyone
My Faux Turquiose project is still moving but slowly ! Yesterday, various other work commitments got in the way and I'm still a little behind. I wanted to prepare some more bracelet beads and a couple of toggle clasps. I did polish some beads but not all the beads for both bracelets, so hopefully that will happen today. I've designed and prepared the clasps in an artistic wire prototype so I'm ready to make the sterling silver version. Here is a quick look at the very simple design I'm going to use.


I will use much thicker sterling silver wire (2mm) and will solder the wires in place. The chunky silver version should look good. Once the beads and toggle clasps are complete, I can thread the beads onto Fireline. I'm not sure how much time I've got today but will try and finish the bracelets.

Thanks for reading.


Wednesday 2 March 2016

From Scratch @ thepapersac

Hi Everyone
My Faux Turquiose project is going OK. I didn't quite get where I needed to be yesterday, so I'm hoping to catch up today. I managed a stretchy bracelet and one of the pendant pieces. The stretch bracelet is complete (such an easy job) but I did need quite a few approaches with the pendant. I decided the pendant beads needed some spacers and couldn't decide if black or silver was best ? In the end, having tried both - silver was definitely the way to go. I also needed to add a bail. The simple jump ring was not enough. Here is a quick look at the progress.


 The pendant required a customised sterling silver wire with a balled end. All the beads needed more polishing to. So, I've learned I need to be more realistic in terms of design to production !

Today, I'm hoping to get a few more beads ready for the next bracelets. I need to make some silver clasps and will take time getting exactly the right shape and size. I'm thinking a form of bar and ring clasp but not sure about the dimensions or the actual shape.

Thanks for reading.

Tuesday 1 March 2016

From Scratch @ thepapersac

Hi Everyone
My Faux Turquiose project is underway and I've managed to organise my 'stones' into little sections which will become pieces of jewellery. Each stone was chosen to be most suitable for an idea rather than applied to a tried and tested design. It's possible, that I may need to change my plans if things don't happen as I quite expect. Here is a quick look at the plan :


In addition, I have some earring plans which will form a second production phase. I've tumbled, 'veined', sanded and polished most of the stones. I'm hoping to construct the stretch bracelet today as well as prepare findings for the necklaces. Ive made two silver rings and I need to develop the stones setting components. Each ring design is very different, so I need to spend time working through the best way to hold the stones. Two of the stones are quite large too !
Here is a quick look at the polished ring cabachon and a single stone :


Thanks for reading.