Search This Blog

Popular Posts

Saturday 31 October 2015

Holiday Post 4

Hi Everyone
Another little snippet from our holiday. It's raining outside and not that inviting, so I'm practicing with my Zentangle tiles. 


Thanks for reading.


Tuesday 27 October 2015

Holiday Post 3

Hi Everyone
Just a little view of today 


Thanks for reading.


Sunday 25 October 2015

Saturday 24 October 2015

Holiday post

Hi Everyone
Just testing a little photo post idea. These are 3 little air dry clay experiments pre decoration.


Just need to get them off the mould - without disaster ! Can't build up the courage to try !

Bye for now.

Thanks for looking in.

Friday 23 October 2015

From Scratch

Hi Everyone
Today, I'm featuring another little gift and/kit for the Christmas stocking filler series. This one is a beaded ring. A very simple threaded version which will come in a  small organza bag. I'm adding a snowflake tag which can be used as your gift tag. I've also designed a gift pocket option which allows the snowflake tag to hang outside the pocket and will feature this pocket design next time. 
I love this ring - it's simple to construct (instructions come in the kit) and very quick. The ring has an elastic thread so can be suitable for all finger sizes. Once you have made a ring, the possibilities are endless in terms of new designs. If you have odd beads lying around these can be used up with the technique. This design uses some shiney bicones and lots of silver spacer beads. When the spacer beads are stacked together they do look like a single silver band.


Some of the ring designs I've been using recently for other work projects have proved challenging for new 'bead makers' (look back to various posts earlier this week), but I can be certain that this particular design is very simple to master. I'm calling this design Audrey, with a nod to Audrey Hepburn. I always think of Audrey when I look at this particular ring design. Other bead combinations produce very different rings but this one, in particular, gives a solid silver ring characteristic with a bit of shiney glamour !
Here it is on my finger (while working)


Audrey Rings will be available either made up or in little kits. They will be around the £6 mark and gift wrapping will be offered as a separate option.

Next week is half term holidays and we will be away on our annual trip to somewhere near to Whitby. I will post a few photos if /when Internet is available (I do struggle with connection when we go away into the hills!).

Have a great weekend.
Thanks for reading.


Thursday 22 October 2015

Clay Day

Hi Everyone
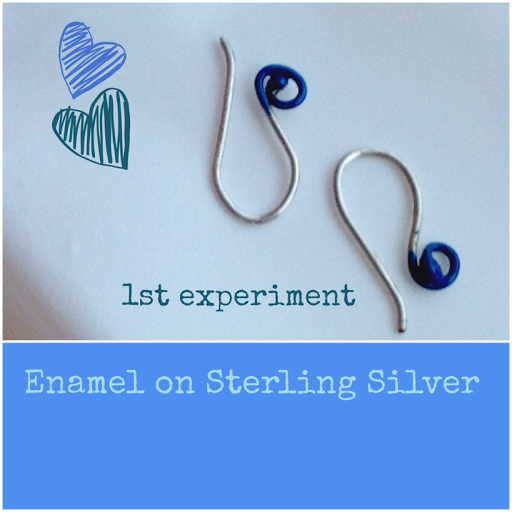
I'm still slightly distracted with 'beading' projects rather than making my clay jewellery, so the blog series name is still questionable! Although, we do have a link to clay beads today. I've made quite a few new non clay (beaded) rings - see various posts from earlier this week. I've also managed to complete a very small experiment enamelling Sterling Silver (a former job on the list). I want to do more of this but for now the beading is still top of my list. Here is a quick look at the Silver experiment :


I used a piece of Sterling Silver wire to create very small earring wires. The enamel was applied to the end of the wire, curled to create a slightly balled shape. I like the result but need the curled bit to be larger. I'm going to solder a larger shape onto the existing curl and add more enamel - maybe a different shade of blue ? I like the technique and will definitely focus on this one in the near future.

Getting back to the beading thing, I'm developing a new ring with a larger stone. I'm following the same technique as I have used for a few of the previous rings but the much larger size of the beads present new design issues and each step forward is followed by a new challenge. Here is a summary of developments to date :


I want to get to the point where I can mix and match beads, some made by me and some manufactured. I like the shiney metalic seed bead in ring design, so am keen to keep that element. I do feel life is too short to make polymer seed beads which are small enough to make a traditional beaded ring band. However, I'm keen to develop some new customised shapes which can make a band using hand crafted polymer. The finished ring will be proudly shared when complete. You may have noticed the carved bead (above) which I made a while ago and I'd like to incorporate the bead into a ring - note the clay connection !, similar to the stone in the image above. I want the construction technique to be clean and the thread hidden via the construction, this means lots of taking apart and re doing. I like perfection and nothing less will do !

Thanks for reading.

Thanks for reading

Wednesday 21 October 2015

Recipe Wednesday

Hi Everyone
As promised last week, I've done a bit of baking for this weeks mid week pudding. I  have to admit that the pudding did take a little longer and did generate a little more washing up than my previous puddings. However, the pudding was a huge success.

This weeks pudding is a tried and tested recipe from my much loved BeRo book. The Be Ro book calls it a Chocolate Swiss Roll. We have renamed it - Chocolate Roulette. Not sure why ? but it seemed to stick and I'm OK with it.


I served up the Roulettes (slices of the pudding) with raspberries and crumbled chocolate flake. You probably think it's the only combination possible in our house ! ie. chocolate, raspberries and cream. Looking back - I think most of the recipes follow this 'rule'.

To make the Roulette - line a Swiss Roll tin with greeseproof paper. Cream 75gm sugar with 2 eggs, fold in 70gm self raising flour and 5gm cocoa powder. Pour the mixture into the tin and cook Gas mark 7 for 8mins. Turn out the cooked cake onto a sugared (icing sugar) piece of greeseproof paper and roll into a log shape. I also roll the log (a second time) in a tea towel and allow to cool. Whip up 300ml double cream and add raspberries (1/2 punnet) and spread onto the cooled cake. I undo the roll just enough to get the cream mixture into the cake. I could have improved spreading the cream mixture to the very ends of the cake, I felt the ends were not as full as they could be. Roll up again and coat with icing sugar and chocolate flake. Slice onto plates and add a few raspberries. That's it.

The Boys loved this pudding - they all gave it 4/5 - I did ask what could be improved and they said 'more cake'. I gave the cake 5/5 - good tast, looks good, not too much washing up (I could do better with washing up next time) and I probably have most of the ingredients most of the time. I don't always have cream at the ready but I think I could probably use thick yogurt.

 I'm already thinking of different flavours to use with different fillings. So, will try out another version for next time.

Thanks for reading.

Tuesday 20 October 2015

The Making Framework

Hi Everyone
We have another workshop session today for The Making Framework and it's the final in the beading series (3 of 3). We will finish with either a ring/ several rings or a self directed beading project today.
As part of the workshop (towards the end) we will also practice a little Zentangle. A Zentangle is a miniature abstract work of art. It's created from a collection of patterns. A Zentangle is traditionally created on a 8.9x8.9 cm piece of card called a 'tile'. The process is intended as a meditative art form using a pen and pencil. In our previous workshop we had a short introduction to Zentangle and practiced with a few examples and reference books. Everyone started a tile and we will continue with the practice this time. Although there are identified rules and expectations in the world of Zentangle (many reference books are available) we will take inspiration from the art form rather than sticking rigidly to any rules.
The Zentangle practice is in preparation for a new project starting in a few weeks. Our new making experience will involve making little bowls from airdry clay and decorating them with Zentangle or a form of surface design, inspired by Zentangle. I'm super excited about planning  these new making sessions and will have the opportunity to test out lots of little trials.
However, getting back to the focus of the session - our rings. Making the rings brings lots of beading skills together. To build a successful ring, it new to be comfortable as well as stylish. Choosing the colour and bead size combinations can be tricky, sometimes it's about trial and error. Hopefully we can experience some of this in the workshop. The are also the challenge of keeping tension with the beads to form the structure and making a strong, durable piece. Rings are given a hard time as we use our hands all the time. These rings will need to be worn with some care. I tend to take them off for housework but I do wear them most of the day and will definitely expect them to cope with most things I do. 
The sub skills set I mentioned last week is coming along and each project will be scrutinised post workshop. I've a long list of these subskills for beading and I need to pare them down. The workshop will give me a last chance (for the moment) to watch and analyse.
Here are a few images of the rings we will produce and the details of our local workshop. I will also take some more and share how the makers design/produce their rings.


Thanks for reading.


Monday 19 October 2015

Make Art Monday

Hi Everyone
I'm still with The Eyes Project today (read back on Mondays for background on this project). Linda (2) will be painted on wood and I've been revisiting a previous piece of work (on wood) for ideas. This piece of work is around the right scale (for Linda 2) and I like the simplicity of the shape. The wood gives a great embedded texture which I like.


Today, I want to try some more eyes on wood. Linda's eyes are more sophisticated than those in this piece and I'm not sure I will be able to reproduce the new sketches, in detail.
                                 

However, let's see what turns out. I will share my results on wood, next time.

Thanks for reading.


Friday 16 October 2015

From Scratch

Hi Everyone
Friday again ..... I spend most days wondering how my days are flying by ? 
It's almost time to think about the dreaded Christmas gift lists - is it too soon to even mention Christmas ? I look forward to Christmas and love giving gifts, especially small scale handmade gifts. However, Christmas comes with so much stress and seems to start earlier every year. I should be more organised than most on the making front but ....... perhaps we won't go there.
Anyway, getting back to my news, this Friday I'm going to introduce a little idea wich will happen each Friday up to Christmas and will feature little handmade gifts. Many of the gifts will be adaptable and will be suitable for any time of the year. For planning purposes we have ten more Friday's until Christmas, although gifts will probably need to 'done and dusted' much sooner. 
My first little gift will be a very simple beaded bracelet with five strands and threaded onto elastic. Im calling the bracelet a Butterfly Bead Bracelet. There will be a couple of options re colours and the type of purchase. You can buy the finished bracelet, beautifully gift packaged or you can buy a kit. The kit will then be the gift or you could buy the kit and make it and then give as a gift. Hope that's clear ?
I'm putting some options together for the shop today and all will definitely be clear. Anything in a basic kit form (not gift packaged) will be cheaper. Here is a look at the basic bracelet in pretty blues and greens.


I'm working on some different colours and versions this week with some inventive (hopefully) gift packaging. Each kit will be approximately £6. I will post detailed I mages here (with options) when the bracelets are about to go into the shop.

As I share the little gifts each week, we will get into the Christmas mood (I hope) I'm certainly no where near yet !

Have a great weekend.
Thanks for reading.

Thursday 15 October 2015

Clay Day

Hi Everyone
It's Clay Day again - so soon ! Last time, I talked about producing some enamelled silver posts.
Bad news ! - I've been distracted this week from my original plans (no change there) and have not managed the enamel process, maybe today ? I've also managed to move away from my initial plans for Thursday's. Where is the clay ? Maybe, I need a new name for the series ?

However, I've made quite good progress with a new small beading project. Ive wanted to make some beaded rings for a while and have ended up making three rings. Two of the designs are quite acceptable, the third lacks balance in terms of design, although when I put it on my finger the look is good and it feels comfortable - still not totally convinced. I will probably undo it and start again - it's the only way.

I also have a confession to make here - I do struggle, slightly, with many beading projects. I understand and appreciate the level of the actual skills required to 'bead' but often find myself thinking - do I like the final look of a beaded item ? I guess it's like lots of things, I like some and not others.  
As previously stated, I really appreciate the skill required to produce a quality beaded item and greatly admire the many amazing beaders out there. My own struggle with beading makes me understand how difficult it is to make a beaded item. I want to acquire some of the skill because I feel it will add to my range of making skills and allow me to create exciting items in the future, beaded or not. The potential of developing transferable skills via tackling a wide range of different projects and using different techniques and materials is huge.
Back to my beaded rings. Here they are :


Although, these rings are made from pre made beads (bought !); my plan and all the practice involved is giving me the knowledge and design skills for making specific beads suitable for a beaded item ( not on paper yet). I'm now in a position to understand how particular shapes can fit together with a thread (thread yet to be finally decided) to make a form. I'm also particularly aware of the need to have replicated shape and size for each bead type in any beaded design. I know this sounds obvious but making these rings has reinforced this aspect of beading. I'm hoping, I can do a good design job. At the begining of my beading adventure, I would feel quite anxious about the sessions, however, I've moved on ...........   and feel I'm in control rather than the beads. I have a way to go re calling myself a beader but it's been a great lesson in my MAKING life.

Thanks for reading.

Wednesday 14 October 2015

Recipe Wednesday

Hi Everyone
Today's recipe is an amazing pudding. Very easy to make and I love it. Unfortunately, The Boys HATE it. They have named the pudding 'Toxic Shock'. 

It's a Nigella Lawson creation and is made from liquorice. The liquorice is in the form of small pellets and the technique involves melting a teaspoon of pellets with 60ml of water in a pan. When melted, you get a weak coffee looking liquid, add sugar (2 tablespoons) and 175ml of double cream. Heat through, stiring. Blend 2 teaspoons of cornflower with a tablespoon of milk and add to the liquorice liquid pan, mixing all the time. After a few mins, you have a lovely thick cream. Pour into serving glasses/pots and cool in the fridge. I added a few chocolate sticks and a few raspberries. These quantities are good for 4 servings.


I gave the pudding 5/5 for ease of making and washing up. The Boys gave the pudding 0/5 - all three of them ! and of course the name - Toxic Shock.

I'm very disappointed and am looking for a friend to share this lovely pudding. I'm considering a new category in the book called - Gills Recipes

Next time, I'm actually 'baking' !! (midweek).

Thanks for reading.

Tuesday 13 October 2015

The Making Framework

Hi Everyone
Last week, I introduced a new beading project to one of the workshop groups and everyone completed the project with 'flying colours' (read back for details and images last week). As I hoped, the Starburst Pendent proved to be an easy make. The only real challenge to building the pendent is keeping tension throughout the development. There seems to be a tendency to keep moving the half built pendent and as a result the tension is lost and the shape of the pendant goes limp ! However, everyone seemed to understand this requirement by making the pendant and we moved on enormously. The project allows for mistakes to be made but quickly self corrected - brilliant to see someone seeing this and moving on.

I'm begining to analyse each little project in the Making Framework for skills and techniques. Im aiming to create a simple table per project, highlighting a hierarchy of skills necessary for success. There seems to be a list of about 5/6 'sub skills' which are common to many projects. New crafts tend to bring along a slightly different aspect of the core 5/6 subskills. One of these subskills is the tension idea, practiced in most beading projects. In papercraft skills as an example, tension can be interpreted as keeping something secure for cutting or glueing. This example, I think, is the difference between producing a quality looking item or a rather 'shoddy' finish. As this core subskills is acquired in one craft, I'm seeing a transference to others. As I'm identifying these sub skills, I'm hoping each project can be developed to include little steps which will increase subs skill acquisition.
 
The beading section within the Making Framework is in its third session next workshop and the final one for this series. We will try and put into action my sub skills development idea. There will be two structured options and one Maker-led.  Making a beaded ring, making a multi strand beaded bracelet and a 'I'm the Maker' option. The last option is quite a milestone. I'm hoping it will work OK for a few folk. The Maker-led idea is to design and be inspired to just 'go' with a material and an acquired technique (developed over a few sessions). This is great and what the Making Framework is all about. Some Makers will not be ready, this is OK too,  each Maker journey is a personal one.

The Framework hopes to include a wide range of Makes to encourage skills development and almost inspire new ways of Making. I love to see how people interpret projects opportunities. I find watching the process inspiring in my own Makes.
Here are a few images of the pendents created in the latest workshop - worn with pride !


Thanks for reading.

Monday 12 October 2015

Make Art Monday

Hi Everyone
some close up images of Linda's original eyes feature today. 
The faces of all the Angel dolls are very basic but this close up version of the right and left eye shows just how simple they are. I've had some great new photos made of the original piece and took advantage of a few close ups like these to try and get the essence of the eyes. In my original painting, I tried to get some 'watery'/glazed feel in Linda's face, from a distance I thought it was OK - close up, it's not so convincing. However, I have found the detailed close ups really helpful and will do this for the other Angels. I'm still developing Lee Angel and will move onto Linda this week. I like the idea of working with all dolls at the same time. I want them to be connected and by working with them together, I think I can link together.


It's amazing to see just how much pink there is on Linda's face ! She looks as if she's got third degree burns all over her face ! or severe hot flushes (in the top left image).
I will try and be faithful to the original characters, so will not 'over draw/paint' their new faces but I think I can improve on the colour blending. Linda's  eye make up needs a bit of sophistication too - if I can get it !

Thanks for reading.

Friday 9 October 2015

From Scratch

Hi Everyone
Today's the From Scratch offer is a beading kit. This kit is called a Starburst Pendent and featured in a recent workshop - read back on Tuesday's for more on this one. I've created a few different colours in the kit with an option of two different chains. The chain could be Sterling Silver or Antique Bronze. The kits will be in the shops in a few weeks.


At the moment, I'm developing some packaging which will turn this pretty, simple kit into a lovely gift. I've come up with a few ideas - a hand printed cotton bag or a little wooden box. The box is favourite at the moment but I will make several of each before deciding on the final packaging.
Here is a quick look at my printed fabric approach - this is just a scrap from initial experiments :


I will play around with lots of ideas before deciding on the final design. I like the idea of big bows - not sure how or why ? but for some reason the idea won't go away ! Somewhere there will be lettering or handwriting. 
The other approach is a little wooden box. It's not really either/ or in any of my packaging lines. Each item I produce is an individual, unique piece - the same can apply to packaging too.


I'm hoping to offer the packaging in little kits too - watch this space for more details.

Thanks for reading. Have a great weekend.

Thursday 8 October 2015

Clay Day

Hi Everyone
I'm giving an update on my own little jewellery development project today. Progress is slow but thats OK with me. My plan is to enjoy making things just for me and part of that process is to take my time - I'm the client so I can decide.
So far, I've made beads for a bracelet and developed some small stud earrings. I did think the bracelet would take a clasp but I've now decided to use the stretch threading approach. I made a couple of silver clasps but will use them with a necklace. There are some beads left over from the bracelet and I plan to add to them today. I'm also going to develop slightly different shades of the same colour clay today and will just see how it goes. Ive got an idea to make each bead slightly different. I want to try a few new carved beads, similar to the bracelet beads (maybe larger ? ) and the necklace will have some of the character of the bracelet. I was keen from the outset to incorporate some silver into these pieces and have decided to use closed jump rings I made last week. I will make some more today.


I've especially enjoyed spending time thinking and working with silver. I've made some earring posts from scratch and although this is such a time consuming thing to do and completely unnecessary (posts are relatively inexpensive and widely available) I have felt very satisfied with the results. My posts also have a certain 'raw' feel to them which I like.
Here are a few images of my process :


These posts (above) are flat based and like the ones which are available to buy.
The next image shows another way of making and attaching silver posts - this requires the 'balled' silver post to be embedded into the clay - it works well with pre cured designs. The flat base is required if the posts are to be attached to a cured bead. In the bottom two images, the 'balled' silver posts have been hammered flat before sticking to the clay. The bottom right image shows a tiny piece of clay added post curing and results in embedding the 'balled' silver into the earring bead.


I like the idea of producing a much larger 'balled' silver post, shaping the wire into an earring hook and enamelling the 'balled' silver with bright colours. Will try out this idea later today and share next time.

Thanks for reading.

Wednesday 7 October 2015

Recipe Wednesday

Hi Everyone
The recipe for today is a fruit muffin, named Chocolate Fruit Muffin ! - no bright ideas came forth this week !
The recipe is from an old book of mine but I've changed the ingredients a few times and I think this is to be the settled list. Start with two bowls - one for dry ingredients and one for wet. I think this makes the whole thing seem very simple and I can whip up the whole thing in about 6mins. This list makes 12 muffins.
The dry bowl needs : 250gms plain flour, 25gm cocoa powder, 2tsp baking powder,1/2 tsp of bicarbonate of soda, 100gms chocolate chips (any milk,plain or white). Quick stir.
The wet bowl needs : 2 eggs, 85gms sugar (any sugar which will easily mix in),85gms melted butter, 150ml milk. Quick stir.
Combine both wet and dry bowls together. If the mixture is not 'loose' (this will determine how moist the muffins turn out) add a bit more milk. You don't want a runny consistency. 
Place 12 muffin cases in a tin and using two teaspoons divide the mixture into the cases. I like to fill up a spoon and use the other to scrape into the muffin case. Place in a pre heated oven 200C/400F/Gas 6 for 18-20mins. That's it. 
I like to sprinkle icing sugar over the top just before serving.


As you can see, I also added a Flake and some raspberries and .........  cream ! 
Everyone likes this pudding. It needs a bit of planning for mid week but it's in the book because I feel comfortable making it quickly and it needs very little effort. Also not much washing up (always the decider !) The boys gave the pudding 5/5 and my mark is also 5/5. So it's the first 10.

Next time ....... you will love this one or hate it !

Thanks for reading.

Tuesday 6 October 2015

The Making Framework

Hi Everyone
The Making Framework has another new project today. It's a beaded pendant for a necklace. The pendant could also develop into a ring or a bracelet but for today we will stick with the pendant.
Here is a quick look at the finished item - which comes in a few different colours and chains :


As mentioned, there is a choice of colours and chains but essentially the project is about creating a single beaded component which will form the pendant. The beading technique is very easy and the pendant is created very quickly. The challenge is to keep all the beads 'tensioned' to give a pretty starburst/flower look. It's possible to create a domed component by tensioning the thread tightly, we will try a range of different tensions to find the one we like. The pendant is heavy enough to hang nicely on the chain and is a good learning project. I'm not sure which one I will make in the workshop ? , I keep changing my mind. 
Last time, the Making Workshop Group struggled with a beading project making small beaded charms (see our invite below). I hoped, I had not turned everyone away from beading. The Daisy Bracelet (also in the invite below) was a great success but the charms proved very challenging. This week , I have a chance to persuade everyone they can achieve a great result and have a nice time too. 

                           
Last time, the group felt stressed out by the relative difficulty of the beading skills required. I do understand their problems, I too felt the same when I was learning how to make the charms. I think the difficulty comes from using very small seed beads and ending up with a small item which lacks structure until complete. 
Today, the pendent project comes together very quickly and the colours are distinct (I think this enhances the beading pattern and allows the brain to understand what comes next - as a result early success is felt ! That's my hope anyway. We need to have a positive experience this time.

While developing these projects ie. The Making Framework Projects, I'm analysing all the skills (in detail) needed to complete each project  - some of these skills are about making decisions and communicating eg asking and giving support etc. I'm not necessarily talking about the craft skill needed when working with certain  materials. Alongside the obvious, I hope to identify some of the soft skills used and/or developed via the project. I will be reporting on this aspect of the project next time.

Thanks for reading.

Monday 5 October 2015

Make Art Monday

Hi Everyone
My Eyes project is moving on but ....... very slowly. I had hoped to have a finished sketch but not quite there. I've still got decisions to make about the eyes. I spent lots of time developing the eyes for Lee and my sketch has lost a little of the detail. This detail makes the character come alive, so it's very important to get it right. I've decided to make a face shape on the final surface and work on just the eyes. When I'm happy with the detail of the eyes, the remains features will follow. This is my usual way of working with faces but I'd changed the process to get the head shape/size as I wanted. 
Here is a view of the latest sketch with a little colour going on :


I need to keep on reminding myself my aim is to create a series of pieces to accompany this piece - in the original, Lee doesn't have a face so I have made some progress.


Will keep going today and report my progress next time.


Thanks for reading


Friday 2 October 2015

From Scratch

Hi Everyone
This weeks From Scratch item is a tiny pair of earrings which will use a Fabric Wrap (featured last week) for packaging. These tiny stud earrings are made in my From Scratch workshop using sterling silver posts and polymer clay. The earrings are called Dotty Studs and are available in lots of colours. These are in a green blue clay mix and the Fabric wraps are in a red tiny star fabric design. These pieces combined would make a great little gift or a stocking filler. The Dotty Studs are tiny and are the type of earring I wear all the time. I have lots in different colours. The 'Dotty' bit relates to the beaded end of the post which measures 3mm across. The shape of this particular Dotty Stud is a flat fronted ball, I will change the shape slightly with each pair of earrings so you will get a genuine unique item with every purchase.

I'm offering a custom colour option on the Dotty Studs - so if you have a particular request please get in touch. Here are the Dotty Studs :


The Studs will have a plastic butterfly on the back but I can offer a silver option upon request. As you can see from the photo the Dotty Studs are tiny(thumb nail photo). I've brushed the silver post to give them a surface pattern which gives them a little extra interest. The Dotty Studs will be on sale for £6.00 per pair - this will be a launch price for a limited time. The Dotty Studs will go into the shops over the weekend and I will feature this item again next time with more colour options and the completed gift packaging.

I'm going to try out my embellished Fabric Wrap idea later today. The Wrap will get a beaded edge - at least that's the plan. Not sure about the Wrap price will publish when finished next time.


Have a great weekend.
Thanks for reading.

Thursday 1 October 2015

Clay Day

Hi Everyone
Clay Day has come around so quickly this week ! - can't believe it's Thursday already. 
I've had a little success with 'beading the bead' - you may remember that this technique gave me lots of grief last time. I've managed to cover a polymer core bead with some tiny seed beads. I love the colour and generally my bead is a reasonably OK re the beading. I'm still not that confident about my process. I can do the 'peyote' technique and I understand about increasing and decreasing to cope with the bead shape but ........... having tried a few more times, I struggle with how neat the end result looks. I'm determined to get this right and will have another go today.
The point of the beaded bead was to add interest to a new bracelet (for me) using a variety of bead techniques. The other specific technique I wanted to use was the carved bead (this also challenged me a few months ago !)
 I now have a suitable range of beads - some to be cured this morning, and then I will be able to construct the bracelet. I've made some sterling silver findings for the bracelet - a hook clasp and some soldered closed jump rings. I think everything is in place and I will make up the final piece today. I can't quite decide if I will use a stretch thread or not ? I have made the clasp but had initially decided on the stretch design. The stretch approach is more practical for me but I also like the idea of introducing silver into the piece ? I will try both and decide. Here is a few images of the bracelet 'to be' :


In addition to the bracelet beads, I've used up some left over clay by making some small beads for stud earrings. I will make some silver posts and will cure the beads with the embedded posts.  I'm trying out some new 'post' designs in this little project. Will report on the outcome next time. The bracelet and the earrings will form the first elements of my new jewellery range (in my personal collection). Next, I'm going to choose an outfit from my wardrobe to base my next clay development.

Thanks for reading.