Search This Blog

Popular Posts

Friday 30 September 2016

More printing experiments.

Hi Everyone
I've had another great time experimenting with making stamps and surface patterns.
Colours are so important and I've been playing with the colours of each image and combining shapes to make new colours from my basis stamp pad range. I'm using Tim Holtz Distress pads which all combine beautifully but by making very simple layers, I've managed to extend the colour range. 
I especially like the lining up/blocking of the shapes. Very simple shapes work well when repeated. It's about spending time, experimenting !
Here is a quick look at my second phase experiments. 


My favourite of the day is the top right collection with various shades of blue. I would love to duplicate this one on fabric.
Also, I couldn't resist making another fish, it's a bit rough but I quite like it. I think most of the collection elements would make some great wrap paper/tags. 

I also played around with more of a composition thing -


This little collage is produced on a bit of scrap paper with the stamp pad overprinting the stamped shapes in a random fashion. It's very crude and not a finished piece but I quite like it and I think it would work on fabric, in a wide repeat.

Thanks for calling in today. Have a great weekend.


Thursday 29 September 2016

Printing Experiments

Hi Everyone
I'm sharing the results of a little stamp making experiment today. 
This project will form the basis for a series of workshops focussing on printing and dying over the next few months, very exciting ! In the first phase, we are going to make and use some simple stamps to develop surface pattern design. I think, we will develop gift tags, decoupage papers and printed fabric pieces (Fat Quarter size) ; although this may all change ?
I've dabbled with this technique before and love the whole idea of printing - I've had such a good time producing these simple little stamps from soft erasers and basic carving tools, I'd forgotten how much I like printing.
 Using colour is a very important element of the project and hopefully in the workshops we can experiment with lots of combinations and inspire each other. Here is a quick look at my initial samples :


I'm not sure which is my favourite ? I love the row of houses but maybe the bottom fish has it ? I'm going to spend a bit more time on this project today, so may have something more to share tomorrow.

Thanks for calling in today.

Wednesday 28 September 2016

Made to Measure for Mary

Hi Everyone
At last, I'm there. 
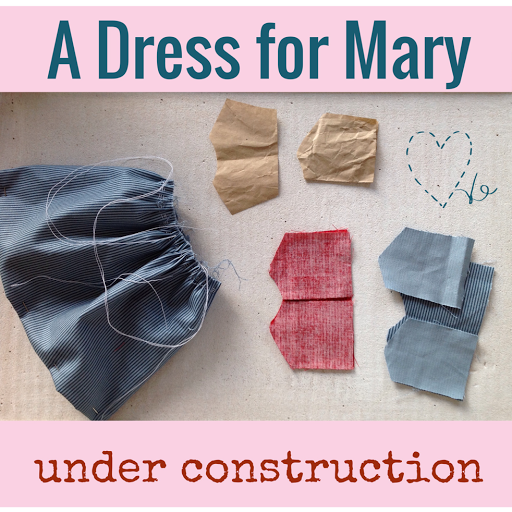
Mary, one of my latest Art dolls, has a new dress 'in the making'. I mentioned a few blogs ago, that my Dolls would tell me what they wanted to wear and so it is. I've gone for a traditional selection of fabrics and a classic design for Mary.


 The first item will be a dress. This dress will have a full skirt and a simple bodice. I'm also thinking about an apron and perhaps a hat ? There will also be some kind of knitted cardigan with knitted socks - possibly striped. That's as far as I've got, at the moment. I think Mary will be at home in a pretty Cottage garden.

I'm planning to review each item as its made and will adapt where necessary. I'm using little bits of leftover fabrics and other embellishments that are lying around my studio. The whole 'look' will be an eclectic one, revealing Mary's character.

Here is the first stages of the dress construction. I made a very simple pattern for the dress bodice and will 'make to measure' the final fit. The skirt is just a gathered oblong shape. Mary does have a distinctive shape which will limit the shape of any clothing ! I'm going to concentrate on taking attention away from her very large waistline !


I'm not sure about hair and facial features ? Mary will let me know what to do.

Thanks for calling in today.

Tuesday 27 September 2016

Yarn Talk

Hi Everyone
I'm featuring a few thoughts about my current obsession with wool yarn today. My studio is brimming with the stuff to knit or crochet. Most of my knitting and crochet activities are my hobby rather than work, although I have introduced a few little projects using yarn, recently.
If you are a regular reader, you will know I've been dying my own yarn. I'm very excited about dying things. So...... last Friday morning was such a treat to go to a local hand painting yarn event and produce more  hand painted yarn. This time it's 4 ply and I'm still pondering what to do with it ? I like the idea of a cardigan using my painted yarn to create vibrant colours along the bottom of the sleeves and body of the cardigan. I've only dyed 100gm, so much more yarn is needed - if I go with the cardigan idea ?
 Here is a quick look at the finished skein :


I love the colours and am thinking about additional yarn (for my cardigan idea) in light grey shades. I'm not entirely sure how the yarn will knit up but I'm hoping for some irregular striping. 

In the meantime, I've started my next knitting project - a lovely 'poncho'. I see myself wearing the poncho as my everyday warm layer when the weather turns cool. I'm hoping I can throw it over almost any outfit and feel warm and cosy. Here is a quick look at the project :


The pattern is called Saltwick Bay and is a coastal area which I know, somehow I connect to this place when I'm knitting ? It's a difficult idea to explain but it's certainly inspired me to make a good job of the project and I can't wait to pick up my knitting each evening. I've just started and have the neck part done. I'm now working on increasing stitches for the shoulder area. Much more to go but I'm pleased with progress, so far.

Thanks for calling in today.


Monday 26 September 2016

Welcome to the new Vita.

Hi Everyone
I've a little news about Vita, the crochet TILDA doll. Vita has been made again and is now much more the doll I wanted.
Read back HERE for the previous update.

I used a pattern for inspiration but changed the sizes/shapes of the body and limbs as well as the hair style. Vita is very much a TILDA style doll but I hope to make her my own with hair and clothing choices. Here she is :


I'm planning some dresses and various accessories, perhaps a hat and jewellery ? I'm slightly unsure about developing Vita's facial features. Her face is relatively small and particularly narrow. I will probably keep with the TILDA doll face. Here it is for reference :


This face (left) is the usual TILDA doll face but as Vita is made from crochet yarn, the finished item will look different. I may need to make the eyes larger as well as find a way of tackling the cheek rouge. I'm quite pleased how Vita turned out. She will never stand on her own legs so I think she needs a wooden doll stand. Next, I'm looking forward to dressing her.

Thanks for calling in today.


Thursday 22 September 2016

Miss Mitchell's friend.

Hi Everyone
I've had another lovely day with the paper mâché dolls. I've spent time building the legs and feet (only slightly) as well as developing Miss Mitchell's hair. I also considered each of the dolls and have finally decided who they are.
The tall doll will be Mary Haversham, she's an old friend from the past (you can read back and find her on the blog) and Miss Mitchell will be the smaller doll.
                                   

I will use the painted images to inspire each doll but I'm still keen to go with whatever happens - they may not look like the paintings ? I'm also going to put each doll on a stand, this will allow me to go with more elaborate shoes. I won't need to consider if the shoes will hold the doll in a standing position.
I'm still a little undecided about using paper mâché pulp on the faces but I'm convinced the eyes of each doll are important and have done a little research on glass eyes. I hoped to buy some eyes for both dolls. However, no luck there !. So, I'm going to make some eyes from polymer clay. Both dolls have distinctive hair so that too will be an important part of each doll.

Thanks for calling in today. Have a great weekend.

The Dolls will tell me.

Hi Everyone
As planned, I managed to work on the Paper Mâché Doll Project. I made the bodies and limbs for both dolls and have covered them in their first layer of newspaper. I like to use the Financial Times for this job, it's a lovely pink colour and doesnt leak out black print everywhere. I used my mix of very thick wallpaper paste rather than a PVA glue and it all worked well.
The dolls are begining to grow a character, I really enjoyed making them yesterday. At one point, I actually stopped, looked at them and literally thought, I'm really enjoying this !
 I don't have an absolute fixed vision of what they will look like (other than an inspiration from Miss Mitchell). I like the idea of just going with the Make, although I am still keen to keep the Miss Mitchell hairstyle and a round face (look back for more on Miss Mitchell 1/9/16 post). I think Miss Mitchell's eyes are unique to her, so perhaps its important to keep the eyes too.

                                 
Somehow - the feet define the whole doll ? The doll on the right was to be Miss Mitchell. I'm not so sure now ? Miss Mitchell wears ballet pumps and the left hand doll would suit better ? The doll on the left has a bent right arm which would be perfect for a Miss Mitchell butterfly.


Today, I want to give the limbs some more definition and the face will get the basis of some features. I'm undecided about a paper mâché pulp mix on the face ? I need to experiment a little more. Hopefully, I can get the dolls completely built today and then I will seal them (with Modge Podge). The hair is an important element and I'm still thinking about how to achieve what I need. I'm sure it will evolve as I go.
 Then ........ it will be time to design and make some lovely clothes. This will be the best bit - I'm going to knit and sew the clothing, lots of little details. As I work with the dolls, they will tell me what I need to make.

Thanks for calling in today.

Wednesday 21 September 2016

Flower Bracelets and unfinished projects.

Hi Everyone
I'm sharing a few of the lovely Flower Bracelets produced yesterday at our Making Workshop.


I love the colour combinations of the beads and the magnetic clasp is a joy to use. The clasp snaps into place and is a real feature of the design. I'm converted to magnetic clasps.

I'm also off to my local knitting group this morning, I've lots of knitting projects at the 'almost finished' stage. Little jobs like sewing in threads and finishing necklines and blocking. I'm going to try and finish all my current projects before starting a new one. The knitting group is such an inspiration, its always difficult to resist a new idea or a new yarn. That's the plan !!

Later, I'm hoping to complete the long awaited paper mâché doll. The doll has reached the top of the list, so she has a chance today !

I have many unfinished projects. I'm on a mission to get EVERYTHING up to date, I often give myself this message ! This time, I've made a list with completion dates and will try and keep to deadlines. I'm hoping my planning will succeed this time.

Thanks for calling in.

Tuesday 20 September 2016

Making Workshop

Hi Everyone
We have a new Making Workshop today. This is the start of our third year of MAKING workshops and we will begin with some pretty beaded bracelets. There will be lots of chat (need to catch up from the Summer break) and coffee so this MAKE is something we are familiar with. However, this year, I've got an exciting programme planned and will share the detail as we MAKE.

Here is a quick look at a few samples bracelets from todays workshop 


I've made myself the beginings of another bracelets (for demo purposes) and have chosen the Flower Bracelets style but using lots of different coloured beads, it's my favourite and Im excited to finish and wear it as soon as possible. Here's a quick look :


I'll take some photos of our workshop and share the results over the next few days.

Thanks for calling in today.

Monday 19 September 2016

Knitting Update etc.

Hi Everyone
I enjoyed a very busy weekend, full of family active stuff - weather was great, I feel like I need a holiday to recover !
I've managed to complete the knitting part of my ARIKA cowl (read back to Friday for more on this). The next job is to block the cowl and get the shape for stitching together. I don't usually bother with blocking but it's going to be an essential element of my finishing having seen blocked items recently.


I've got quite a bit of yarn leftover and am now wondering what to make ? The ARIKA pattern does add lots of tassels all around the cowl and decided I didn't like the fringe of tassels. I'm now undecided, so will test out a small area - which will eat into my leftover yarn ! I'll report back on how my blocking goes in a few days.

My other task on the list is developing my paper mâché doll. Read back for more on this. I'm keen to get the body finished this week so I can get on and dress the doll - the exciting bit. I've got a vague plan of action but am experimenting so anything could happen ! As usual, I will take photos and share my experiments.This is my inspiration Julie Arkell doll. I'll keep this in mind when I work today -


Thanks for calling in today.

Friday 16 September 2016

Knit Project News

Hi Everyone
News today of my new knit project - the ARIKA which is an asymmetric cowl. You may have seen my post from last week about dying some cotton yarn. I've decided I will use the dyed yarn for my cowl. The colours didn't turn out as planned but they are quite pretty and I'm keen to see how the cowl will turn out.
Read back here for the dye story.


I've started the begining of the cowl, there's a way to go but it's looking OK so far :


The cowl is knitting up quite quickly and I'm confident a few days will see the knitting part complete. I will also need to block the cowl to get the appropriate final shape as per the pattern. I'm not quite as confident about the blocking process but hopefully it will work out.

I'm using this knit as a trial for a second cowl which I will knit in my preferred  colours . I'm having a second go at dying the yarn in my original colours - this time I'm going for a wool yarn rather than cotton.


Thanks for calling in today.
Have a great weekend.
Back on Monday.

Thursday 15 September 2016

Spinning Wool !

Hi Everyone
Another very exciting new experience for me today. I'm trying out Drop Spinning. I've got a great book and a spinning whorl. Hopefully, before too long, I'll have some yarn to show for my efforts. The big plan is to spin, dye and knit something. I'm not sure when or what this will be ? It doesn't matter too much about a date. My first job is to read and understand.


The book is lovely to look at and I'm looking forward to spending my day with it. I've got a few things to do but my book will be top of the list. I'm also getting involved in a Drop Spinning workshop in a month or so. If I can't manage to get going, the workshop will sort me out. I can't wait that long,of course,before starting. Fingers crossed, I can make sense of the techniques I need. Then ...... Lots and lots of practice.

Thanks for calling in today.

Wednesday 14 September 2016

Dye Job News

Hi Everyone
I had a great day yesterday dying some cotton yarn (read back yesterday for more on this). 


I knew things would be different dying a cotton yarn (plant based material) rather than a wool yarn. However, I failed to consider how much fixer I would need for the cotton and almost lost all my colours. Everything started so well and initially I got the colours mixed just as I wanted.


I loved the deep shades (bottom right). After washing lots of dye came out and although the colours are very different they are very pretty. Here they are drying on the line (bottom left). 

I have a plan B. I'm not sure if I will re dye the same cotton yarn or go for a wool ? I like the deep colours and want to make my cowl/ neck warmer in the deep colours but may still make a second in the pale colours.
When I get my techniques sorted out, I will post some tips and images of both cotton and wool material.

Thanks for calling in.


Tuesday 13 September 2016

New Dye Project

Hi Everyone
Another little treat for me today - I've found another dye project. This time I'm going to dye some cotton yarn which will become a cowl/neck warmer. It's a lovely item when it's knitted up. I don't think the photo does it justice. I've seen a completed version at my Knit Group. The item should come together quite quickly when I've done the dye bit. This experiment is just that - I'm hoping to develop some colours inspired by my little mood board -


The colours I'm going for are a blue/grey colour along with navy,burnt orange and a deep claret. I'm hoping I can mix the right colours and make a good job of the dye process. My photo shows the current colour of the yarn (bottom left). After dying, I will knit up the design, however, I'm not hugely taken with the long fringe and may leave it off altogether ? The yarn (top right) will eventually become a poncho - more on that at a later date.

This dye job is quite a challenge for me. Wish me luck. As usual I will report my outcomes.

Thanks for calling in today.

Monday 12 September 2016

Presenting new socks

Hi Everyone
Today, I'm sharing my latest sock make. Last Monday, I delivered the bad news that I'd run out of my lovely hand painted yarn (read back for more on this) while making my latest pair of socks. My solution was to use a constrasting yarn for the toe part of the socks but I couldn't decide on the colour to use. Eventually, I came up with a lovely ginger/burnt orange colour. Having added a toe to each sock (had to undue one first !! ) with the ginger colour , I felt the sock needed a bit more ginger elsewhere on the sock to balance the design. I tried a few ideas and settled upon a few stripes for the leg of each sock.


I love the effect of the ginger and the green colours together. I've used something called Swiss Darning or Duplicate Stitch to make the stripes. It's a very easy way of adding surface design to knitting - look it up if it's new to you.
Generally, I'm really pleased with how the socks have turned out and think the contrasting yarn adds to the design. I bought the yarn while on holiday, staying at a place called Dirlton, so I've called this design the Dirlton Sock. I will think of our holiday each time I wear the socks.
Thanks for calling in
Bye for now.

Friday 9 September 2016

Fabric Portfolio

Hi Everyone
I've been a little off focus today - my Miss Mitchell doll has been left behind ! (read back for more on this). Instead, I've made a fabric portfolio. The portfolio will form a project for my book (FROM SCRATCH)  which is undergoing a bit of an edit ! I'm hoping to use the portfolio each day for my rewrites and will enjoy seeing the actual print from the book cover on the portfolio.


The idea is to make a number of these portfolios in different sizes with different purposes as part of the project. I'm hoping to use varied fabrics, sizes and different embellishments to make very different  items.
This portfolio will get a fabric label (to be sewn top right of the cover)  and I've made some progress with it. I've used some quilting techniques and machine embroidery to develop my label - this item will also form part of a new project in the book. Here is a look at how far I've got :

                                   
I have an idea of dying part of my label and adding colour to the edges of the house element. All this is a bit of an experiment and I'm not quite sure how things will turn out ? However, I've had a lovely time making the stuff today.

Thanks for calling in today.
Have a great weekend.
Thursday 8 September 2016

Paper mâché heads

Hi Everyone
I've been experimenting with some paper mâché heads for Miss Mitchell. I have three inner core heads using various combinations of newspaper, glue and tape. Having made the first three core heads, I will also go for a paper towel version with Modge Podge. The more wet glue, the longer it takes to dry and I want a much quicker way to build the dolls . Number 1 took a couple of hours, number 3 is instant and number 2 will probably never dry !


I like number 1 the best (so far), it's scrunched  up newspaper with a second film of glued newspaper. Number 2 is lots of layers of wet glued paper and number 3 is dry newspaper wrapped in tape. All 3 heads are about 6.5cm across and quite round. These little balls are the first stage in the head development.
I quite like the idea of making a paper paste substance to act like a type of clay which will cover all the body parts, including the head. Ive decided to make each body part separately and join the body parts together with short wooden pegs and a glue gun. The idea is then, to cover the joined structure with my customised paper clay.
Today, my plan is to keep going and produce the body. I've decided to go with bigger feet (read back for more on this). When I get the body sorted, I'm going to experiment with printing fabric for a dress.
My plan,at this stage, is very loose. I have approximate measurements and an overall shape. I want the doll construction to work so will keep going with that.

                                  
                                                                                                                     and I'm happy to change things as the doll evolves. 

Thanks for calling in.

Wednesday 7 September 2016

What about her feet ?

Hi Everyone
A few days ago I talked about making a paper mâché doll in the form of my Miss Mitchell character (1/9/16 blog). I'm  almost there with preparations, I've made a sketch and collected all the bits - I'm probably ready to go - famous last words !
 I've  also done a bit of research over the last few days re paper mâché recipes and techniques and have decided to go with a combination of paper towel layers and newspaper. I like the paper towels because they are clean to use with no print to discolour the piece and my hands but the newspaper does add a certain something to the finished surface when the newsprint shows through. I think the print will be visible on the face ? - however, her face is quite pale so maybe not ?
I'd like to print some fabric for a dress and will try to include some customised polymer buttons and jewellery in the costume. I'm not sure exactly how my Miss Mitchell will turn out, the detail of the feet/shoes are not decided yet and the hands - should I form fingers  ?
 I do like the idea of reproducing Miss Mitchell's uniques hair style and will definitely incorporate the 'hairdo'. The colours and butterfly detail is key too. Ultimately, I will allow Miss Mitchell to tell me how to proceed. I'm treating this project as an experimental thing, hopefully I can make a range of dolls and improve on each one.


I'd like to make printed fabric using my Gelli plates with some flowers/weeds from the garden providing the surface design and even get some butterfly images onto the piece. 
I'm hoping to spend some time today experimenting. I'll share my results - good or bad.

Thanks for calling in today.

Tuesday 6 September 2016

The Rebirth of Vita

Hi Everyone
Yesterday, I spent some time trying to organise all my current projects in an effort to complete them. One of the projects which has given me so much trouble is a crochet doll known to me as Vita. Various body parts have been made several times, each time I've made the arms and legs for instance, they have been slightly different and not quite what I wanted, either too short of too long or too thin ! I've decided to completely undo the doll and start again. 

This time I've started with the limbs rather than the body. Ive made my own pattern and started with the legs. I want my finished doll to be larger than the previous version, so will have to experiment to get the right dimensions rather than sticking to the original pattern. I'm still on the legs but it's going great. This is an early photo of a new leg.


I've loosened up the crochet stitches and everything seems like it will work. My first effort of the body was much too small and very tightly finished. The doll shape is a specific shape with a series of increase and decrease curves so this job needs to be proportioned. I will take a view on the resize options after I've finished the limbs.

I've done more in a few hours than I managed in the whole project, as a result it's much more enjoyable. I'm keen to get this back on track and have some ideas about clothing already. I like the idea of printing some fabric for a dress and dying some wool for a cardigan, socks, hats etc.
You can see some of my ideas for Vita on the 15/8/16 post - things have moved on ! and that Vita is no more. However, she will be reborn, bigger and better with lovely new clothes.


The doll featured in the 15/8/16 post will be a fabric version - I can't loose the Angel idea !

Thanks for calling in.


Monday 5 September 2016

Socks News

Hi Everyone
I have good news and bad news to share re my latest sock MAKE. The socks use the yarn I acquired while on the first part of our Garnd Tour 2017 in North Berwick (read back a few weeks for more on this). The yarn is a lovely range of greens and I've managed to create my own pattern for this pair of socks. They are 'made to measure' and very simple but for this pair Ive developed quite a long leg part, with hindsight it's probably been a mistake because I've run out of yarn before finishing the second sock !! 


There's no chance to get another skein as its a single, hand painted yarn - so bad news. However, good news too, it's an opportunity to improve my socks by developing a new yarn to compliment the main body of the sock. I'm going to undo the toe section of the sock I've completed and add new coloured toe sections to both socks along with an additional couple of rows at the top of each rib.


 My dilema is what colour to use ? - should I use another green shade or another colour altogether ? I can't decide. I'll give it a day or so to make my decision.

I'm actually feeling very positive about this little problem. I'm sure it will improve the final socks.

Thanks for calling in today.

Friday 2 September 2016

Hand Painted Yarn

Hi Everyone
I had great success yesterday with my first attempt at hand painting/dying yarn. I'd done a bit of research but was slightly unsure of what to expect ? However, everything worked out well and I'm now very keen to try more !

Take a look at the finished 'painted yarn' :

                                 
Here are a few images to illustrate the very simple process I used :

                                 
Initially, soak the yarn in water. Mix the dye liquid and prepare a layer of cling film. Spread out the yarn and 'paint', in my case pour dye in random places. Very quickly, I ran out of Kool Aid (my initial chosen dye colour - it's a kind of dilute drink in powder form) and was reduced to looking into the baking cupboard for some simple food colouring. I liked the deep colours of the Kool Aid but ........ I think, I favour the flexibility of the food colouring re mixing different colours and subtle shade developments. After 'painting' my yarn, I covered the whole thing in cling film and places on a plate. Then, microwave in stages of 2 mins until the yarn is heated (total of 4 mins) - hot to the touch. I waited until the yarn cooled completely before rinsing. All the colour had taken and there was very little colour in the rinse water.


The colours turned out well, vibrant and varied.
I'm hugely impressed with this dying technique. I'm looking forward to knitting a pair of socks with the yarn. I'm also planning my next dye colour combinations - it's my new favourite obsession.

Thanks for calling in.

Thursday 1 September 2016

Dolls and Dying Things

Hi Everybody
I've long been a fan of the dolls created by Julie Arkell. Paper mâché styled characters with quirky clothing and a little message embroidered somewhere on the costume. One of the first pieces I came across is the doll used by Loop (yarn shop) to market their shop. This little character is amazing and embodies everything I love about making stuff from recycled materials.

                                 
I'd like to try and made a version which will be a Miss Mitchell - my own favourite doll character. Miss Mitchell has a distinctive 'look' and I think she lends herself to the paper mâché doll. Here she is, for reference. I especially like the chunky feet from Julie Arkells dolls but Miss Mitchell has smaller, ballet slipper feet. I've been thinking about a little doll stand to compensate but it's a bit of a disappointment that the feet will not be 'chunky'. Maybe I can come up with something that can work ? I'll keep thinking.

                                
My other exciting news is my yarn dying project. I've got everything in place to get on with it today. Fingers crossed, I can get it right. I'll share what I create tomorrow. Wish me luck.

Thanks for calling in.